How to Load data from Zendesk to Snowflake
7 min read
May 3, 2024


Don't go through the pain of direct integration.
RudderStack’s Zendesk integration makes it easy to send data from Zendesk to Snowflake and all of your other cloud tools.
For more details, see our Zendesk to Snowflake integration.
Extract data from Zendesk
Zendesk APIs are not specific to pulling data. Zendesk provides more than a hundred different APIs for you to integrate with. So you can easily manage your users, enhance your team’s productivity and create seamless integrations. You can create integrations or even enrich Zendesk with data from external sources. Zendesk API is a RESTful API that can be accessed through HTTP. As a RESTful API, interacting with it can be achieved using tools like CURL or Postman or using HTTP clients for your favorite language or framework.
A few suggestions:
- Apache HttpClient for Java
- Spray-client for Scala
- Hyper for Rust
- Ruby rest-client
- Python http-client
Additionally, Zendesk offers a number of SDKs and libraries so you can access the API from your framework of choice without having to deal with the technicalities of HTTP. API clients are available for the following languages:
- Ruby
- Python
- PHP
- Java
- .NET
- Node.js
- Clojure
- Force.com
- R
Zendesk API Authentication
Zendesk’s API is an SSL-only API, regardless of how your account is configured. You must be a verified user to make API requests. You can authorize against the API using either basic authentication with your email address and password, your email address and an API token, or an OAuth access token.
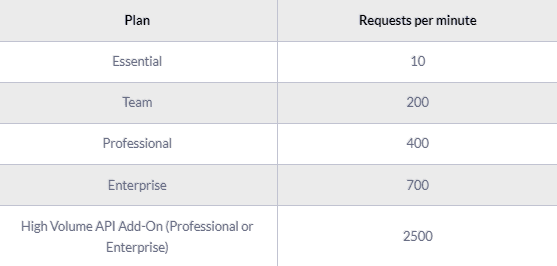
Zendesk Rate Limiting
The API is rate-limited. It only allows a certain number of requests per minute, depending on your plan and the endpoint. Zendesk reserves the right to adjust the rate limit for given endpoints to provide a high quality of service for all clients. The current limits are the following:
Pagination
By default, most list endpoints return a maximum of 100 records per page. You can change the number of records on a per-request basis by passing a per_page parameter in the request URL parameters. Example: per_page=50. However, you can’t exceed 100 records per page on most endpoints.
When the response exceeds the per-page maximum, you can paginate through the records by incrementing the page parameter. Example: page=3. List results include next_page and previous_page URLs in the response body for easier navigation:
SH
Endpoints and Available Resources
The Zendesk REST API exposes many resources and endpoints that allow users to interact with the platform in every possible way. Thus, it is possible to create new applications on top of the Zendesk platform, integrate external systems with it, and pull data out of the platform. The most important resources are the following:
- The tickets that your customers create through Zendesk.
- Ticket events. Changes that have occurred to the tickets.
- Organizations.
- Users.
- Ticket metrics. These are metrics related to your tickets.
- Data related to the Net Promoter Score.
- Articles
Let’s assume that we want to pull all the tickets we have on Zendesk. To do that, we need to perform a GET request to the appropriate end-point, like this: GET /api/v2/incremental/tickets.json?start_time=1332034771
SH
And a sample response:
JSON
A complete ticket object might contain the following fields:

The results of the Zendesk API are always in JSON format. The API offers you the opportunity to get very granular data about your accounting activities and use it for analytics and reporting purposes.
Zendesk Data Preparation for Snowflake
Before you start ingesting any data into a Snowflake data warehouse instance, the first step is to have a well-defined schema of data you own.
Data in Snowflake is organized around tables with a well-defined set of columns, with each one having a specific data type.
Snowflake supports a rich set of data types. It is worth mentioning that a number of semi-structured data types are also supported. With Snowflake, it is possible to load data in JSON, Avro, ORC, Parquet, or XML format. Hierarchical data is treated as a first-class citizen, similar to what Google BigQuery offers.
There is also one notable common data type that Snowflake does not support. LOB or large object data type is not supported. Instead, you should use a BINARY or VARCHAR type. But these types are not that useful for data warehouse use cases.
A typical strategy for loading data from Zendesk to Snowflake is to create a schema where you will map each API endpoint to a table.
Each key inside the Zendesk API endpoint response should be mapped to a column of that table, and you should ensure the right conversion to a Snowflake data type.
Of course, you must ensure that as data types from the Zendesk API might change, you will adapt your database tables accordingly. There’s no such thing as automatic data typecasting.
After you have a complete and well-defined data model or schema for Snowflake, you can move forward and start loading data into the database.
Load data from Zendesk to Snowflake
Usually, data is loaded into Snowflake in a bulk way, using the COPY INTO command. In JSON format, files containing data are stored in a local file system or Amazon S3 buckets. Then a COPY INTO command is invoked on the Snowflake instance, and data is copied into a data warehouse.
The files can be pushed into Snowflake using the PUT command into a staging environment before the COPY command is invoked.
Another alternative is to upload every data directly into a service like Amazon S3, from where Snowflake can access data directly.
Finally, Snowflake offers a web interface as a data loading wizard where someone can visually set up and copy data into the data warehouse. Just keep in mind that the functionality of this wizard is limited compared to the rest of the methods.
Snowflake in contrast to other technologies like Redshift, does not require a data schema to be packed together with the data that will be copied. Instead, the schema is part of the query that will copy every data into the data warehouse. This simplifies the data loading process and offers more flexibility on data type management.
Updating your Zendesk data on Snowflake
As you will be generating more data on Zendesk, you will be obliged to update your older data on Snowflake. This includes new records together with updates to older records that, for any reason, have been updated on Zendesk.
You will have to periodically check Zendesk for new data and repeat the previously described process while updating your currently available data if needed. Updating an already existing row on a Snowflake table is achieved by creating UPDATE statements.
Snowflake has a great tutorial on the different ways of handling updates, especially using primary keys.
Another issue that you must take care of is identifying and removing any duplicate records on your database. Either because Zendesk does not have a mechanism to identify new and updated records or because of errors on your preferred data pipelines, duplicate records might be introduced to your database.
In general, ensuring the quality of data inserted in your database is a big and difficult issue.
The best way to load data from Zendesk to Snowflake
So far, we just scraped the surface of what you can do with Snowflake and how to load data into it. Things can get even more complicated if you want to integrate data coming from different sources.
Are you striving to achieve results right now?
Instead of writing, hosting, and maintaining a flexible data infrastructure, use RudderStack to handle everything automatically for you.
RudderStack, with one click, integrates with sources or services, creates analytics-ready data, and syncs your Zendesk to Snowflake right away.
Sign Up For Free And Start Sending Data
Test out our event stream, ELT, and reverse-ETL pipelines. Use our HTTP source to send data in less than 5 minutes, or install one of our 12 SDKs in your website or app.
Don't want to go through the pain of direct integration? RudderStack's Zendesk integration makes it easy to send data from Zendesk to Snowflake.
Published:
May 3, 2024
Get started today
Start driving better business outcomes with your customer data in less than a week
Book a demo
Explore use cases with an expert and see RudderStack in action.
Implement RudderStack
Start collecting and enabling real-time customer data everywhere it's needed.
Drive better outcomes
Supercharge your analytics, product, growth, and AI teams.