Serve JavaScript SDK on Custom Domains
7 minute read
RudderStack serves the JavaScript SDK through Amazon S3, delivered via the Amazon CloudFront CDN.
This guide covers the steps to use your own domain instead of the RudderStack domains for serving the JavaScript SDK.
Setup overview
Create a new distribution by following these steps:
- Log in to your AWS console.
- Click Services and go to Network & Content Delivery > CloudFront.
- Click Create a CloudFront distribution.
The following table gives a high-level overview of the required cache policy, origin request policy, and response headers policy for serving the JavaScript SDK:
| Cache policy | Origin request policy | Response headers policy (optional) |
|---|---|---|
| Cache policy settings | Origin request policy settings | None |
Step 1: Configure distribution
The following sections highlight the required distribution settings for serving the SDK.
Origin
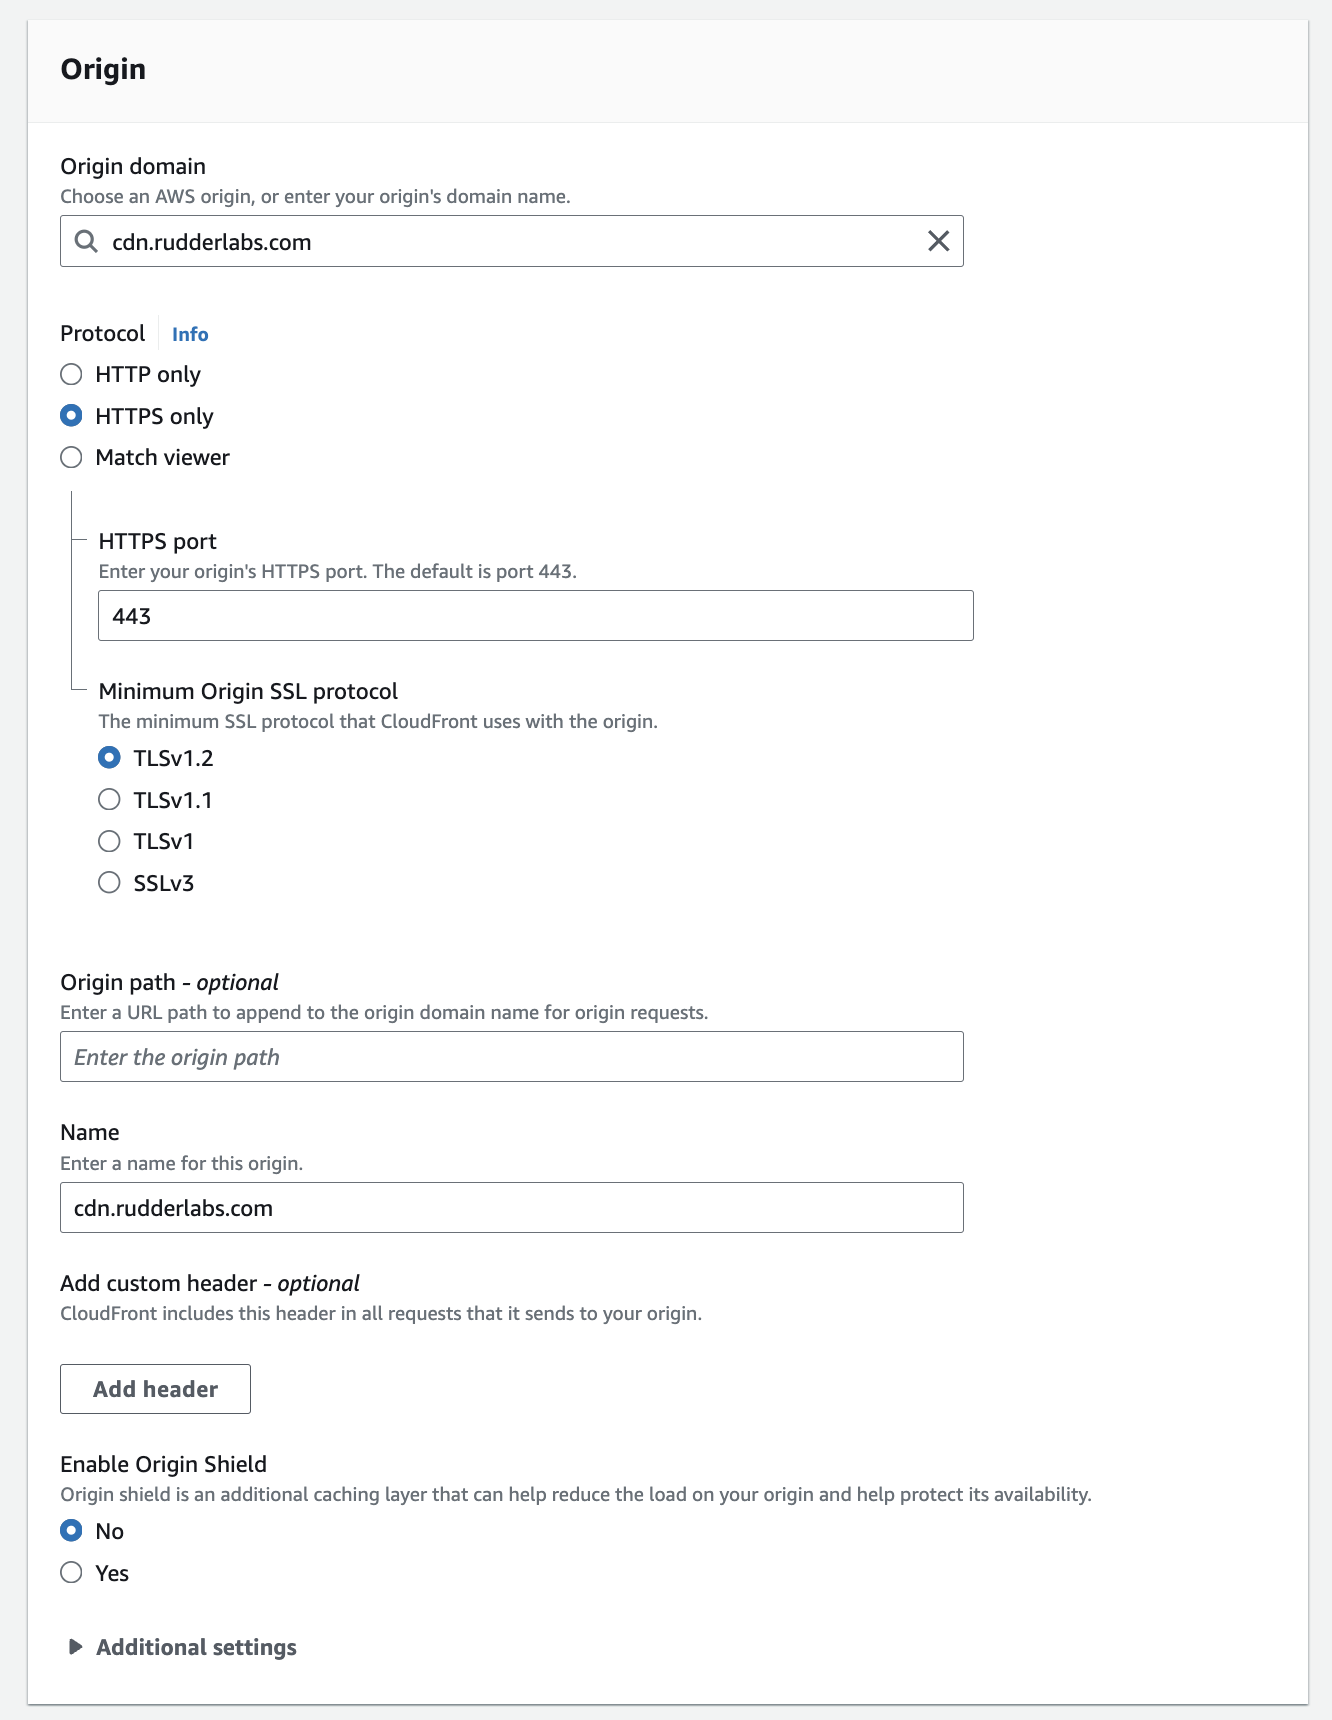
The following table summarizes the settings:
| Field | Setting |
|---|---|
| Origin domain | cdn.rudderlabs.com |
| Protocol | HTTPS Only |
| HTTPS port | 443 |
| Minimum origin SSL protocol | TLSv1.2 |
| Name | cdn.rudderlabs.com |
| Enable Origin Shield | No |
Default cache behavior settings
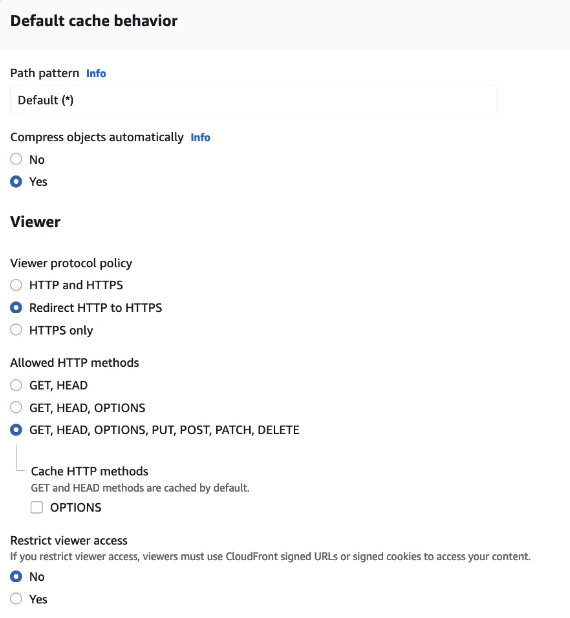
The following table summarizes the settings:
| Field | Setting |
|---|---|
| Compress objects automatically | Yes |
| Viewer protocol policy | Redirect HTTP to HTTPS |
| Allowed HTTP methods | GET, HEAD, OPTIONS, PUT, POST, PATCH, DELETE |
| Restrict viewer access | No |
Cache key and origin requests
Select Cache policy and origin request policy (recommended) and configure the following settings:
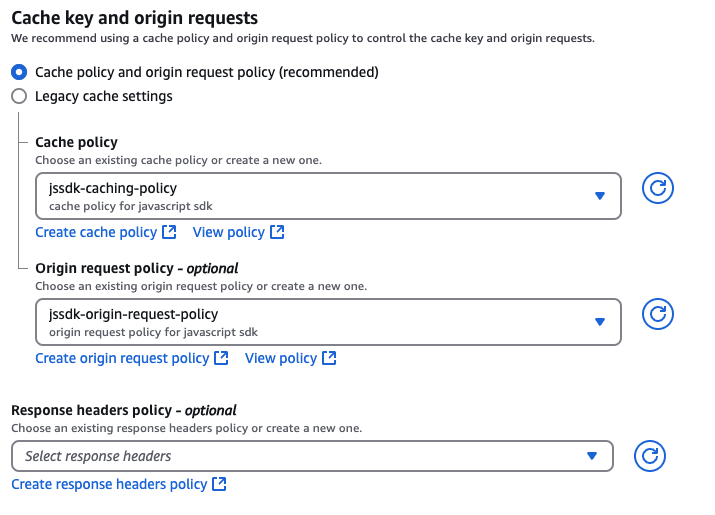
The following table summarizes the settings:
| Field | Setting |
|---|---|
| Cache policy | See Cache policy settings |
| Origin request policy | See Origin request policy settings. |
| Response headers policy | None |
Cache policy settings
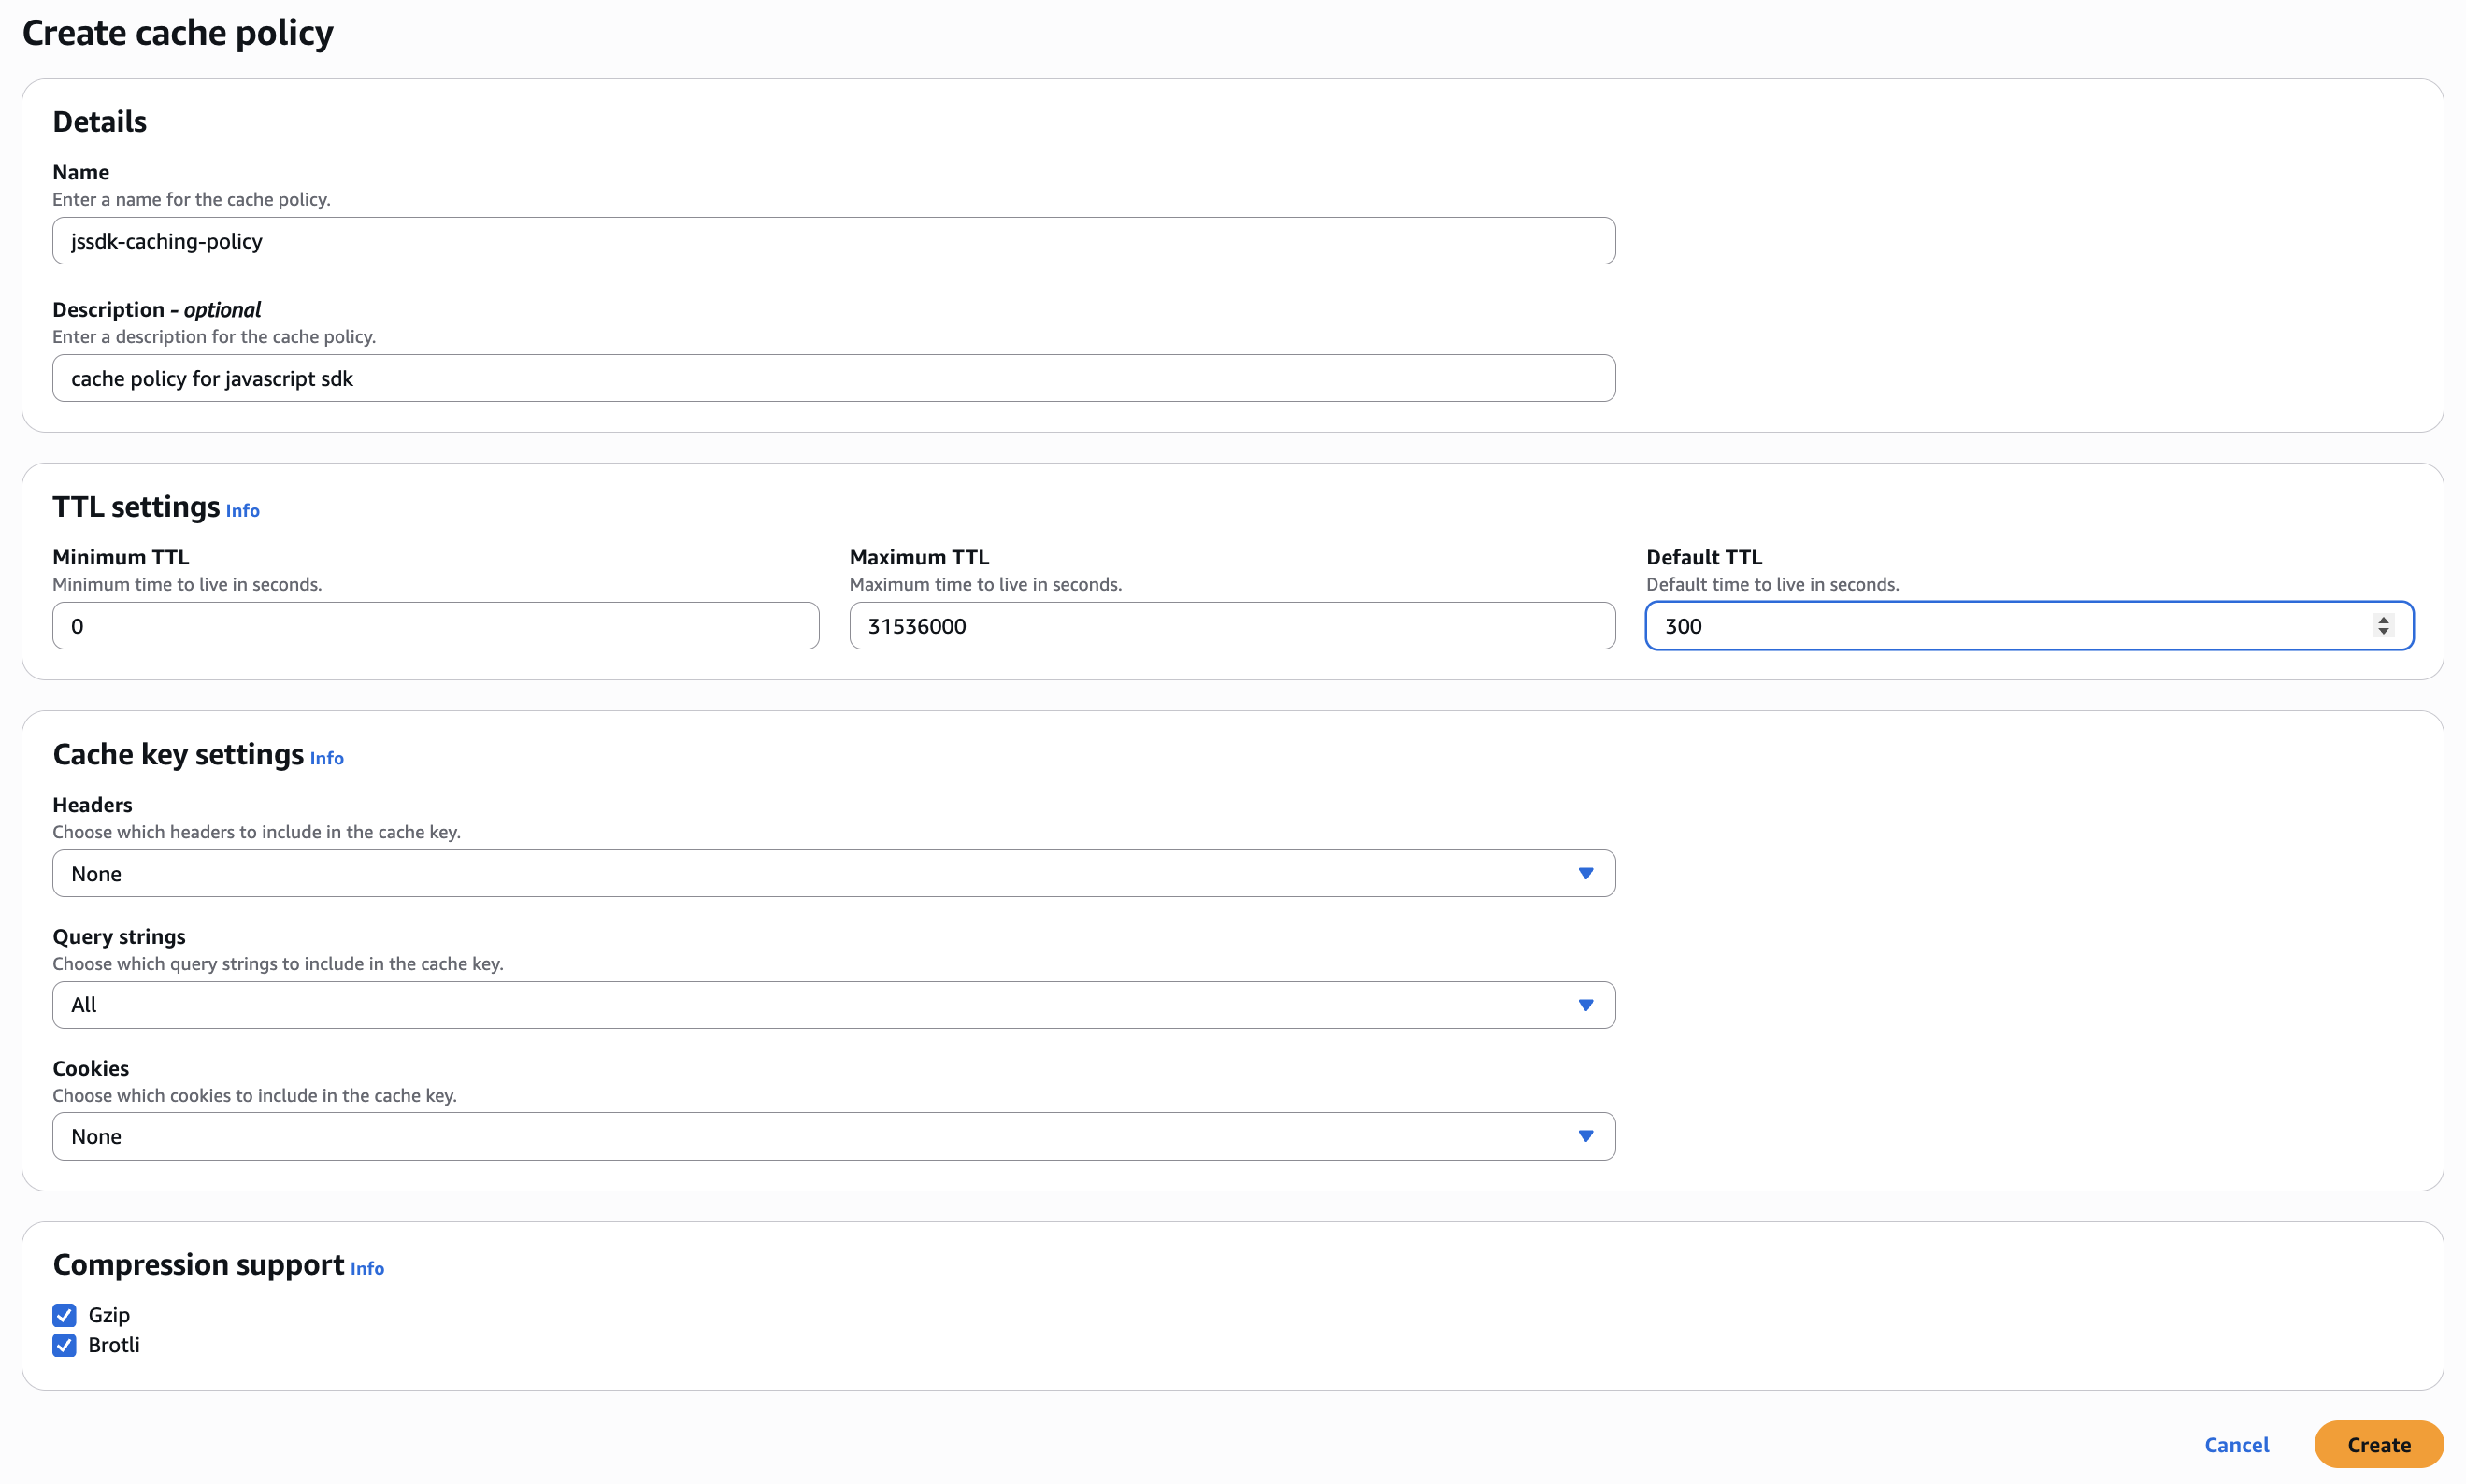
The following table summarizes the settings:
Details
| Field | Setting |
|---|---|
| Name | Name of your cache policy, for example,jssdk-caching-policy. |
| Description | Add your policy description here. |
TTL settings
| Field | Setting | Notes |
|---|---|---|
| Minimum TTL | 0 (in seconds) | Ensures the no-store header is respected. |
| Maximum TTL | 31536000 (in seconds) | Allows CloudFront to use the Cache-Control value from origin if it is greater than 0. |
| Default TTL | 300 (in seconds) | Used when origin does not include Cache-Control headers. |
For the RudderStack CDN, CloudFront is configured with a long default TTL (one year) to maximize cache efficiency, and rely on invalidations during releases to refresh content.
RudderStack recommends configuring the prescribed TTLs settings when setting up a custom domain. For the reasoning behind these recommendations, see the AWS documentation.
This ensures that the custom domain’s CloudFront distribution always respects the origin Cache-Control and Age headers as the TTLs defined by RudderStack. Since these headers are managed by RudderStack, they may be updated in the future to improve reliability and correctness.
In cases where you need to control browser-side caching policies instead of relying solely on RudderStack’s origin settings, you can configure a CloudFront response headers policy with the Override origin option enabled for Cache-Control headers.
If you are using a different cloud provider for your custom domain, make sure to set the maximum TTL value to300, that is, 5 minutes.
Cache key settings
| Field | Setting |
|---|---|
| Headers | None |
| Query strings | All |
| Cookies | None |
Compression support
Select both Gzip and Brotli.
Then, click Create to generate the cache policy.
Origin request policy settings
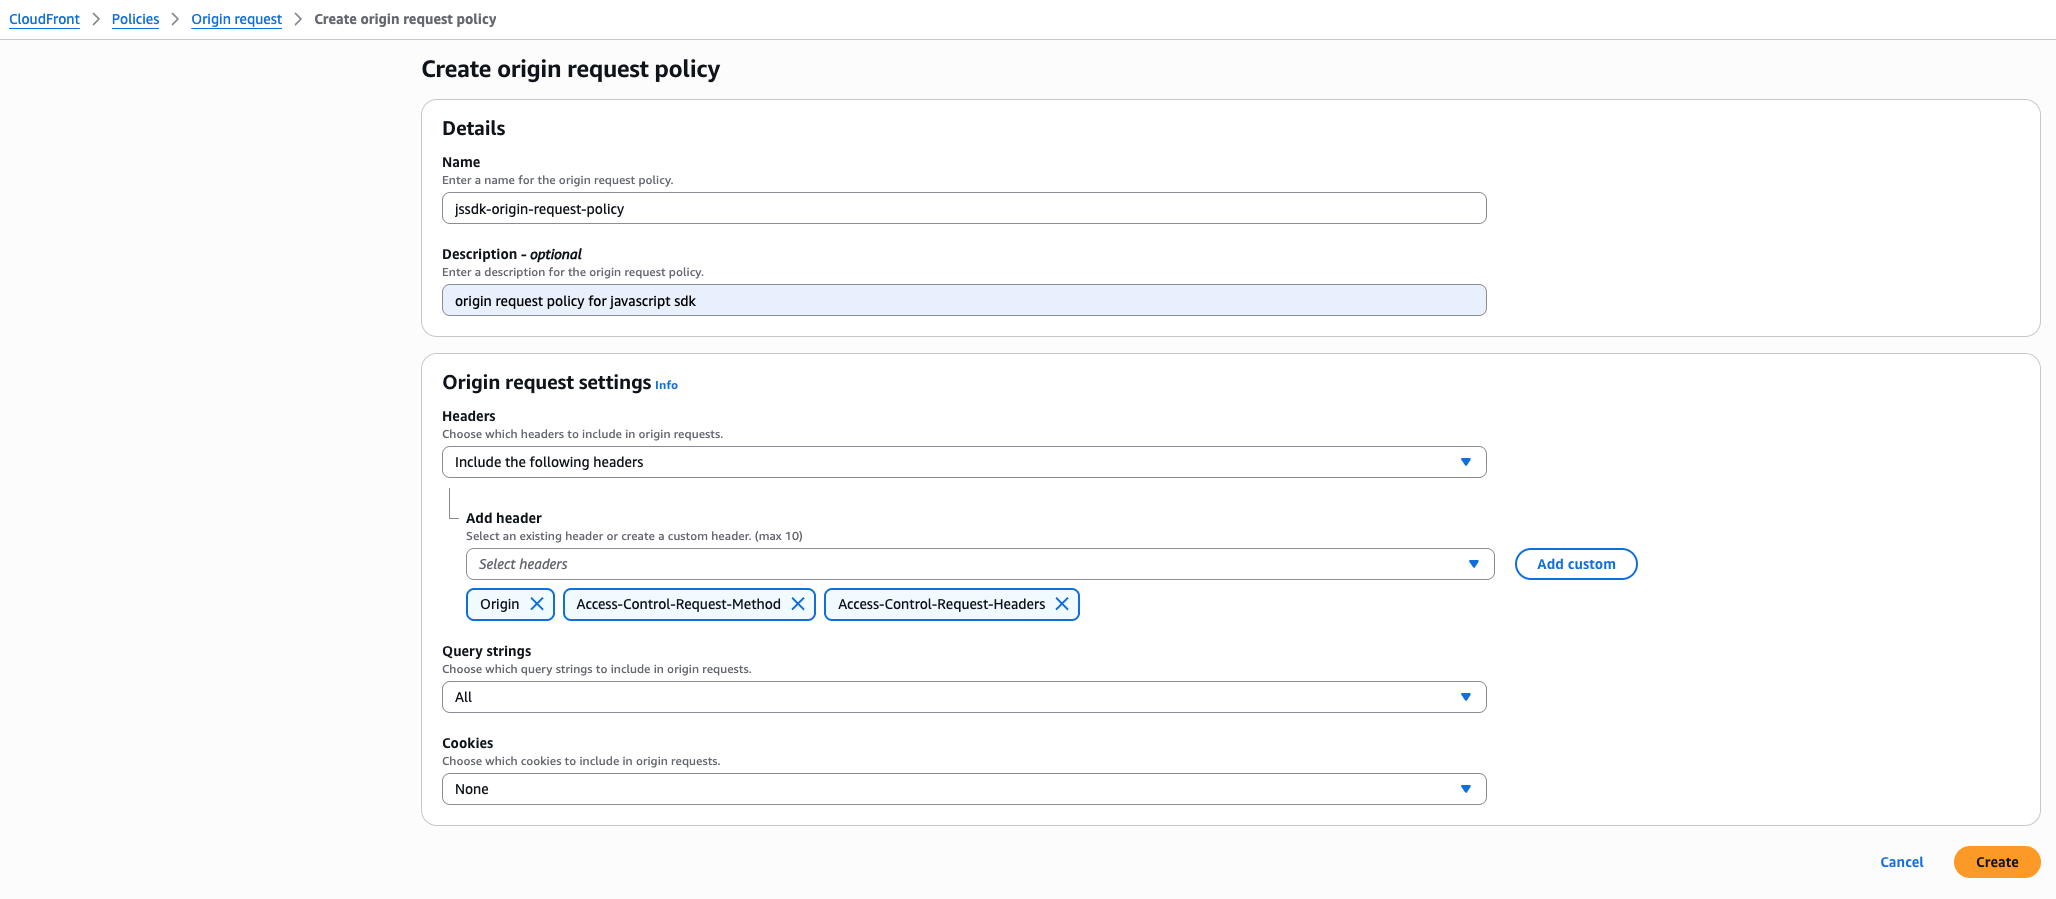
Create a new origin request policy with the following settings:
| Field | Setting |
|---|---|
| Name | Enter the origin request policy name, for example, jssdk-origin-request-policy |
| Headers | Include the following headers |
| Add header |
|
| Query strings | All |
| Cookies | None |
Additional distribution settings
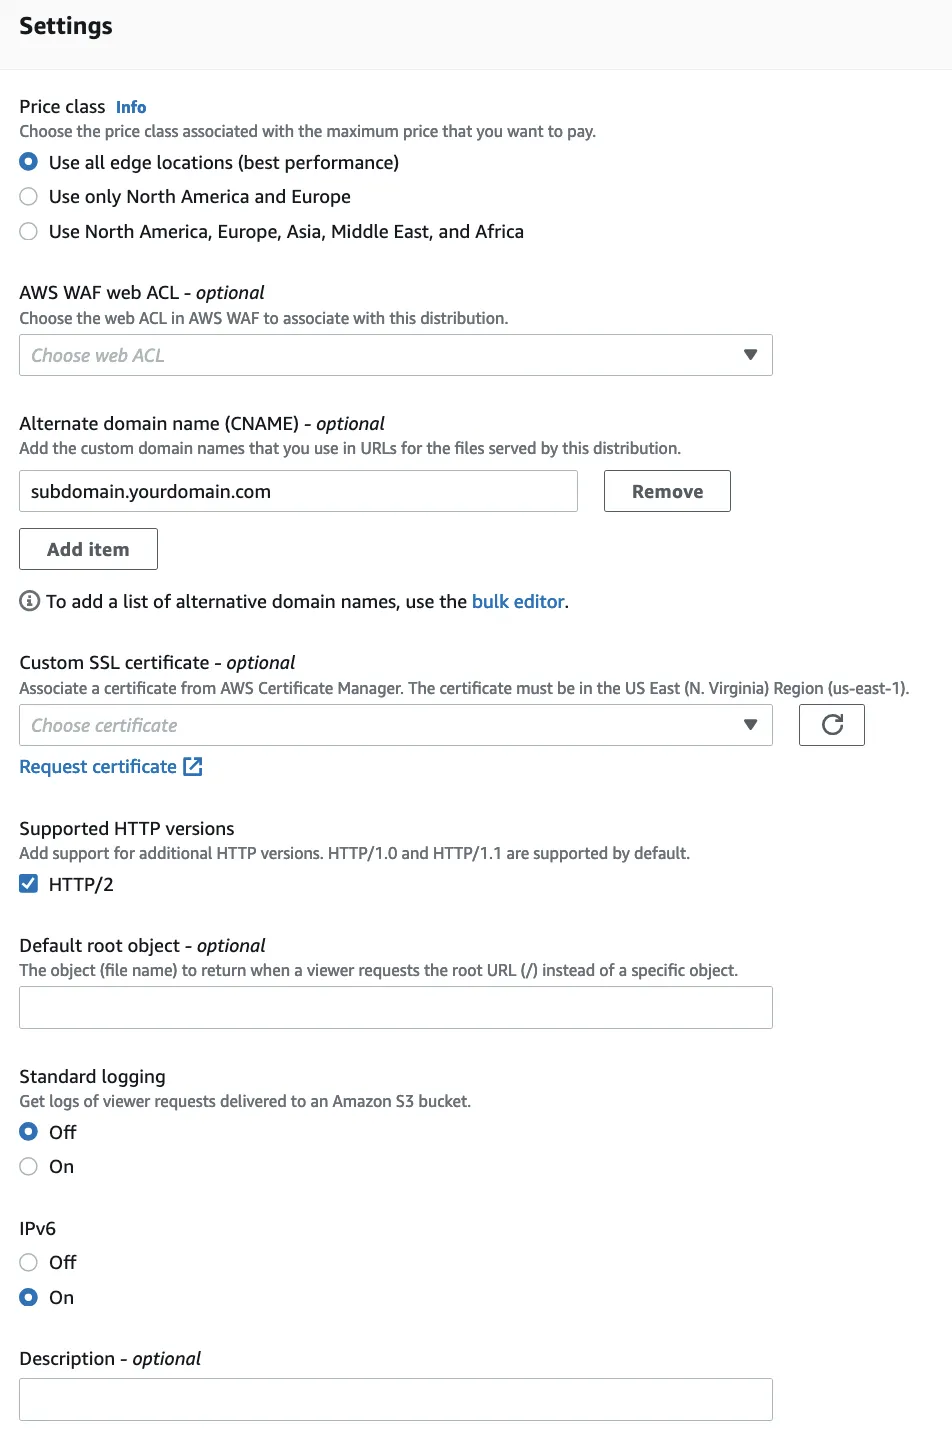
The following table summarizes the settings:
| Field | Setting |
|---|---|
| Price class | Use all edge locations(best performance) |
| Alternate domain name(CNAME) | <YOUR_CUSTOM_DOMAIN> |
| SSL Certificate | Add your custom SSL Certificate. See Use custom SSL certificates for more information. |
| Supported HTTP versions | HTTP/2 |
| Standard logging | Off |
| IPv6 | On |
Step 2: Deploy distribution
Click Create distribution and wait for CloudFront to be deployed:

Add CNAME Record to DNS
Once your distribution is deployed, create a CNAME record for the subdomain you wish to use along with the distribution URL.
| Name | Value |
|---|---|
| Subdomain you wish to use (used in the creation of the distribution). Note: This will vary based on your DNS provider but will typically be just the subdomain. For example: for cdn.yourdomain.com you would use cdn. | The CDN URL for the created distribution. Example: <prefix>.cloudfront.net |

Step 3: Serve SDK
See the following sections to serve the SDK depending on your installation method:
CDN
Paste the following snippet in your website’s <head> section and update the URL from:
var sdkBaseUrl = "https://cdn.rudderlabs.com";to:
var sdkBaseUrl="https://<YOUR_CUSTOM_DOMAIN>"Replace <YOUR_CUSTOM_DOMAIN> in the above snippet with your domain URL.
Make sure that the distribution settings are configured correctly and no paths are blocked. Otherwise, the events may not flow through correctly.
For example, paths like
<YOUR_CUSTOM_DOMAIN>/v3/modern/plugins/rsa-plugins.jsand<YOUR_CUSTOM_DOMAIN>/3.12.0/modern/plugins/rsa-plugins.jsshould both be accessible. Otherwise, the SDK may not be able to load properly.
- If you’re loading the JavaScript SDK asynchronously, paste the snippet in your website’s
<head>section and update the URL from:
"https://cdn.rudderlabs.com/v1.1/rudder-analytics.min.js"to:
"https://<YOUR_CUSTOM_DOMAIN>/v1.1/rudder-analytics.min.js"- If you’re loading the JavaScript SDK synchronously, paste the snippet in your website’s
<head>section and update the URL from:
<script src="https://cdn.rudderlabs.com/v1.1/rudder-analytics.min.js"></script>to:
<script src="https://<YOUR_CUSTOM_DOMAIN>/v1.1/rudder-analytics.min.js"></script>Replace <YOUR_CUSTOM_DOMAIN> in the above snippet with your domain URL.
NPM
Since you have used the NPM module for integrating the SDK directly into your application, there is no configuration required for serving the core SDK.
Additional configuration
Note that this section is only applicable for:
- npm installations
- Customized CDN installations not following the default directory structure that the SDK uses to automatically fetch the plugins and device mode destinations.
This section covers some additional configuration required for loading the device mode destinations and plugins:
Configure the load API option for plugins as follows if you are not using the @rudderstack/analytics-js/bundled package that bundles all the plugins into the SDK package.
rudderanalytics.load(WRITE_KEY, DATA_PLANE_URL, {
  pluginsSDKBaseURL: "https://<YOUR_CUSTOM_DOMAIN>/v3/modern/plugins"
});
To load device mode destinations, use the following load API option:
rudderanalytics.load(WRITE_KEY, DATA_PLANE_URL, {
  destSDKBaseURL: "https://<YOUR_CUSTOM_DOMAIN>/v3/modern/js-integrations"
});
The JavaScript SDK automatically replaces
/v3in the configured URL with the current SDK version to load the most compatible integrations and plugins. So, make sure to proxy the whole RudderStack CDN domain instead of specific paths.For example, if you specify
https://<YOUR_CUSTOM_DOMAIN>/v3/modern/js-integrationsfor loading device mode destinations, then you might see the network request going tohttps://<YOUR_CUSTOM_DOMAIN>/3.23.0/modern/js-integrations/<DEST_NAME>.min.jsto load the destination integration SDKs.
To load device mode destinations, use the following additional load API option:
rudderanalytics.load(WRITE_KEY, DATA_PLANE_URL, {
    destSDKBaseURL: "https://<YOUR_CUSTOM_DOMAIN>/v1.1/js-integrations"
});
Replace <YOUR_CUSTOM_DOMAIN> in the above snippet with your domain URL.
Use custom SSL certificates
To use a custom domain for your use case, you can request or import an SSL certificate with your CDN provider. Note that this is an optional setting.
To use the AWS Certificate Manager with CloudFront, choose the relevant ACM/IAM certificate in the Custom SSL certificate field:

You can choose your subdomain or use a wildcard domain*.yourdomain.comto set up multiple subdomains.
The AWS Certificate Manager will guide you through the verification by email or DNS TXT records. You will be able to choose your own domain for SSL certificates once verified.
Custom request header for GCP external load balancer
If you’re setting up a custom domain using the GCP External HTTPS Load Balancer, make sure to add a custom request header in your backend service configuration:
| Header | Value |
|---|---|
Host | cdn.rudderlabs.com |
FAQ
Why do I see Store clientDataInCookie or RudderEncrypt parse errors on track calls?
Upgrade to the latest JavaScript SDK version to resolve this issue.
Note that proxying the SDK CDN does not fix this error on its own. If issues persist on Safari or iOS after you upgrade, proxy all three domains listed in Use Custom Domains and see JavaScript SDK FAQ.
Can I overcome ad blockers by serving the JavaScript SDK on my domain?
Many popular ad blockers block specific SDK-related downloads and API calls based on the domain name and URL. You can serve the SDK on your CDN to circumvent this issue.
