Sync data from NetSuite to your warehouse destination via RudderStack.
8 minute read
Cloud Extract (ETL) is sunset
This source is deprecated and no longer supported as of January 10, 2026.
NetSuite is a popular business management suite that delivers efficient ERP, CRM, and other ecommerce solutions to thousands of customers worldwide.
This document guides you in setting up NetSuite as a source in RudderStack. Once configured, RudderStack automatically ingests your NetSuite data and routes it to your specified data warehouse destination.
Add a comma-delimited list of the above-mentioned RudderStack IPs in the Allowed IP addresses field.
Finally, click Save.
Enabling token-based authentication
To enable token-based authentication for your NetSuite account in order to generate tokens, follow these steps:
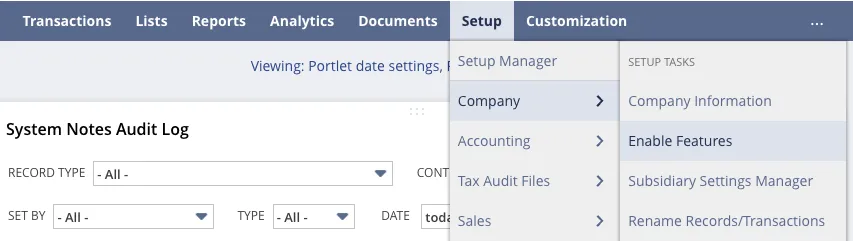
Go to Setup > Company > Enable Features.
Select the SuiteCloud tab.
Under the SuiteScript section, check the CLIENT SUITESCRIPT and SERVER SUITESCRIPT settings and click I Agree to access the SuiteCloud terms of service.
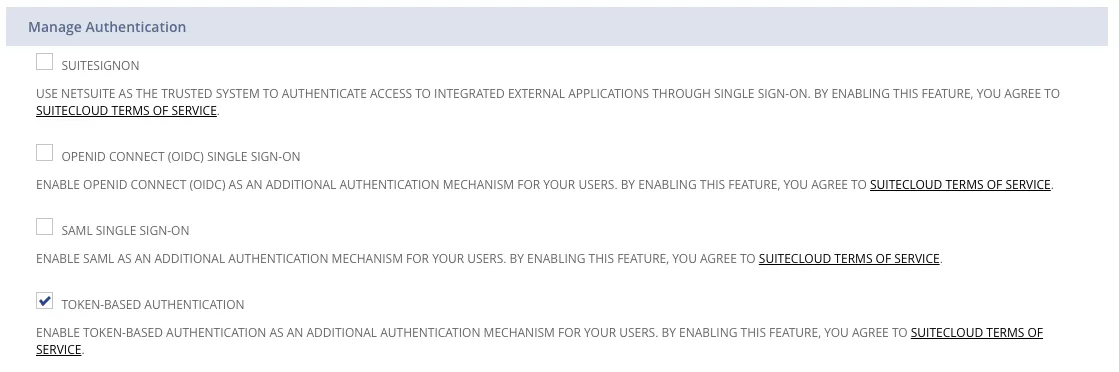
Under the Manage Authentication section, check TOKEN-BASED AUTHENTICATION.
Finally, click Save.
Creating a new integration flow
To uniquely identify RudderStack in your NetSuite account, you also need to create an integration record for RudderStack. Follow these steps:
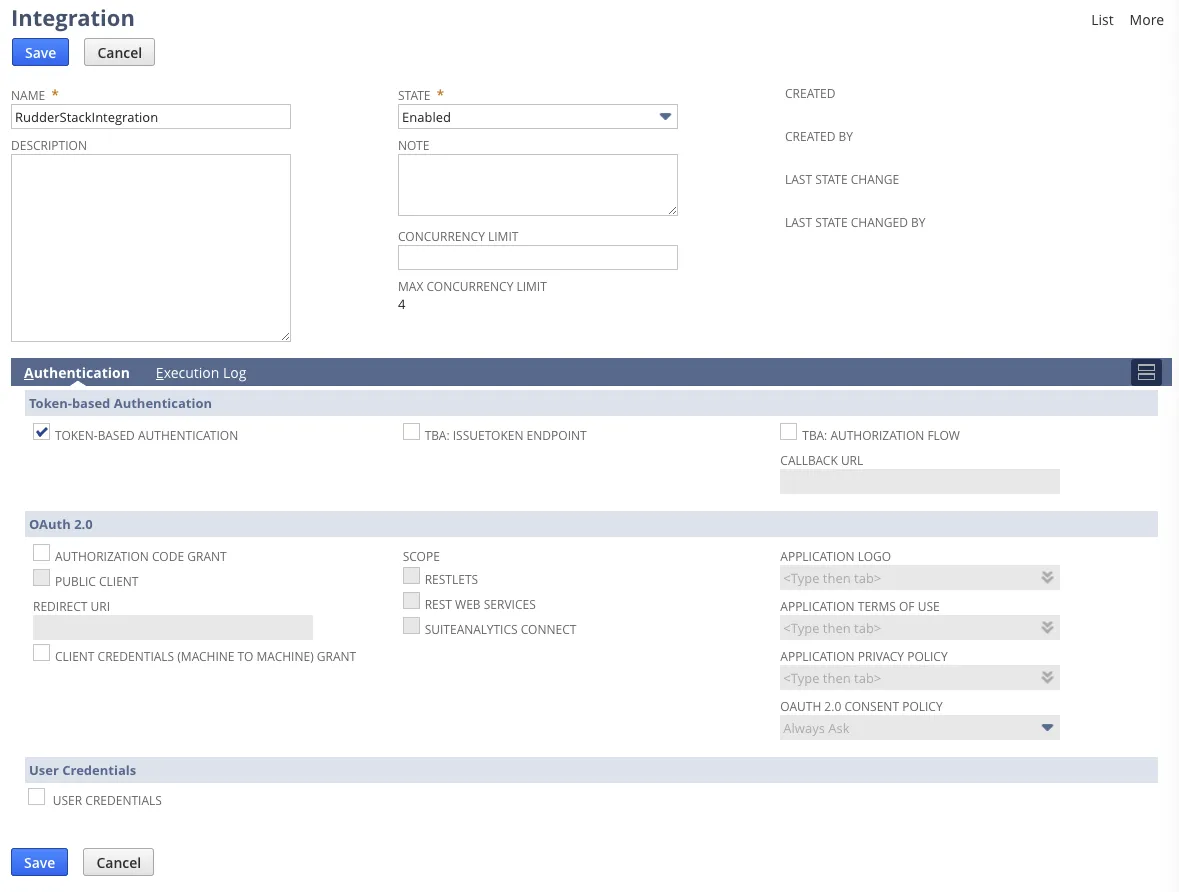
Go to Setup > Integration > Manage Integrations > New.
Enter the following settings:
Name: Enter the name for your integration, for example, RudderStackIntegration.
State: This field should be Enabled.
In the Authentication tab, check Token-based Authentication.
Remember to uncheck all the other options.
Finally, click the Save button.
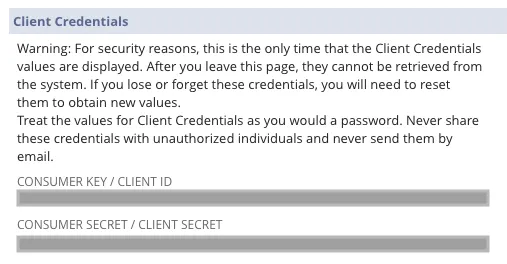
In the resulting confirmation page, you can see the CONSUMER KEY / CLIENT ID and CONSUMER SECRET / CLIENT SECRET under Client Credentials, as shown:
Store this consumer key and secret safely. You will need these credentials while setting up the NetSuite source in RudderStack.
Creating a NetSuite role and configure permissions
To create a NetSuite Token ID and Secret, you first need to create a Role for RudderStack and an Employee with this specific role.
Step 1: Create a role
To create a new role, follow these steps:
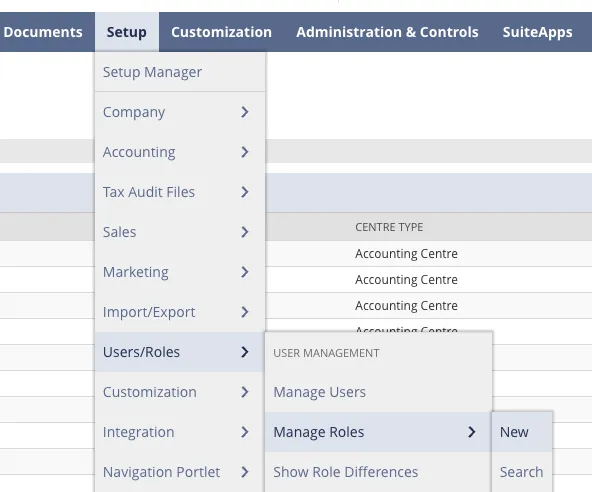
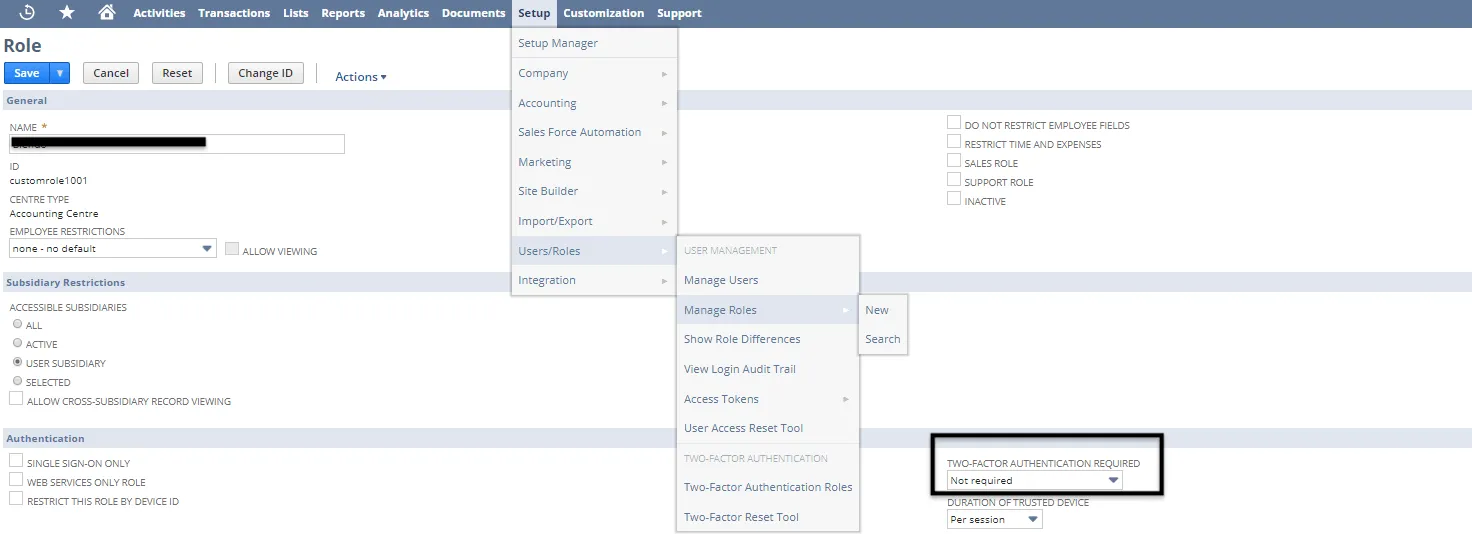
Go to Setup > Users/Roles > Manage Roles > New.
Enter a name for the role in the Name field, for example, RudderStack.
Select Two-Factor Authentication Required to Not Required.
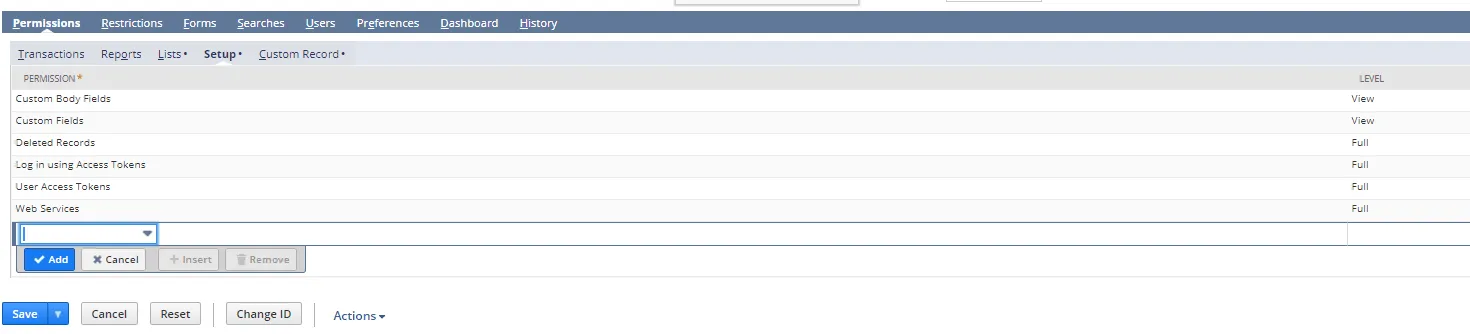
Under the Permissions section, go to Setup and assign the following permissions:
Full permissions
SOAP Web Services
User Access Tokens
Log in using Access Tokens
Deleted Records
View permissions
Custom Fields
Custom Body Fields
Custom Lists
Customer Status
For each pipeline resource that you want RudderStack to sync, you should give the role the relevant permissions to access it. These resources are divided among the following sections:
Transactions
Reports
Lists
Custom Records
Note that each permission should have View level.
It is extremely important that you have assigned the permissions for every resource, saved search or custom record that you want RudderStack to sync. This is required so that you don’t encounter any RudderStack sync failures with permission-related issues.
Step 2: Create an employee
To create a new employee, follow these steps:
Go to Lists > Employees > Employees > New.
Then, enter the name and email ID of the employee.
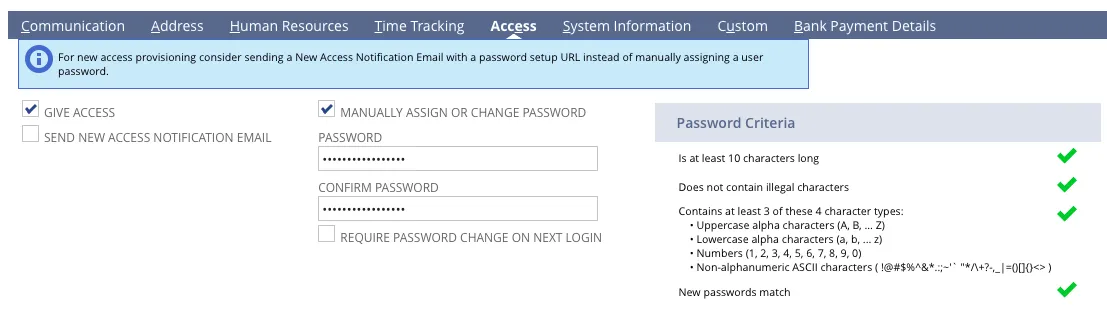
Under the Access tab, check Give Access and Manually assign or change password. Then add the required password.
Finally, add the Role which you have created in the previous step and click Save to save the settings.
Step 3: Create an access token
In this step, you need to generate the access tokens required for the integration record (application) and the user role.
To generate the access token, you may have to first log in as the user created in the previous step.
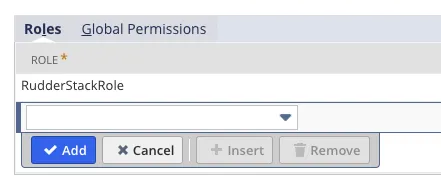
Go to Setup > Users/Roles > Access Tokens > New.
Then, enter the following settings:
Application Name: Select the integration record you created.
User: Select the user you created.
Role: Select the role you created.
Token Name: Assign a name for the token.
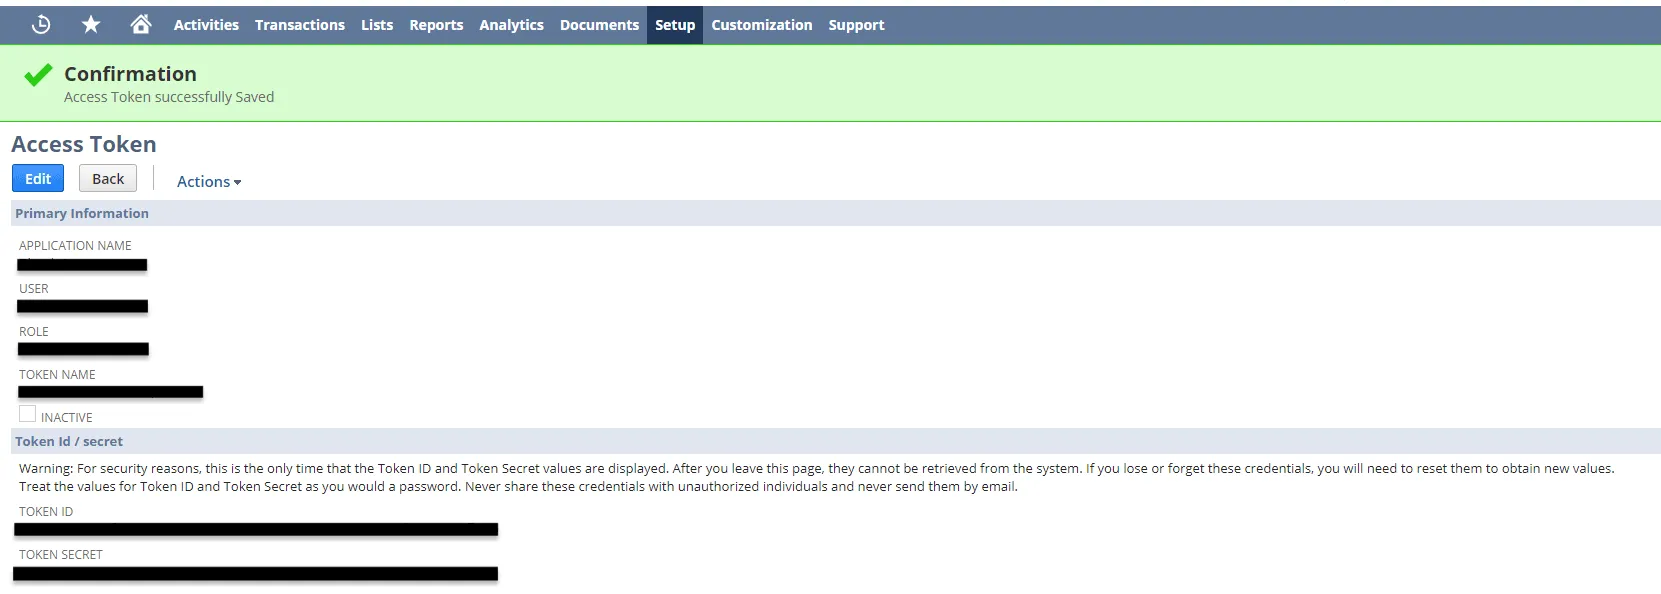
Finally, click the Save button. The confirmation page will display a Token ID and Secret, as shown:
For security reasons, this is the only time these credentials will be displayed. Hence, copy and store the Token ID and Token Secret safely. You will need these credentials while setting up the NetSuite source in RudderStack.
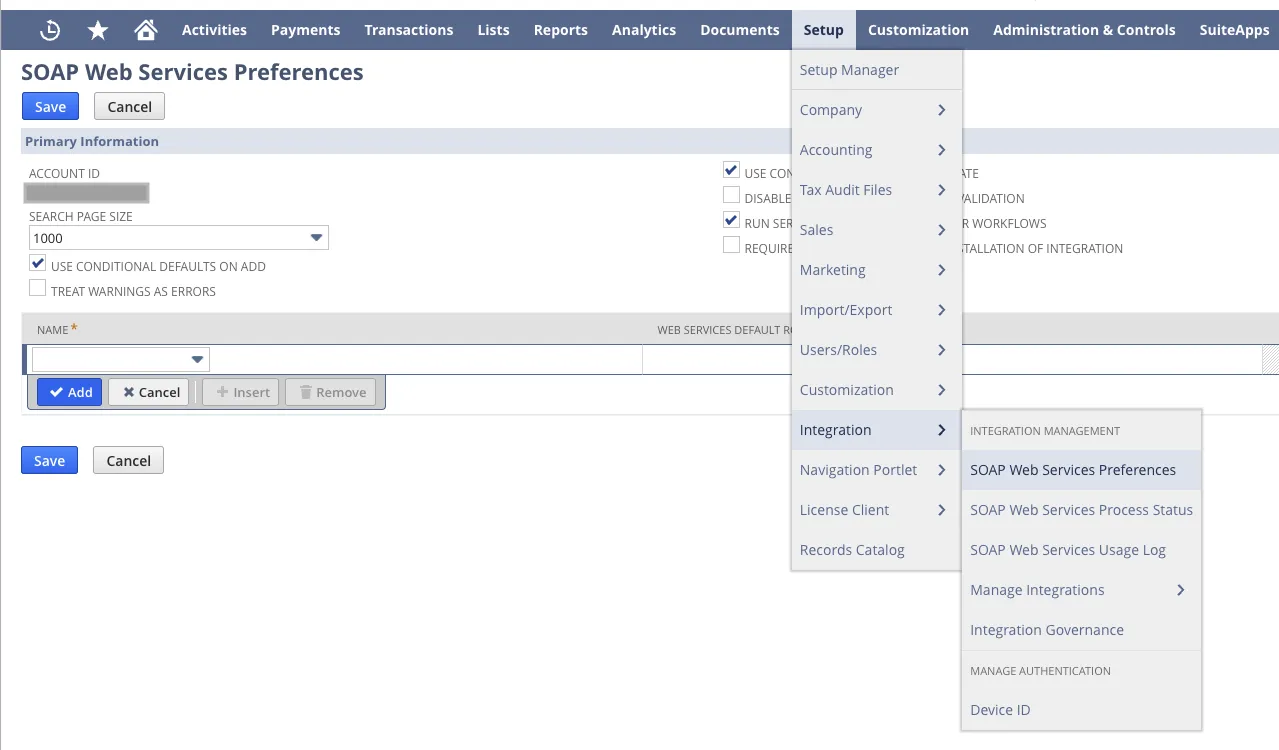
Locating your NetSuite Account ID
To locate your NetSuite account ID, go to Setup > Integration > SOAP Web Services Preferences.
You will find the account ID in the resulting page, as highlighted below:
Enter the complete account ID including the suffix (for example, 1234567_SB2) while configuring your NetSuite source in RudderStack.
Configuring NetSuite source in RudderStack
To set up NetSuite as a source in RudderStack, follow these steps:
Go to Sources > New source > Cloud Extract and select NetSuite from the list of sources.
Assign a name to your source and click Continue.
Connection settings
Enter the following connection credentials required to set up your NetSuite source in RudderStack:
Account Name : Enter an account name of your choice.
You can set any account name of your choice.
Account ID : Enter the NetSuite account ID. You can get the account ID by going to your NetSuite dashboard and navigating to Setup > Integration > Web Services Preferences. For more information, refer to the Locating your NetSuite Account ID section above.
Consumer Key : Enter your NetSuite consumer key.
Consumer Secret : Enter your NetSuite consumer secret.
For more information on obtaining the NetSuite consumer key and secret, refer to the Creating a new integration flow section above.
Token ID : Enter your NetSuite token ID.
Token Secret : Enter your NetSuite token secret.
For more information on obtaining the NetSuite token ID and secret, refer to the Create an access token section above.
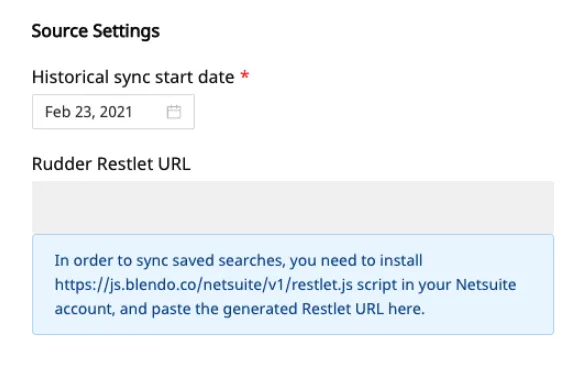
Setting the historical sync date
Set the Historical sync start date from when you want RudderStack to sync all your historical NetSuite data. Also specify the RudderStack Restlet URL and click Next, as shown:
To get the RudderStack Restlet URL, you need to first install this script in your NetSuite account and paste the generated restlet URL in the RudderStack dashboard. For more information on adding the script in your NetSuite account, refer to the FAQ section below.
Destination settings
The following settings specify how RudderStack sends the data ingested from NetSuite to the connected warehouse destination:
Table prefix: RudderStack uses this prefix to create a table in your data warehouse and loads all your NetSuite data into it.
Schedule Settings: RudderStack gives you three options to ingest the data from NetSuite:
Basic: Runs the syncs at the specified time interval.
CRON: Runs the syncs based on the user-defined CRON expression.
Manual: You are required to run the syncs manually.
For more information on the schedule types, refer to the Common Settings guide.
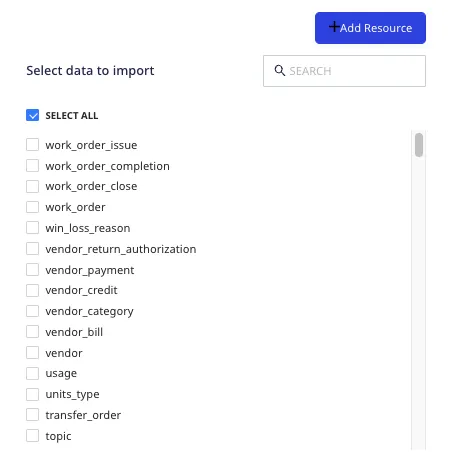
Selecting the data to import
Finally, you need to select the NetSuite data that you wish to ingest via RudderStack. You can either select all the data, or choose specific NetSuite data attributes, as per your requirement, as shown:
Note that none of the resources are selected by default, so you will have to do the selection manually.
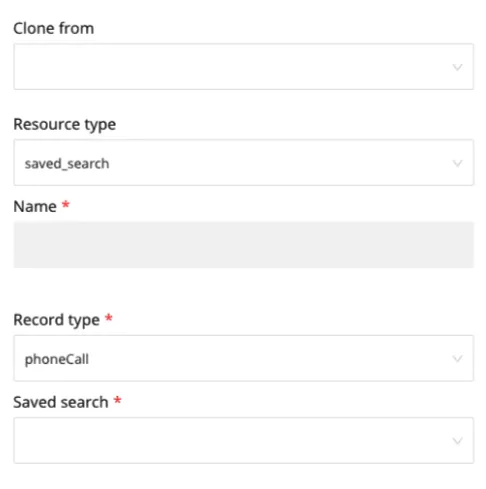
Importing custom records and saved searches
RudderStack supports two special types of resources that you can ingest from NetSuite, namely custom records and saved searches. To import these resources, click Add Resource on the top right, as shown above. You will see the following window:
If you have already configured a NetSuite resource before, you can choose the Clone from option to use the values of that resource as is.
Alternatively, select the appropriate Resource type you want to import:
For a saved_search, enter a Name for the resource, select the Record type present in your NetSuite account, and the exact Saved search that you have created there.
For a custom_record, enter a Name for the resource and select the custom record that is present on your NetSuite account.
Finally, save the information by clicking on Save.
NetSuite is now configured as a source. RudderStack will start ingesting data from NetSuite as per your specified schedule and frequency.
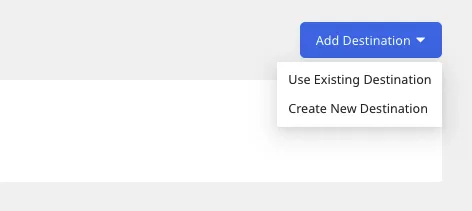
You can further connect this source to your data warehouse by clicking on Add Destination, as shown:
Use the Use Existing Destination option if you have an already-configured data warehouse destination in RudderStack. To configure a data warehouse destination from scratch, select the Create New Destination button.
FAQ
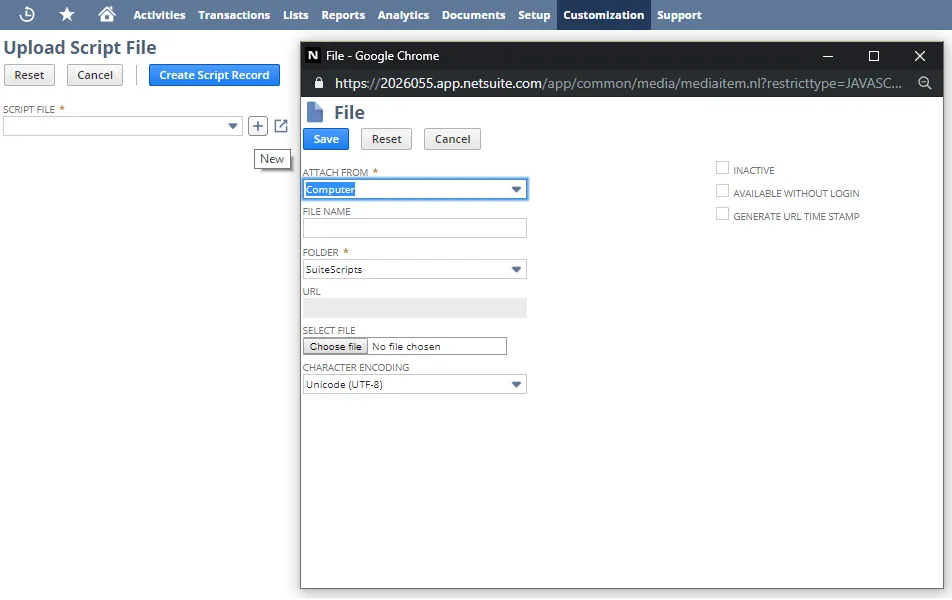
How can I get the RudderStack Restlet URL?
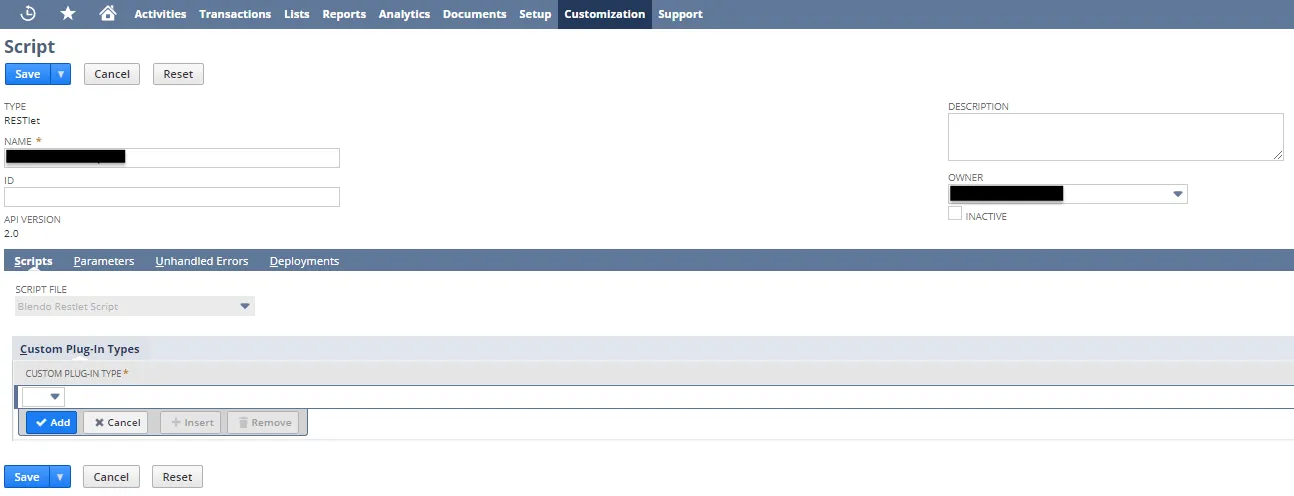
To get the RudderStack Restlet URL, you need to first install this script in your NetSuite account and paste the generated Restlet URL in the dashboard settings.
Then, add the Name of the script and the Owner, that is the Employee that you created in the Creating an employee section above. Then click Save.
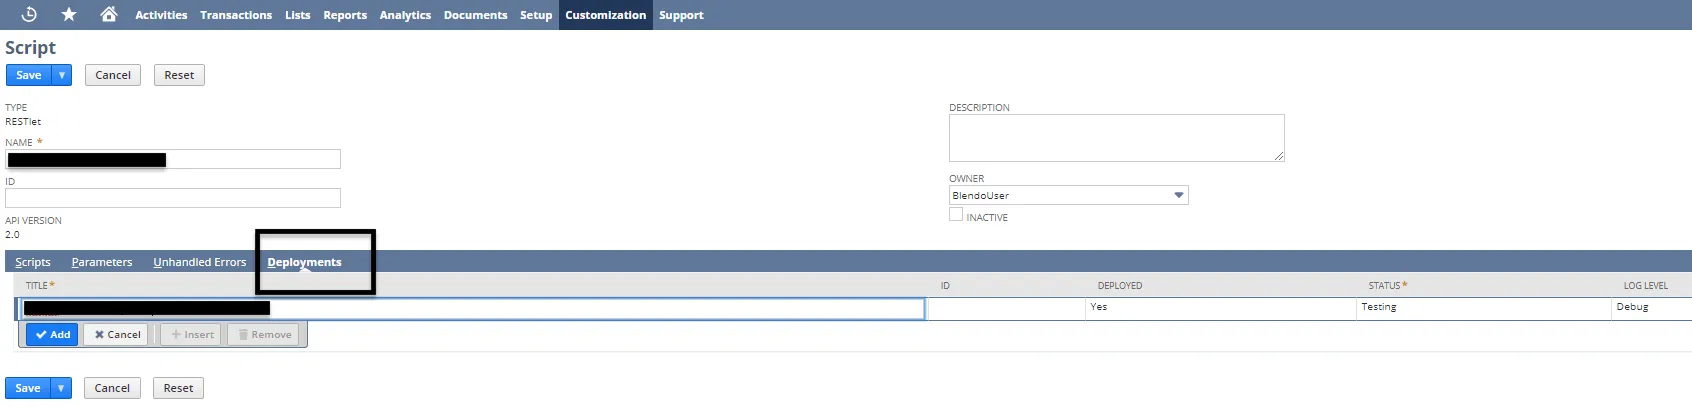
To deploy the script, click Deployments, add the script Title, and click Add. After the script is deployed, click Save.
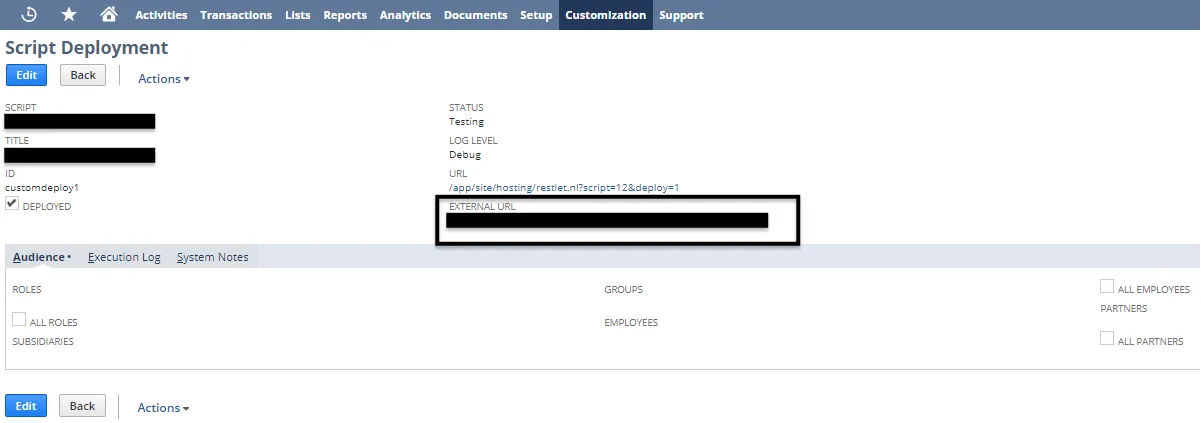
Finally, click the title of your deployed script. You should be able to see the External URL, which is the RudderStack Restlet URL that you need to use in the NetSuite source configuration.
Is it possible to have multiple Cloud Extract sources writing to the same schema?
Yes, it is.
RudderStack associates a table prefix for every Cloud Extract source writing to a warehouse schema. This way, multiple Cloud Extract sources can write to the same schema with different table prefixes.
How does RudderStack count the events for Cloud Extract sources?
RudderStack counts the number of records returned by the source APIs when queried during each sync. It considers each record as an event.
Questions? We're here to help.
Join the RudderStack Slack community or email us for support
This site uses cookies to improve your experience while you navigate through the website. Out of
these
cookies, the cookies that are categorized as necessary are stored on your browser as they are as
essential
for the working of basic functionalities of the website. We also use third-party cookies that
help
us
analyze and understand how you use this website. These cookies will be stored in your browser
only
with
your
consent. You also have the option to opt-out of these cookies. But opting out of some of these
cookies
may
have an effect on your browsing experience.
Necessary
Always Enabled
Necessary cookies are absolutely essential for the website to function properly. This
category only includes cookies that ensures basic functionalities and security
features of the website. These cookies do not store any personal information.
This site uses cookies to improve your experience. If you want to
learn more about cookies and why we use them, visit our cookie
policy. We'll assume you're ok with this, but you can opt-out if you wish Cookie Settings.