RudderStack iOS SDK v2 Beta
21 minute read
iOS SDK v2 is legacy and will be deprecated soon.
For new Swift implementations, use the iOS (Swift) SDK instead.
The RudderStack iOS SDK v2 lets you track the customer event data from your iOS, macOS, tvOS, and watchOS applications and send it to the specified destinations via RudderStack.
- tvOS is supported in version 1.1.0 and above
- watchOS is supported in version v1.3.1 and above
- macOS is supported in version 2.0.0 and above
Refer to the GitHub codebase to get a more hands-on understanding of the SDK.
SDK setup requirements
- A Mac with the latest version of Xcode.
- Sign up for RudderStack.
- Set up an iOS source in the dashboard. Note the write keyThe write key (or source write key) is a unique identifier for your source. RudderStack uses this key to send events from a source to the specified destination. for this source.
- You will also need the data plane URL associated with your RudderStack workspace.
In the dashboard, the Setup tab for the source has an SDK installation snippet containing both the write key and the data plane URL. You can use it to integrate the iOS SDK v2 into your project.
Installing the RudderStack iOS SDK v2
The RudderStack iOS SDK v2 is distributed through Cocoapods and Carthage.
The recommended and easiest way to add the SDK to your project is throughPodfile.
Follow these steps to install the SDK depending on your preferred method:
- Add the SDK to your
Podfile:
pod 'Rudder', '~> 2.0.0'- Run the following command:
pod installAdd the SDK to your Cartfile:
github "rudderlabs/rudder-sdk-ios"Then, run the following command:
carthage updateRemember to include the following code in all the .m and .h files (Objective-C) or the .swift files where you want to refer to or use the RudderStack SDK classes:
@import Rudder;import RudderRudderStack uses SQLite to temporarily store the events before sending them to the data plane. Making calls which are not thread-safe, like SQLite.shutdown(), might lead to unexpected crashes.
Swift Package Manager
You can also install iOS SDK v2 through Swift Package Manager (SPM) via one of the following methods:
To add the RudderStack package in Xcode, follow these steps:
- Go to File> Add Package.
- In the search bar, enter the package repository
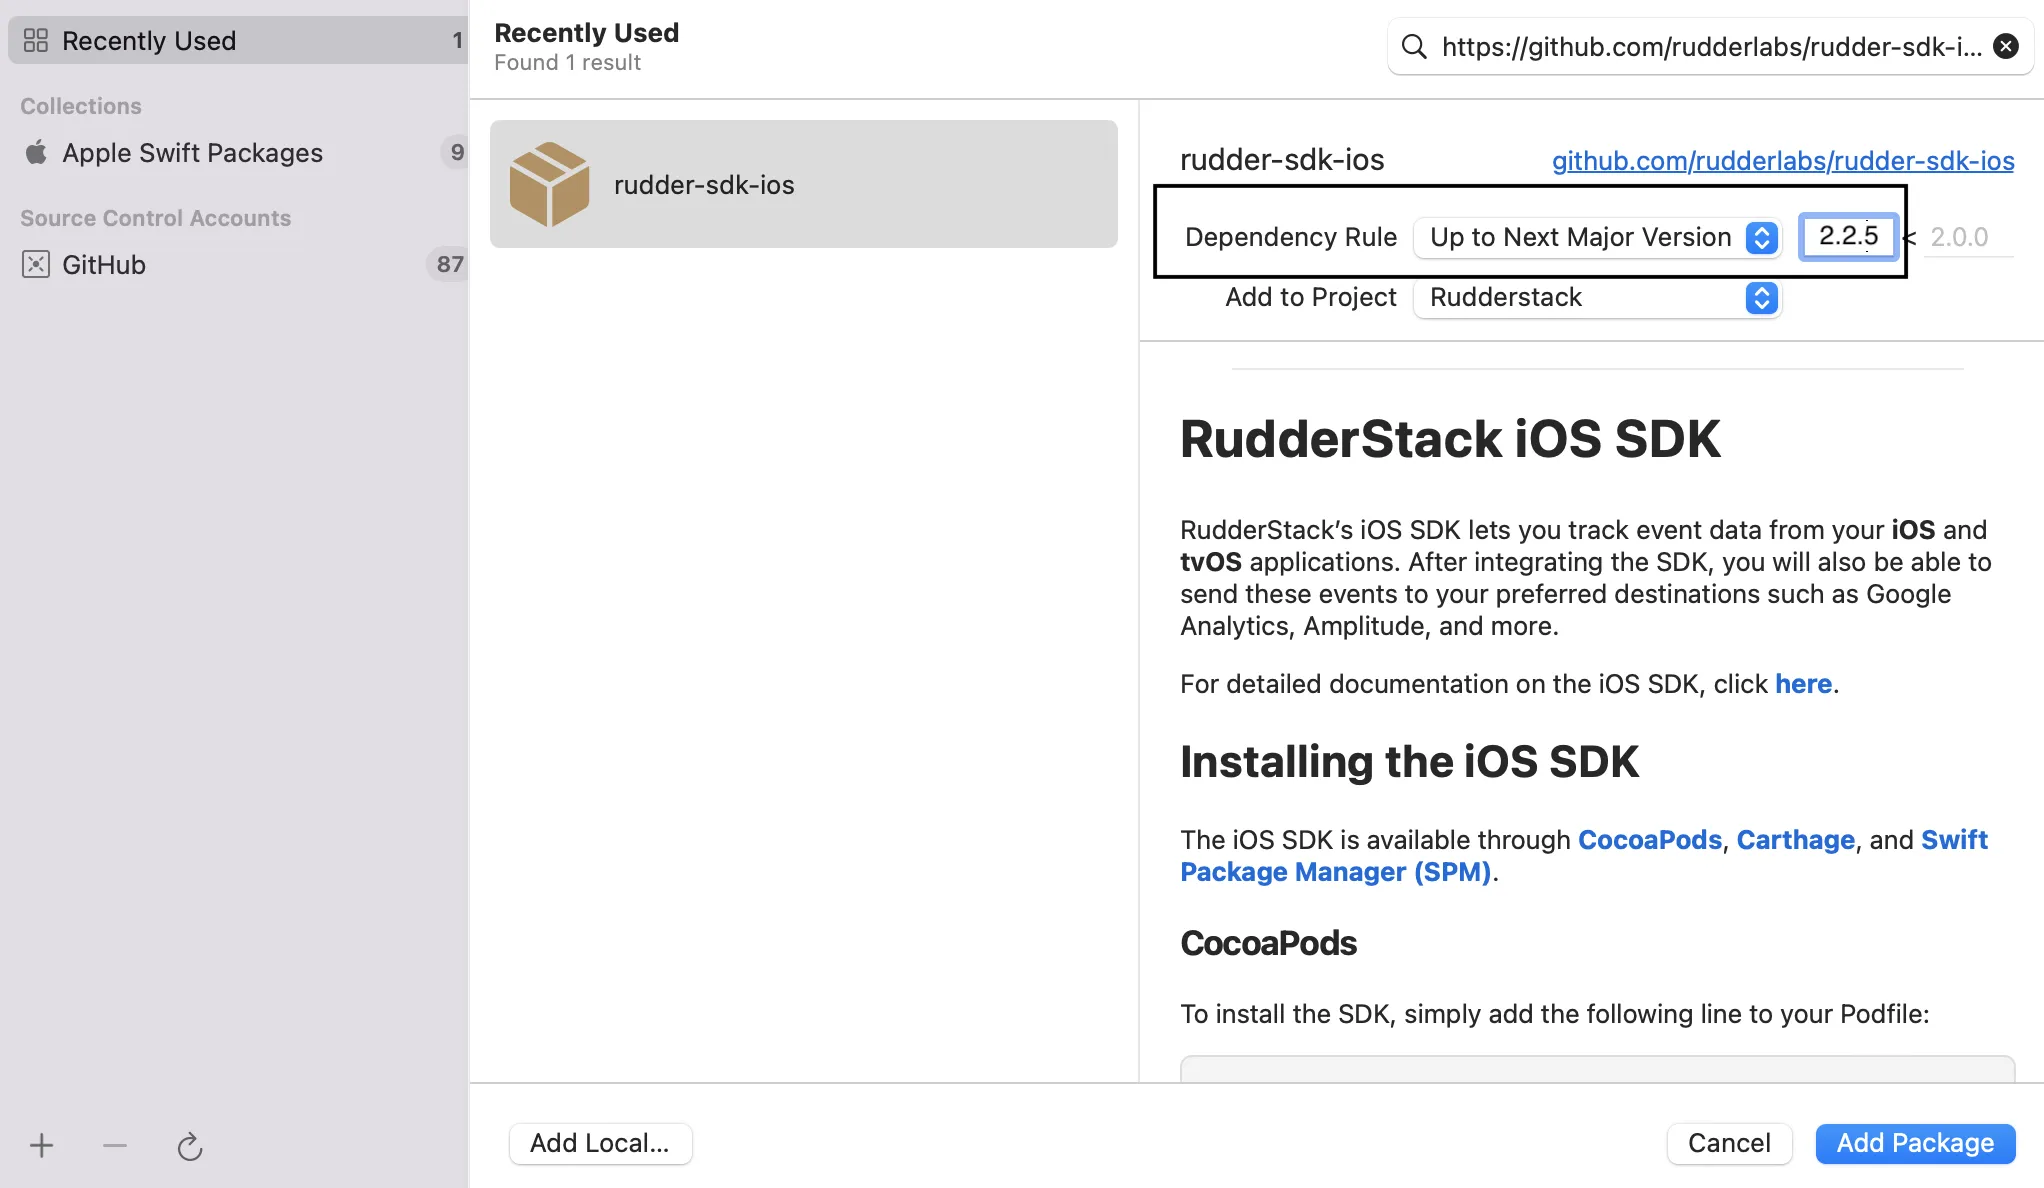
git@github.com:rudderlabs/rudder-sdk-ios.git. - In Dependency Rule, select Up to Next Major Version and enter the value as 2.2.5:
- Select the project to which you want to add the package and click Add Package.
To use the RudderStack Swift package, include the following snippet in your project:
// swift-tools-version:5.5
// The swift-tools-version declares the minimum version of Swift required to build this package.

import PackageDescription

let package = Package(
    name: "RudderStack",
    products: [
        // Products define the executables and libraries a package produces, and make them visible to other packages.
        .library(
            name: "RudderStack",
            targets: ["RudderStack"]),
    ],
    dependencies: [
        // Dependencies declare other packages that this package depends on.
        .package(url: "git@github.com:rudderlabs/rudder-sdk-ios.git", from: "1.8.0")
    ],
    targets: [
        // Targets are the basic building blocks of a package. A target can define a module or a test suite.
        // Targets can depend on other targets in this package, and on products in packages this package depends on.
        .target(
            name: "RudderStack",
            dependencies: [
                .product(name: "Rudder", package: "rudder-sdk-ios")
            ]),
        .testTarget(
            name: "RudderStackTests",
            dependencies: ["RudderStack"]),
    ]
)
Initializing the RudderStack client
To initialize the RudderStack client, place the following code in your AppDelegate file under the didFinishLaunchingWithOptions method:
RSConfig *config = [[RSConfig alloc] initWithWriteKey:WRITE_KEY];
[config dataPlaneURL:DATA_PLANE_URL];
[config trackLifecycleEvents:YES];
[config recordScreenViews:YES];

[[RSClient sharedInstance] configureWith:config];
A shared instance of RSClient is accessible after the initialization via [RSClient sharedInstance].
let config: RSConfig = RSConfig(writeKey: WRITE_KEY)
                  .dataPlaneURL(DATA_PLANE_URL)
                  .trackLifecycleEvents(true)
                  .recordScreenViews(true)

RSClient.sharedInstance().configure(with: config)
A shared instance of RSClient is accesible after the initialization via RSClient.sharedInstance()
RudderStack automatically tracks the following application lifecycle events:
You can disable these events using the trackLifecycleEvents method of RSConfig by passing false. However, it is highly recommended to keep them enabled.
Configuring the RudderStack client
You can configure your client based on the following parameters using RSConfig:
| Parameter | Type | Description | Default value |
|---|---|---|---|
logLevel | RSLogLevel | Controls how much of the log you want to see from the SDK. | RSLogLevel.none |
dataPlaneUrl | String | Your data plane URLThe data plane URL is the location where events are routed and sent to the RudderStack backend for processing. You can find this URL at the top of the Connections page in your RudderStack dashboard. | - |
flushQueueSize | Integer | Number of events in a batch request sent to the server. | 30 |
dbCountThreshold | Integer | Number of events to be saved in the SQLite database. Once the limit is reached, older events are deleted from the database. | 10000 |
sleepTimeout | Integer | Minimum waiting time to flush the events to the server. | 10 seconds |
trackLifecycleEvents | Boolean | Determines if the SDK will capture application life cycle events automatically. | true |
autoSessionTracking | Boolean | Determines if the SDK automatically tracks user sessions. See Tracking user sessions for more information. | true |
sessionTimeout | Integer | Maximum inactivity period before the session expires. | 300000 ms (5 minutes) |
recordScreenViews | Boolean | Determines if the SDK will capture will capture screen view events automatically. | false |
controlPlaneUrl | String | This parameter should be changed only if you are self-hosting the control plane. Refer to the Self-hosted control plane section below for more information. The SDK will add /sourceConfig along with this URL to fetch the required configuration. | https://api.rudderlabs.com |
Self-hosted control plane
If you are using a device mode destination like Adjust, Firebase, etc., the SDK needs to fetch the required configuration from the control plane. If you are using the Control Plane Lite utility to host your own control plane, then follow the steps in this section and specify controlPlaneUrl in RSConfig that points to your hosted source configuration file.
Do not pass thecontrolPlaneUrlparameter during the SDK initialization if you are using the RudderStack dashboard. This parameter is supported only if you are self-hosting the control plane using the Control Plane Lite utility.
OneTrust consent
The iOS SDK v2 integrates with the OneTrust consent manager and lets you specify the user’s consent during initialization. For more information, refer to the OneTrust Consent Management for iOS guide.
Tracking user sessions
The iOS SDK v2 supports session tracking starting v2.3.0.
By default, the iOS SDK v2 automatically tracks user sessions. RudderStack automatically determines the start and end of a user session depending on the inactivity time configured in the SDK (default time is 5 minutes).
To automatically track sessions using iOS SDK v2, thetrackLifecycleEventsshould be set to true while initializing the SDK. This is because RudderStack considers the Application Opened, Application Installed, or Application Updated events as the start of a new session.
RSConfig *config = [[RSConfig alloc] initWithWriteKey:WRITE_KEY];
[config dataPlaneURL:DATA_PLANE_URL];
[config autoSessionTracking:YES];
[config sessionTimeout:5*60*1000L];
RSClient *client = [RSClient sharedInstance];
[client configureWith:config];let config: RSConfig = RSConfig(writeKey: WRITE_KEY)
.dataPlaneURL(DATA_PLANE_URL)
.autoSessionTracking(true)
.sessionTimeout(5*60*1000)
RSClient.sharedInstance().configure(with: config)To disable automatic session tracking, set autoSessionTracking to false.
For more information on user sessions and tracking them using the iOS SDK v2, see Session Tracking.
Supported API calls
The iOS SDK v2 supports all the API calls specified in the RudderStack Events Spec guide. These include identify, track, screen, group, alias, and reset calls.
Identify
The call lets you identify a visiting user and associate them to their actions. It also lets you record the traits about them like their name, email address, etc. Once you identify the user, the SDK persists all the user information and passes it on to the subsequent track or screen calls. To reset the user identification, you can use the reset method.
RudderStack capturesdeviceIdand uses that asanonymousIdfor identifying unknown users. This helps in tracking the users across the application installation.
According to the Apple documentation, if a device has multiple apps from the same vendor, all the apps will be assigned the samedeviceId. If all the applications from the vendor are uninstalled, then a newdeviceIdwill be assigned to the apps on the next install.
An sample identify call is shown below:
[[RSClient sharedInstance] identify:@"user_id" traits:@{@"email": @"alex@example.com"}];RSClient.sharedInstance().identify("user_id", traits: ["email": "alex@example.com"])The identify method accepts the following parameters:
| Name | Data type | Presence | Description |
|---|---|---|---|
userId | NSString | Required | Uniquely identifies the visiting user. |
traits | NSDictionary | Optional | Information on the user traits. Use the dict method of RudderTraits to convert to NSDictionary easily. |
option | RSOption | Optional | Extra options for the identify event. |
Setting your own anonymous ID
By default, RudderStack uses the deviceId as anonymousId. To set your own anonymousId, you can use the setAnonymousId method as shown:
[client setAnonymousId:@"new_anonymous_id"];RSClient.sharedInstance().setAnonymousId("new_anonymous_id")Track
The call lets you record the user events along with any properties associated with them.
A sample track event is shown below:
[[RSClient sharedInstance] track:@"sample_track_event" properties:@{
    @"key_1": @"value_1",
    @"key_2": @"value_2"
}];RSClient.sharedInstance().track("sample_track_event", properties: [
"key_1": "value_1",
"key_2": "value_2"
])track method accepts the following parameters:| Name | Data type | Presence | Description |
|---|---|---|---|
eventName | NSString | Required | Name of the tracked event. |
properties | NSDictionary | Optional | Extra data properties to be sent along with the event. |
option | RSOption | Optional | Extra event options. |
Screen
The screen call lets you record whenever a user views their mobile screen, with any additional relevant information about the screen.
A sample screen event is as shown:
[[RSClient sharedInstance] screen:@"ViewController" properties:@{
  @"key_1": @"value_1",
  @"key_2": @"value_2"
} ];RSClient.sharedInstance().screen("ViewController", properties: [
"key_1": "value_1",
"key_2": "value_2"
])The screen method accepts the following parameters:
| Name | Data type | Presence | Description |
|---|---|---|---|
screenName | NSString | Required | Name of the screen viewed by the user. |
properties | NSDictionary | Optional | Extra property object to be passed along with the screen call. |
option | RSOption | Optional | Extra options to be passed along with the screen call. |
Group
The call lets you link an identified user with a group like a company, organization, or an account. It also lets you record any traits associated with that group, like the name of the company, number of employees, etc.
A sample group call is shown below:
[[RSClient sharedInstance] group:@"sample_group_id" traits:@{
  @"key_1": @"value_1",
  @"key_2": @"value_2"
} ];RSClient.sharedInstance().group("sample_group_id", traits: [
"key_1": "value_1",
"key_2": "value_2"
])The group method accepts the following parameters:
| Name | Data type | Presence | Description |
|---|---|---|---|
groupId | String | Required | The unique identifier of the group with which you want to associate your user. |
traits | NSDictionary | Optional | Any other property of the organization you want to pass along with the call. |
option | RSOption | Optional | Extra event-level options to be passed along with the group call. |
The iOS SDK v2 does not persist the group traits across the sessions.
Alias
The alias call associates the user with a new identification. A sample alias call is shown below:
[[RSClient sharedInstance] alias:@"new_user_id"];RSClient.sharedInstance().alias("new_user_id")Alternatively, you can use the following method signature:
| Name | Data type | Presence | Description |
|---|---|---|---|
newId | String | Required | The new userId you want to assign to the user. |
option | RSOption | Optional | Event-level options. |
RudderStack replaces the olduserIdwith thenewUserIdand persists that identification across the sessions.
Reset
You can use the reset method to clear the persisted user traits from the identify call. This is required for the user logout operation.
In session tracking, calling the reset method clears the current sessionId and generates a new one.
[[RSClient sharedInstance] reset];RSClient.sharedInstance().reset()Setting a custom ID
You can pass a custom ID along with the standard userId in all your API calls. RudderStack adds this value under context.externalId.
The SDK does not not persist the externalId information across other API calls. To use it, you will need to pass externalId in every event.
The following snippet shows how to add an externalId to your identify event:
RSOption *eventOption = [[RSOption alloc] init];
[eventOption putExternalId:@"brazeExternalId" withId:@"some_external_id_1"];

[[RSClient sharedInstance] identify:@"1hKOmRA4GRlm" traits:@{@"email": @"alex@example.com"} option:eventOption];let messageOption = RSOption()
messageOption.putExternalId("brazeExternalId", withId: "some_external_id_1")
RSClient.sharedInstance().identify("1hKOmRA4GRlm", traits: ["email": "alex@example.com"], option: messageOption)Enabling/disabling user tracking via the setOptOutStatus API (GDPR support)
RudderStack gives the users (for example, an EU user) the ability to opt out of tracking any user activity until they give their consent. You can do this by leveraging RudderStack’s setOptOutStatus API.
The setOptOutStatus API takes YES/NO (Objective-C) or true/false (Swift) as a Boolean value to enable or disable the user tracking activities. This flag persists across device reboots.
You need to call thesetoptOutStatusAPI with the relevant parameter only once, as the information persists within the device even if you reboot it.
The following snippet highlights the use of the setoptOutStatus API to disable user tracking:
[[RSClient sharedInstance] setOptOutStatus:YES];RSClient.sharedInstance().setOptOutStatus(true)Once the user grants their consent, you can enable user tracking once again using the setOptOutStatus API by passing NO or false:
[[RSClient sharedInstance] setOptOutStatus:NO];RSClient.sharedInstance().setOptOutStatus(false)Supporting push notifications for device mode destinations
With the iOS SDK v2, you need not call the individual destination’s API in your app to implement the push notifications support; calling the SDK’s push notification API is sufficient.
This feature is specific to RudderStack iOS SDK v2 v2 and is not available in the earlier SDK versions. Also, it is only applicable for the device mode integrations.
To enable push notifications for your device mode destinations, the SDK provides the following functions:
- (void)application:(UIApplication *)application didRegisterForRemoteNotificationsWithDeviceToken:(NSData *)deviceToken;

- (void)application:(UIApplication *)application didFailToRegisterForRemoteNotificationsWithError:(NSError *)error;

- (void)application:(UIApplication *)application didReceiveRemoteNotification:(NSDictionary *)userInfo fetchCompletionHandler:(void (^)(UIBackgroundFetchResult result))completionHandler;

- (void)userNotificationCenter:(UNUserNotificationCenter *)center didReceiveNotificationResponse:(UNNotificationResponse *)response withCompletionHandler:(void(^)(void))completionHandler;- func application(_ application: UIApplication, didRegisterForRemoteNotificationsWithDeviceToken deviceToken: Data)
- func application(_ application: UIApplication, didFailToRegisterForRemoteNotificationsWithError error: Error)
- func application(_ application: UIApplication, didReceiveRemoteNotification userInfo: [AnyHashable: Any], fetchCompletionHandler completionHandler: @escaping (UIBackgroundFetchResult) -> Void)
- func userNotificationCenter(_ center: UNUserNotificationCenter, didReceive response: UNNotificationResponse, withCompletionHandler completionHandler: @escaping () -> Void)To implement these functions, go to your AppDelegate file and add the following lines:
- (void)application:(UIApplication *)application didRegisterForRemoteNotificationsWithDeviceToken:(NSData *)deviceToken {
    [[RSClient sharedInstance] application:application didRegisterForRemoteNotificationsWithDeviceToken:deviceToken];
}

- (void)application:(UIApplication *)application didFailToRegisterForRemoteNotificationsWithError:(NSError *)error {
    [[RSClient sharedInstance] application:application didFailToRegisterForRemoteNotificationsWithError:error];
}

- (void)userNotificationCenter:(UNUserNotificationCenter *)center didReceiveNotificationResponse:(UNNotificationResponse *)response withCompletionHandler:(void(^)(void))completionHandler {
    [[RSClient sharedInstance] userNotificationCenter:center didReceive:response withCompletionHandler:completionHandler];
}

- (void)application:(UIApplication *)application didReceiveRemoteNotification:(NSDictionary *)userInfo fetchCompletionHandler:(void (^)(UIBackgroundFetchResult))completionHandler {
    [[RSClient sharedInstance] application:application didReceiveRemoteNotification:userInfo fetchCompletionHandler:completionHandler];
}- func application(_ application: UIApplication, didRegisterForRemoteNotificationsWithDeviceToken deviceToken: Data) {
RSClient.sharedInstance().application(application, didRegisterForRemoteNotificationsWithDeviceToken: deviceToken)
}
- func application(_ application: UIApplication, didFailToRegisterForRemoteNotificationsWithError error: Error) {
RSClient.sharedInstance().application(application, didFailToRegisterForRemoteNotificationsWithError: error)
}
- func userNotificationCenter(_ center: UNUserNotificationCenter, didReceive response: UNNotificationResponse, withCompletionHandler completionHandler: @escaping () -> Void) {
RSClient.sharedInstance().userNotificationCenter(center, didReceive: response, withCompletionHandler: completionHandler)
}
- func application(_ application: UIApplication, didReceiveRemoteNotification userInfo: [AnyHashable: Any], fetchCompletionHandler completionHandler: @escaping (UIBackgroundFetchResult) -> Void) {
RSClient.sharedInstance().application(application, didReceiveRemoteNotification: userInfo, fetchCompletionHandler: completionHandler)
}Setting the device token for push notifications
To pass push notifications to the destinations that support it, you can pass your device token using the setDeviceToken method:
[[RSClient sharedInstance] setDeviceToken:@"example_device_token"];RSClient.sharedInstance().setDeviceToken("example_device_token")RudderStack sets the device token under context.device.token.
Setting the advertisement ID
RudderStack separates the IDFA collection from the core library so that you have better control over it.
You can pass the IDFA to the setAdvertisementId method to set it under context.device.advertisingId:
[[RSClient sharedInstance] setAdvertisingId:[self getIDFA]];

- (NSString*)getIDFA {
    return [[[ASIdentifierManager sharedManager] advertisingIdentifier] UUIDString];
}RSClient.sharedInstance().setAdvertisingId(getIDFA())
func getIDFA() -> String {
return ASIdentifierManager.shared().advertisingIdentifier.uuidString
}ATTrackingManager authorization consent
You can pass ATTrackingManager.trackingAuthorizationStatus to RudderStack and it is passed along to the relevant destinations as configured.
For example, AppsFlyer accepts this parameter for the attribution to work in their server-to-server events flow.
[[RSClient sharedInstance] setAppTrackingConsent:RSAppTrackingConsentAuthorize];RSClient.sharedInstance().setAppTrackingConsent(.authorize)You can pass the following options to the setAppTrackingConsent method to set the relevant authorization consent:
RSATTNotDeterminedRSATTRestrictedRSATTDeniedRSATTAuthorize
Filtering device mode events
When sending events to a destination via device mode, you can explicitly specify which events should be discarded or allowed to flow through - by allowlisting or denylisting them.
Refer to the Client-side Event Filtering guide for more information on this feature.
Enabling/disabling events for specific destinations
The RudderStack iOS SDK v2 lets you enable or disable event flow to a specific destination or all the destinations to which the source is connected. You can specify these destinations by creating a RSOption object as shown:
RSOption *option = [[RSOption alloc]init];
//default value for `All` is true
[option putIntegration:@"All" isEnabled:YES];
// specifying destination by its display name
[option putIntegration:@"Amplitude" isEnabled:YES];
[option putIntegration:@"<DESTINATION_DISPLAY_NAME>" isEnabled:<BOOLEAN>];let option:RSOption = RSOption();
//default value for `All` is true
option.putIntegration("All", isEnabled:true)
// specifying destination by its display name
option.putIntegration("Amplitude", isEnabled:true)
option.putIntegration(<DESTINATION_DISPLAY_NAME>, isEnabled:<BOOLEAN>)The keyword All in the above snippet represents all the destinations the source is connected to. The SDK sets its value to true by default.
Make sure theDESTINATION_DISPLAY_NAMEyou specify above should exactly match the destination name as shown in the RudderStack dashboard.
You can pass the destinations specified to the SDK in the following two ways:
Method 1: Passing destinations while initializing the SDK
This approach is helpful when you want to enable/disable sending the events to the destinations across all the event calls made using the SDK.
RSOption *defaultOption = [[RSOption alloc] init];
[defaultOption putIntegration:@"Amplitude" isEnabled:YES];

[[RSClient sharedInstance] setOption:defaultOption];let defaultOption = RSOption()
defaultOption.putIntegration("Amplitude", isEnabled: true)
RSClient.sharedInstance().setOption(defaultOption)Method 1: Passing destinations while initializing the SDK
This approach is helpful when you want to enable/disable sending only specific events to the destinations.
RSOption *eventOption = [[RSOption alloc] init];
[eventOption putIntegration:@"Amplitude" isEnabled:YES];

[[RSClient sharedInstance] track:@"sample_track" properties:@{@"key_1": @"value_1", @"key_2": @"value_2"} option:eventOption];let eventOption = RSOption()
eventOption.putIntegration("MoEngage", isEnabled: true)
RSClient.sharedInstance().track("sample_track", option: eventOption)If you use the RSOption object to specify the destinations both while initializing the SDK as well as making an event call, then RudderStack will consider only the destinations specified at the event level.
Debugging
If you run into any issues regarding the RudderStack iOS SDK v2, you can enable VERBOSE or DEBUG logging to determine the issue.
To enable the logging, change your RSClient initialization as shown:
RSConfig *config = [[RSConfig alloc] initWithWriteKey:WRITE_KEY];
[config dataPlaneURL:DATA_PLANE_URL];
[config loglevel:RSLogLevelDebug];

[[RSClient sharedInstance] configureWith:config];let config: RSConfig = RSConfig(writeKey: WRITE_KEY)
.dataPlaneURL(DATA_PLANE_URL)
.loglevel(.debug)
RSClient.sharedInstance().configure(with: config)Adding Chromecast support
Google Chromecast is a device that plugs into your TV or monitor with an HDMI port, and can be used to stream content from your phone or computer.
RudderStack supports integrating iOS SDK v2 with your Cast app. Follow these instructions to build your iOS sender app. Then, add the iOS SDK v2 to it. Follow the Google Cast developer guide for more details.
Developing a device mode destination
This section details the steps required to develop a device mode destination in case RudderStack doesn’t support it already.
More information on the RudderStack device mode can be found in the Connection Modes guide.
- Create a
RSCustomDestination.swiftfile by extendingRSDestinationPlugin:
class RSCustomDestination: RSDestinationPlugin {
    var key: String = "Custom"
    var controller = RSController()
    var type: PluginType = .destination
    var RSClient.sharedInstance(): RSClient?

    func update(serverConfig: RSServerConfig, type: UpdateType) {
        guard type == .initial else { return }
        // Some code
    }

    func track(message: TrackMessage) -> TrackMessage? {
        // Some code
        return message
    }

    func identify(message: IdentifyMessage) -> IdentifyMessage? {
        // Some code
        return message
    }

    func screen(message: ScreenMessage) -> ScreenMessage? {
        // Some code
        return message
    }

    func group(message: GroupMessage) -> GroupMessage? {
        // Some code
        return message
    }

    func alias(message: AliasMessage) -> AliasMessage? {
        // Some code
        return message
    }

    func flush() {
        // Some code
    }

    func reset() {
        // Some code
    }
}- Then, create a
CustomDestinationclass file by extendingRudderDestinationand initializeRSCustomDestinationinsideinit():
@objc
class CustomDestination: RudderDestination {
    override init() {
        super.init()
        plugin = RSCustomDestination()
    }
}
For Objective-C projects, a dialog box will appear while creating the Swift file - asking you to create a bridging header if it does not exist already. In this case, choose Create Bridging Header. This creates a
<PROJECT_MODULE_NAME>-Bridging-Header.hfile.After creating the Bridging Header, search Objective-C Generated Interface Header Name in Build Settings and keep the header name handy. This should be something like
<PROJECT_MODULE_NAME>-Swift.h.Finally, add the
CustomDestinationwith the RudderStack iOS SDK v2 after its initialization:
RSClient.sharedInstance().addDestination(CustomDestination())#import "<project_module_name>-Swift.h"
[[RSClient sharedInstance] addDestination:[[CustomDestination alloc] init]];Privacy manifest
Your apps and third-party SDKs (usually distributed as Swift packages, XCFrameworks, or framework bundles) contain a privacy manifest file named PrivacyInfo.xcprivacy. It records the data collected by your app/third-party SDK and the associated required reason API.
You need to record the reasons in your privacy manifest for each data type your app/SDK collects along with the category of required reasons API that it uses.
See the Apple developer documentation for more information on creating a privacy manifest.
Starting Spring 2024, you are required to include an approved reason in your app’s privacy manifest that accurately reflects how your app uses the API.
This is a mandatory requirement to upload a new app/app update to the App Store Connect. For more information, see this Apple update.
Privacy Accessed API Types
NSPrivacyAccessedAPITypes is an array of dictionaries describing the API types your app/third-party SDK accesses that have been designated as APIs that require reasons to access.
The RudderStack iOS SDK v2 only uses the userDefaults API to store user and context information and it is declared in the privacy manifest in the iOS SDK v2 repository.
Privacy tracking domains
NSPrivacyTrackingDomains is an array of strings listing the internet domains that your app/third-party SDK connects to for tracking purposes. If the user has not granted the tracking permissions through the App Tracking Transparency framework, the network requests to these domains fail and you get an error on your app.
If your application utilizes data for tracking users as outlined by Apple, it is important to seek the user’s consent first. Also, make sure to include the following domain in your app’s privacy manifest under the purpose NSPrivacyTrackingDomains:
rudderstack.com/
Privacy Nutrition Label Types
NSPrivacyCollectedDataTypes is an array of dictionaries that describe the data types your app/third-party SDK collects.
The RudderStack iOS SDK v2 includes an array of Privacy Nutrition Label Types for the following automatically-collected fields:
| Data | Linked to user | Used for tracking | Collection purpose |
|---|---|---|---|
| App version | No | No |
|
| App name | No | No |
|
| Device ID | No | No |
|
See the Apple developer documentation for more information on the above collection purposes.
FAQ
I’m facing issues building with Carthage on XCode 12. What should I do?
If you’re facing an issue with Carthage and XCode 12, you can follow this workaround suggested by the Carthage team.
Does the iOS SDK v2 support the tvOS, macOS, and watchOS platforms?
Yes, the iOS SDK v2 supports tvOS and watchOS platforms. Refer to the table below for the version details:
| Platform | Supported SDK version |
|---|---|
| tvOS | 1.1.0 and above |
| watchOS | 1.3.0 and above |
| macOS | 2.0.0 and above |
How do I migrate from an older SDK version (v1.x) to the current version?
To migrate from the older SDK versions, update the usage of the following classes:
| Previous Name | Updated Name |
|---|---|
RudderClient | RSClient |
RudderConfig | RSConfig |
RudderLogLevelDebug | RSLogLevelDebug |
How can I get the user traits after making the identify call?
You can get the user traits after making an identify call in the following way:
let traits = RSClient.sharedInstance().traitsNSDictionary *traits = [RSClient sharedInstance].traits;
// or
NSDictionary *traits = [[RSClient sharedInstance] traits];How does the SDK handle different client/server errors?
In case of client-side errors, for example, if the source write key passed to the SDK is incorrect, RudderStack gives a 400 Bad Request response and aborts the operation immediately. For other types of network errors, for example, invalid data plane URL, the SDK tries to flush the events to RudderStack in an incremental manner (every 1 second, 2 seconds, 3 seconds, and so on).
Why is there a difference between timestamp and received_at for iOS events vs. Android events sent at the same time?
This scenario is most likely caused by the default behavior of iOS apps staying open in the background for a short period of time after a user closes them.
When a user closes an iOS or Android app, the events will still continue to be sent from the queue until the app closes in the background. Any events still in the queue will be retained until the user reopens the app. Due to this lag, there are some scenarios where there can be significant differences between timestamp (when the event was created) and received_at (when RudderStack actually receives the event).
For Android apps, events can be sent from the background after apps close for a longer period of time than iOS apps, therefore, more of the events coming from the Android (Java) SDK have closer timestamp and received_at times.
Does RudderStack integrate with SKAdNetwork?
RudderStack does not integrate with SKAdNetwork. However, SKAdNetwork can be directly integrated into an iOS application alongside RudderStack.
Can I disable event tracking until the user gives their consent?
Yes, you can. Refer to the Enabling/disabling user tracking via the setOptOutStatus API section for more information.
Why am I getting a warning in Points of Interest instruments?
You may get a warning in your Points of Interest instrument if rudderstack.com/ is not listed in your app’s NSPrivacyTrackingDomain key in any privacy manifest. It may be following users across multiple apps and websites to create user profiles for apps that contact this domain.
To resolve this issue, make sure to:
- Seek user consent, especially if your app utilizes data for tracking users as outlined by Apple.
- Include the
rudderstack.com/domain in your app’s privacy manifest under the purposeNSPrivacyTrackingDomains. See Privacy tracking domains for more information.
