The RudderDBEncryption class accepts the following parameters:
Parameter
Type
Description
Default value
enable
bool
Specifies whether to encrypt/decrypt the database.
False
encryption_key
String
Key used to encrypt/decrypt the database.
-
To remove encryption from a database, configure the RudderDBEncryption object with your encryption key and set enable to false.
Instructions for iOS
The rudder_plugin_db_encryption uses the SQLCipher Cocoapod under the hood to perform encryption. This Cocoapod requires the removal of any references to the standard SQLite system library for it to function as expected.
If you set up a project to inadvertently include a linking reference against the standard SQLite library before SQLCipher, it is possible that the application builds and runs correctly but does not use SQLCipher for encryption. This is not a problem for most projects but there are certain cases where unintentional SQLite linking can occur.
One such example is when using CocoaPods or some other sub-project that declares a dependency on the SQLite3 library. In this case, adding a pod to a project can silently modify the project settings in such a way that SQLCipher is not properly linked.
You can identify and fix the above linking issue during the development stage by looking for the below error log from the SDK:
RSDBPersistentManager: createDB: Cannot encrypt the Database as SQLCipher wasn't linked correctly.
To fix the linking issue, add a linker flag to your project settings to ensure that the Xcode links SQLCipher before SQLite. Follow these steps:
Open the project-level build settings. These are the global project settings, not for the individual application target.
Locate the Other Linker Flags setting and add one of the following commands depending on how you are integrating SQLCipher into the app.
If you are not adding SQLCipher into the app on your own and only using rudder_plugin_db_encryption, then see only the points 3 and 4 in the below table - depending on whether you are using use_frameworks! in your app’s ios/Podfile.
Scenario
Command
Notes
When using SQLCipher commercial edition static libraries
Adjust according to the path to the libsqlcipher-ios.a you received as a part of the package.
When using the sqlcipher.xcodeproj included in the SQLCipher Git repository
$(BUILT_PRODUCTS_DIR)/libsqlcipher.a
-
When using the SQLCipher CocoaPod with the use_frameworks Podfile setting enabled
-framework SQLCipher
-
When using the SQLCipher CocoaPod without the use_frameworks Podfile setting enabled
-lSQLCipher
-
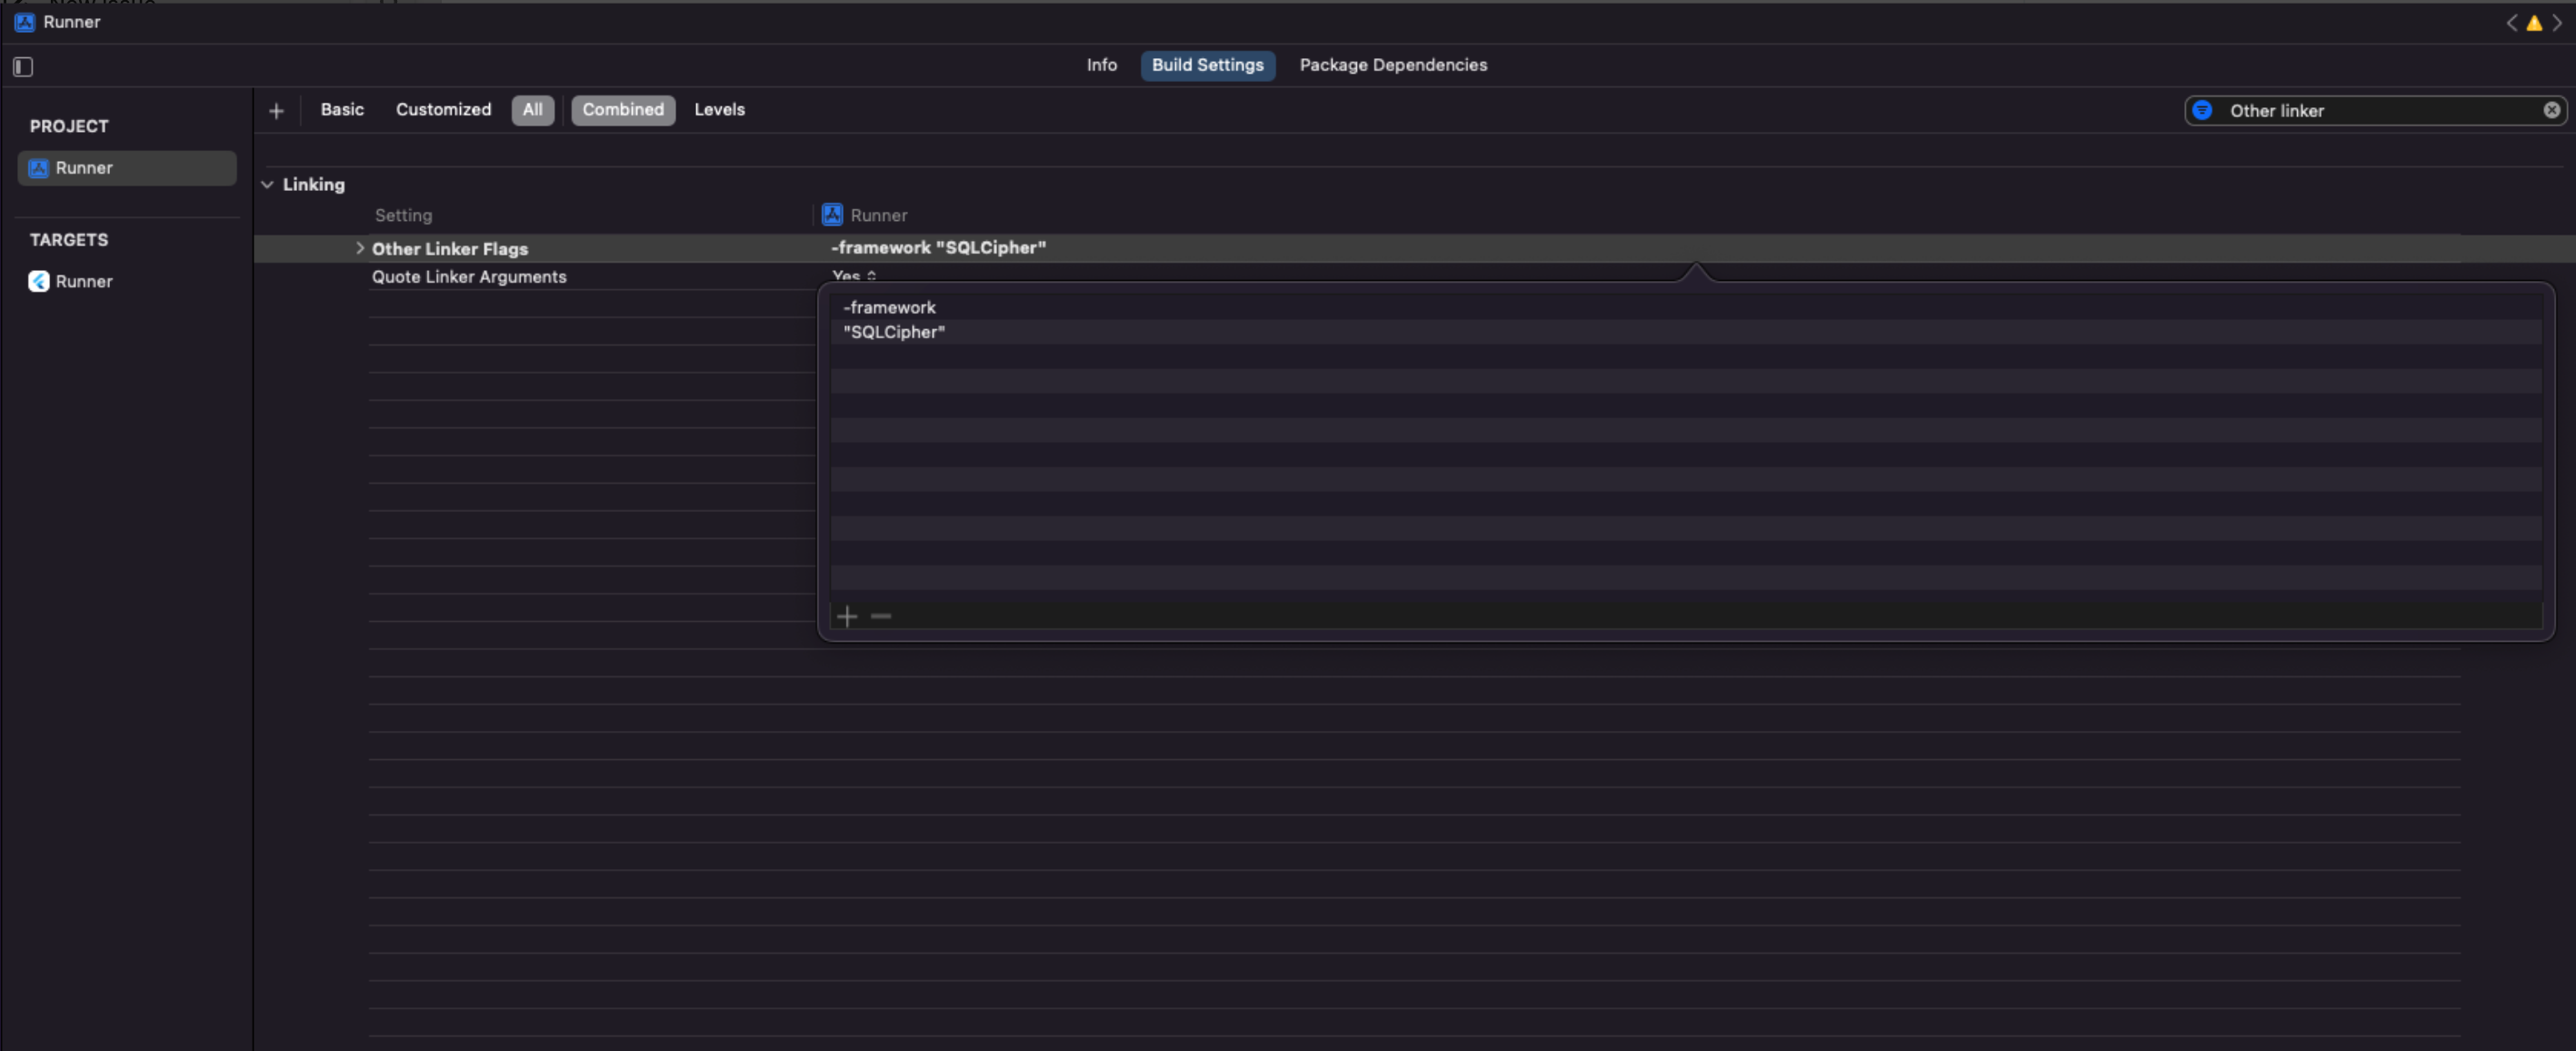
Once the linker flag is added to the project-level build settings, you should see something like the below image:
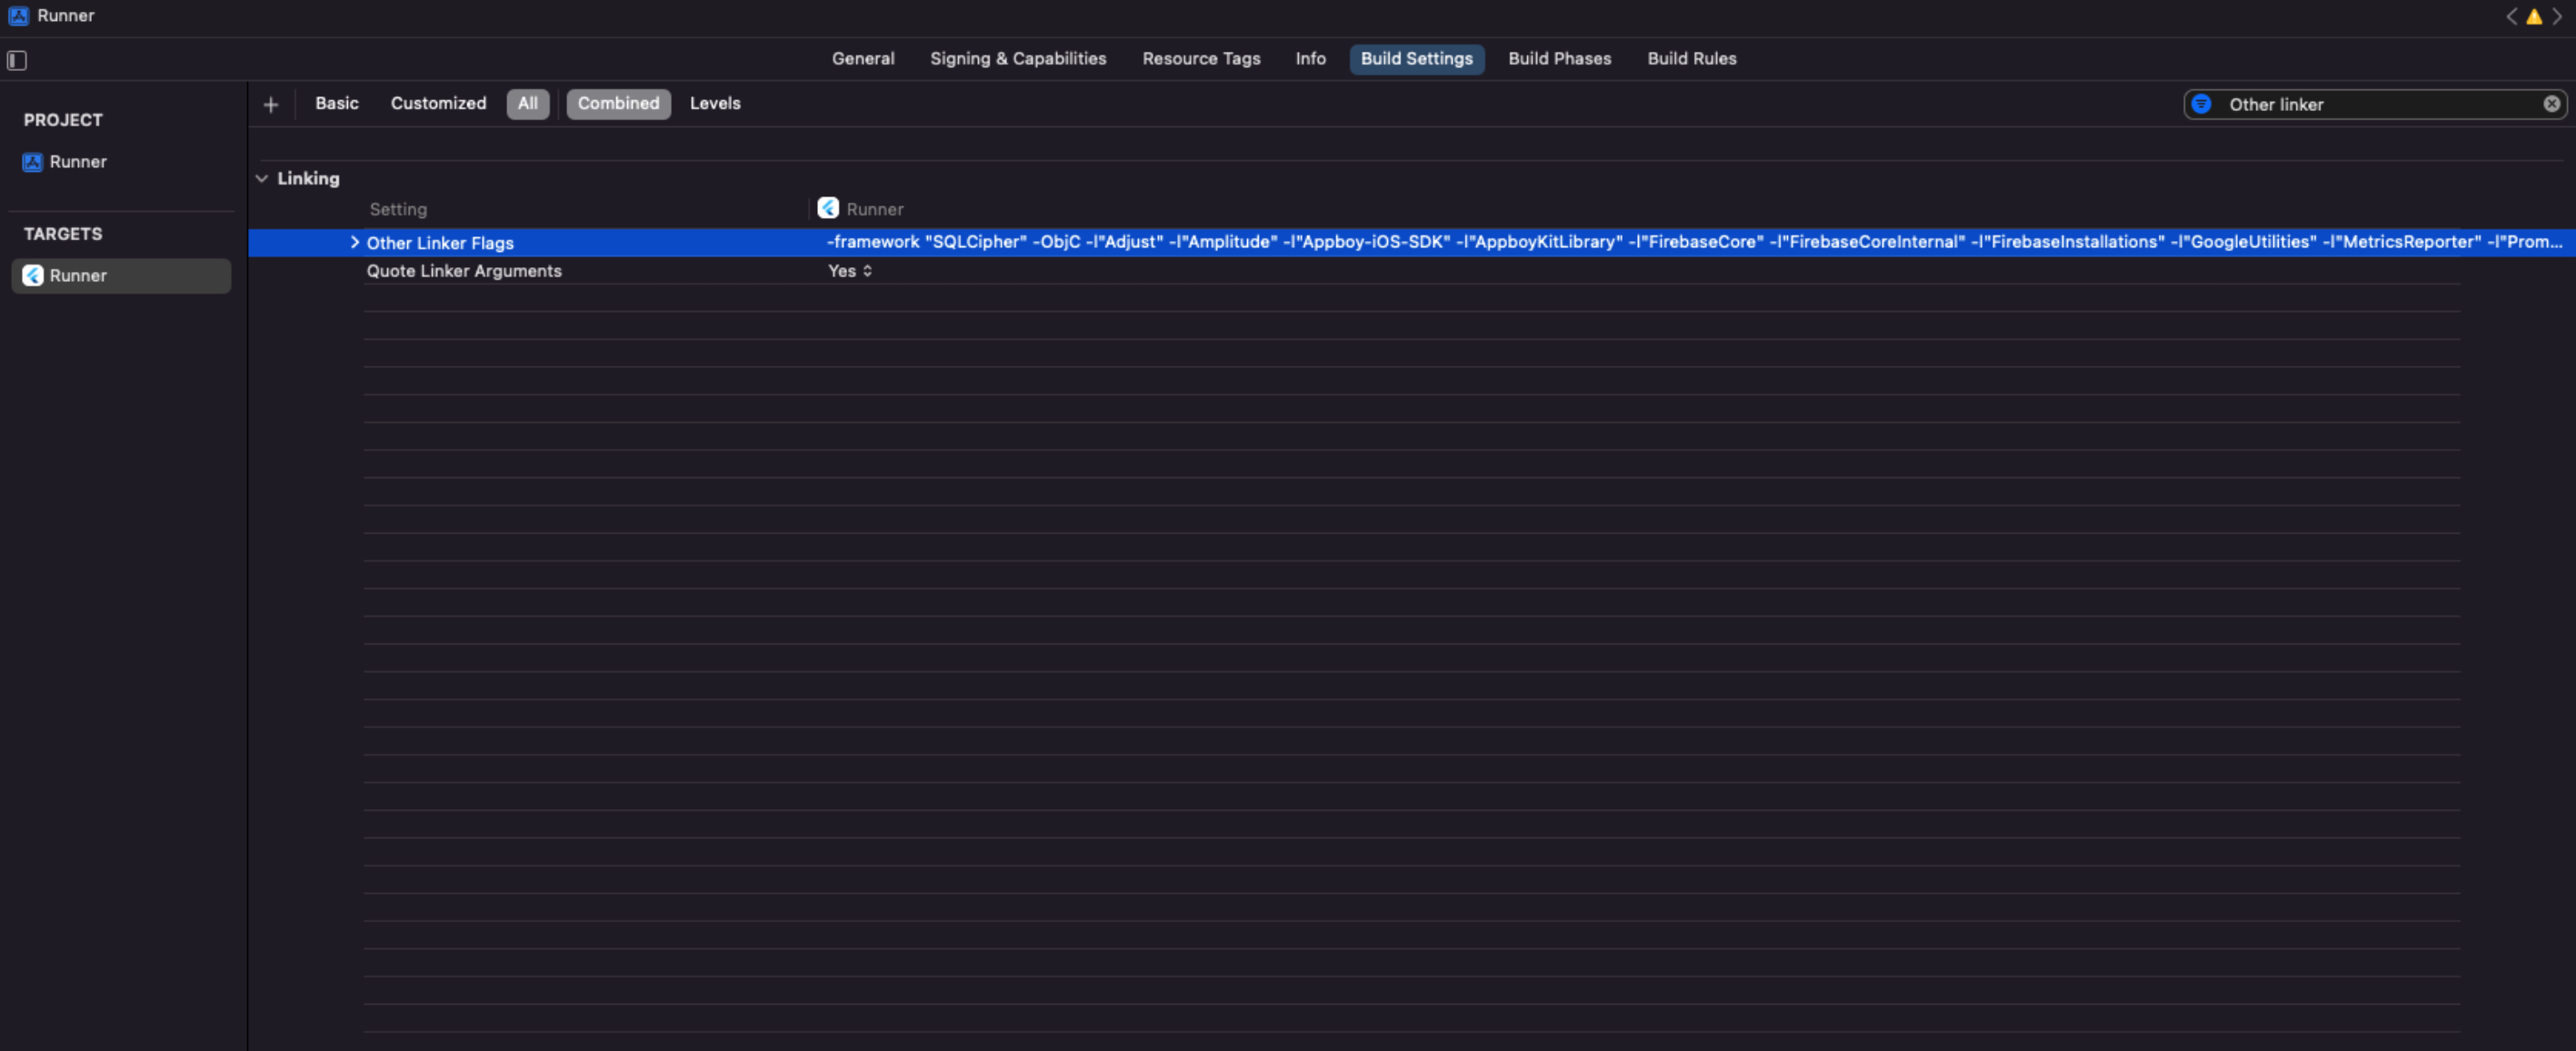
After adding the linker flag to your project-level build settings, check the target-level build settings to ensure SQLCipher is shown first, as seen below:
Gzipping requests
This feature is supported only for the mobile platforms.
The Flutter SDK automatically gzips event requests before sending it to the RudderStack backend (data plane) for processing. However, you can disable this by setting the gzip parameter to false while initializing the SDK:
RudderStack lets you opt out of tracking any user activity until the user gives their consent. You can do this using the SDK’s optOut API.
The optOut API is available in the Flutter SDK starting from version 1.0.6.
The optOut API takes a Boolean value to enable or disable tracking user activities. This flag persists across device reboots.
The following snippet highlights the use of the optOut API to disable user tracking:
rudderClient.optOut(true);
Once the user grants their consent, you can enable user tracking by passing false to the optOut API:
rudderClient.optOut(false);
Filtering events
When sending events to a destination via the device mode, you can explicitly specify the events to be sent or discarded by allowlisting or denylisting them.
Enabling/disabling events for specific destinations
The Flutter SDK lets you enable or disable sending events to a specific destination or all destinations connected to a source. You can specify these destinations by creating an object shown in the following snippet:
RudderOptionoptions=newRudderOption();// represents all destinations connected to the source, the default value is true.
options.putIntegration("All",false);// specifying destination by its display name
options.putIntegration("Mixpanel",false);// specifying destination by its Factory object
options.putIntegrationWithFactory(Appcenter(),true);
Make sure the destination names that you pass while specifying the destinations match exactly with the names listed in the RudderStack dashboard.
You can pass the destinations to the SDK in the following two ways:
Method 1. Passing destinations while initializing the SDK
This is helpful when you want to enable or disable sending the events to the destinations across all the API calls made using the SDK.
If you specify the destinations while initializing the SDK and in the event, then the SDK considers only the destinations specified at the event level.
Setting custom objects for destinations
Starting from v2.4.0, you can also use the putIntegration method on the RudderOption object to set custom objects used by the device mode destinations.
Note that:
This feature is applicable only for the web platform.
For mobile platforms, the putIntegration method accepts the custom objects but does not set them for the destination. Instead, it only enables sending events to that destination (equivalent to options.putIntegration("<destination>", true);).
An example of setting a custom object to Google Analytics 4 via a track call:
To explicitly pass your Android AAID or iOS IDFA, you can use the SDK’s putAdvertisingId method.
The putAdvertisingId method accepts a string argument <ADVERTISING_ID> which corresponds to your Android advertisingId(AAID) or iOS advertisingId (IDFA).
An example of how to use putAdvertisingId is shown below:
You can use your device token to pass push notifications to the destinations that support them. RudderStack sets this token under context.device.token. To set a custom device token, the SDK supports the putDeviceToken method.
An example of setting a custom device token is shown below:
rudderClient.putDeviceToken(<DEVICE_TOKEN>);
Sending events to web device mode destinations
RudderStack does not support sending events from the Flutter SDK to your destinations in web device mode due to some limitations. If you are deploying a Flutter app to the web, you can send events to these destinations in cloud mode only.
For detailed logs, set the log level to DEBUG or VERBOSE.
FAQ
Can I apply encryption only on new databases?
Database encryption works on new and existing databases. Pass the RudderDBEncryption object while initializing the Flutter SDK.
Can I remove encryption from an encrypted database?
Yes, you can. If the database is already encrypted, you can decrypt the database by configuring the RudderDBEncryption object with your encryption key and setting enable to false.
What happens if the supplied encryption key is different to the one the database is encrypted with?
After you encrypt the database:
If no key is provided, then the SDK deletes the current database with unsent events and creates a new unencrypted database instead.
If a wrong key is provided, then the SDK deletes the current database with unsent events and creates a new encrypted database with the given key.
This site uses cookies to improve your experience while you navigate through the website. Out of
these
cookies, the cookies that are categorized as necessary are stored on your browser as they are as
essential
for the working of basic functionalities of the website. We also use third-party cookies that
help
us
analyze and understand how you use this website. These cookies will be stored in your browser
only
with
your
consent. You also have the option to opt-out of these cookies. But opting out of some of these
cookies
may
have an effect on your browsing experience.
Necessary
Always Enabled
Necessary cookies are absolutely essential for the website to function properly. This
category only includes cookies that ensures basic functionalities and security
features of the website. These cookies do not store any personal information.
This site uses cookies to improve your experience. If you want to
learn more about cookies and why we use them, visit our cookie
policy. We'll assume you're ok with this, but you can opt-out if you wish Cookie Settings.