Set up RudderStack to build automated features in the RudderStack UI
6 minute read
Setting up automated features in the RudderStack UI is a straight-forward process. Predictive features are configured within a Profiles project and automatically added to the feature table output when the project is run.
Project setup
Follow the steps below to set up a project and build predictive features:
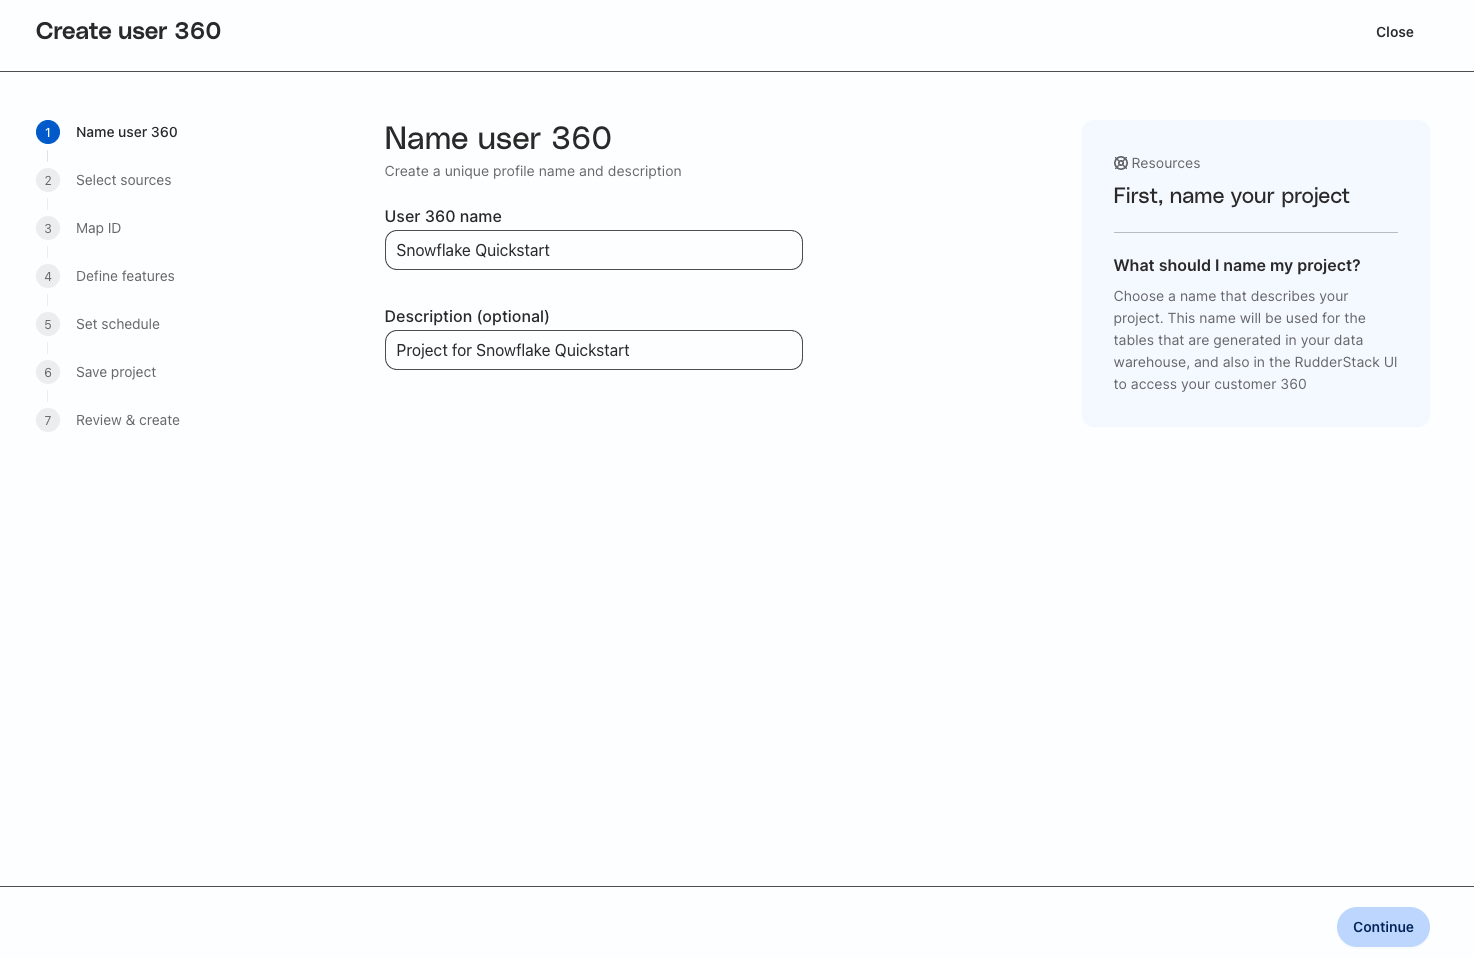
Enter a unique name and description for the Profiles Project where you want to build the predictive features.
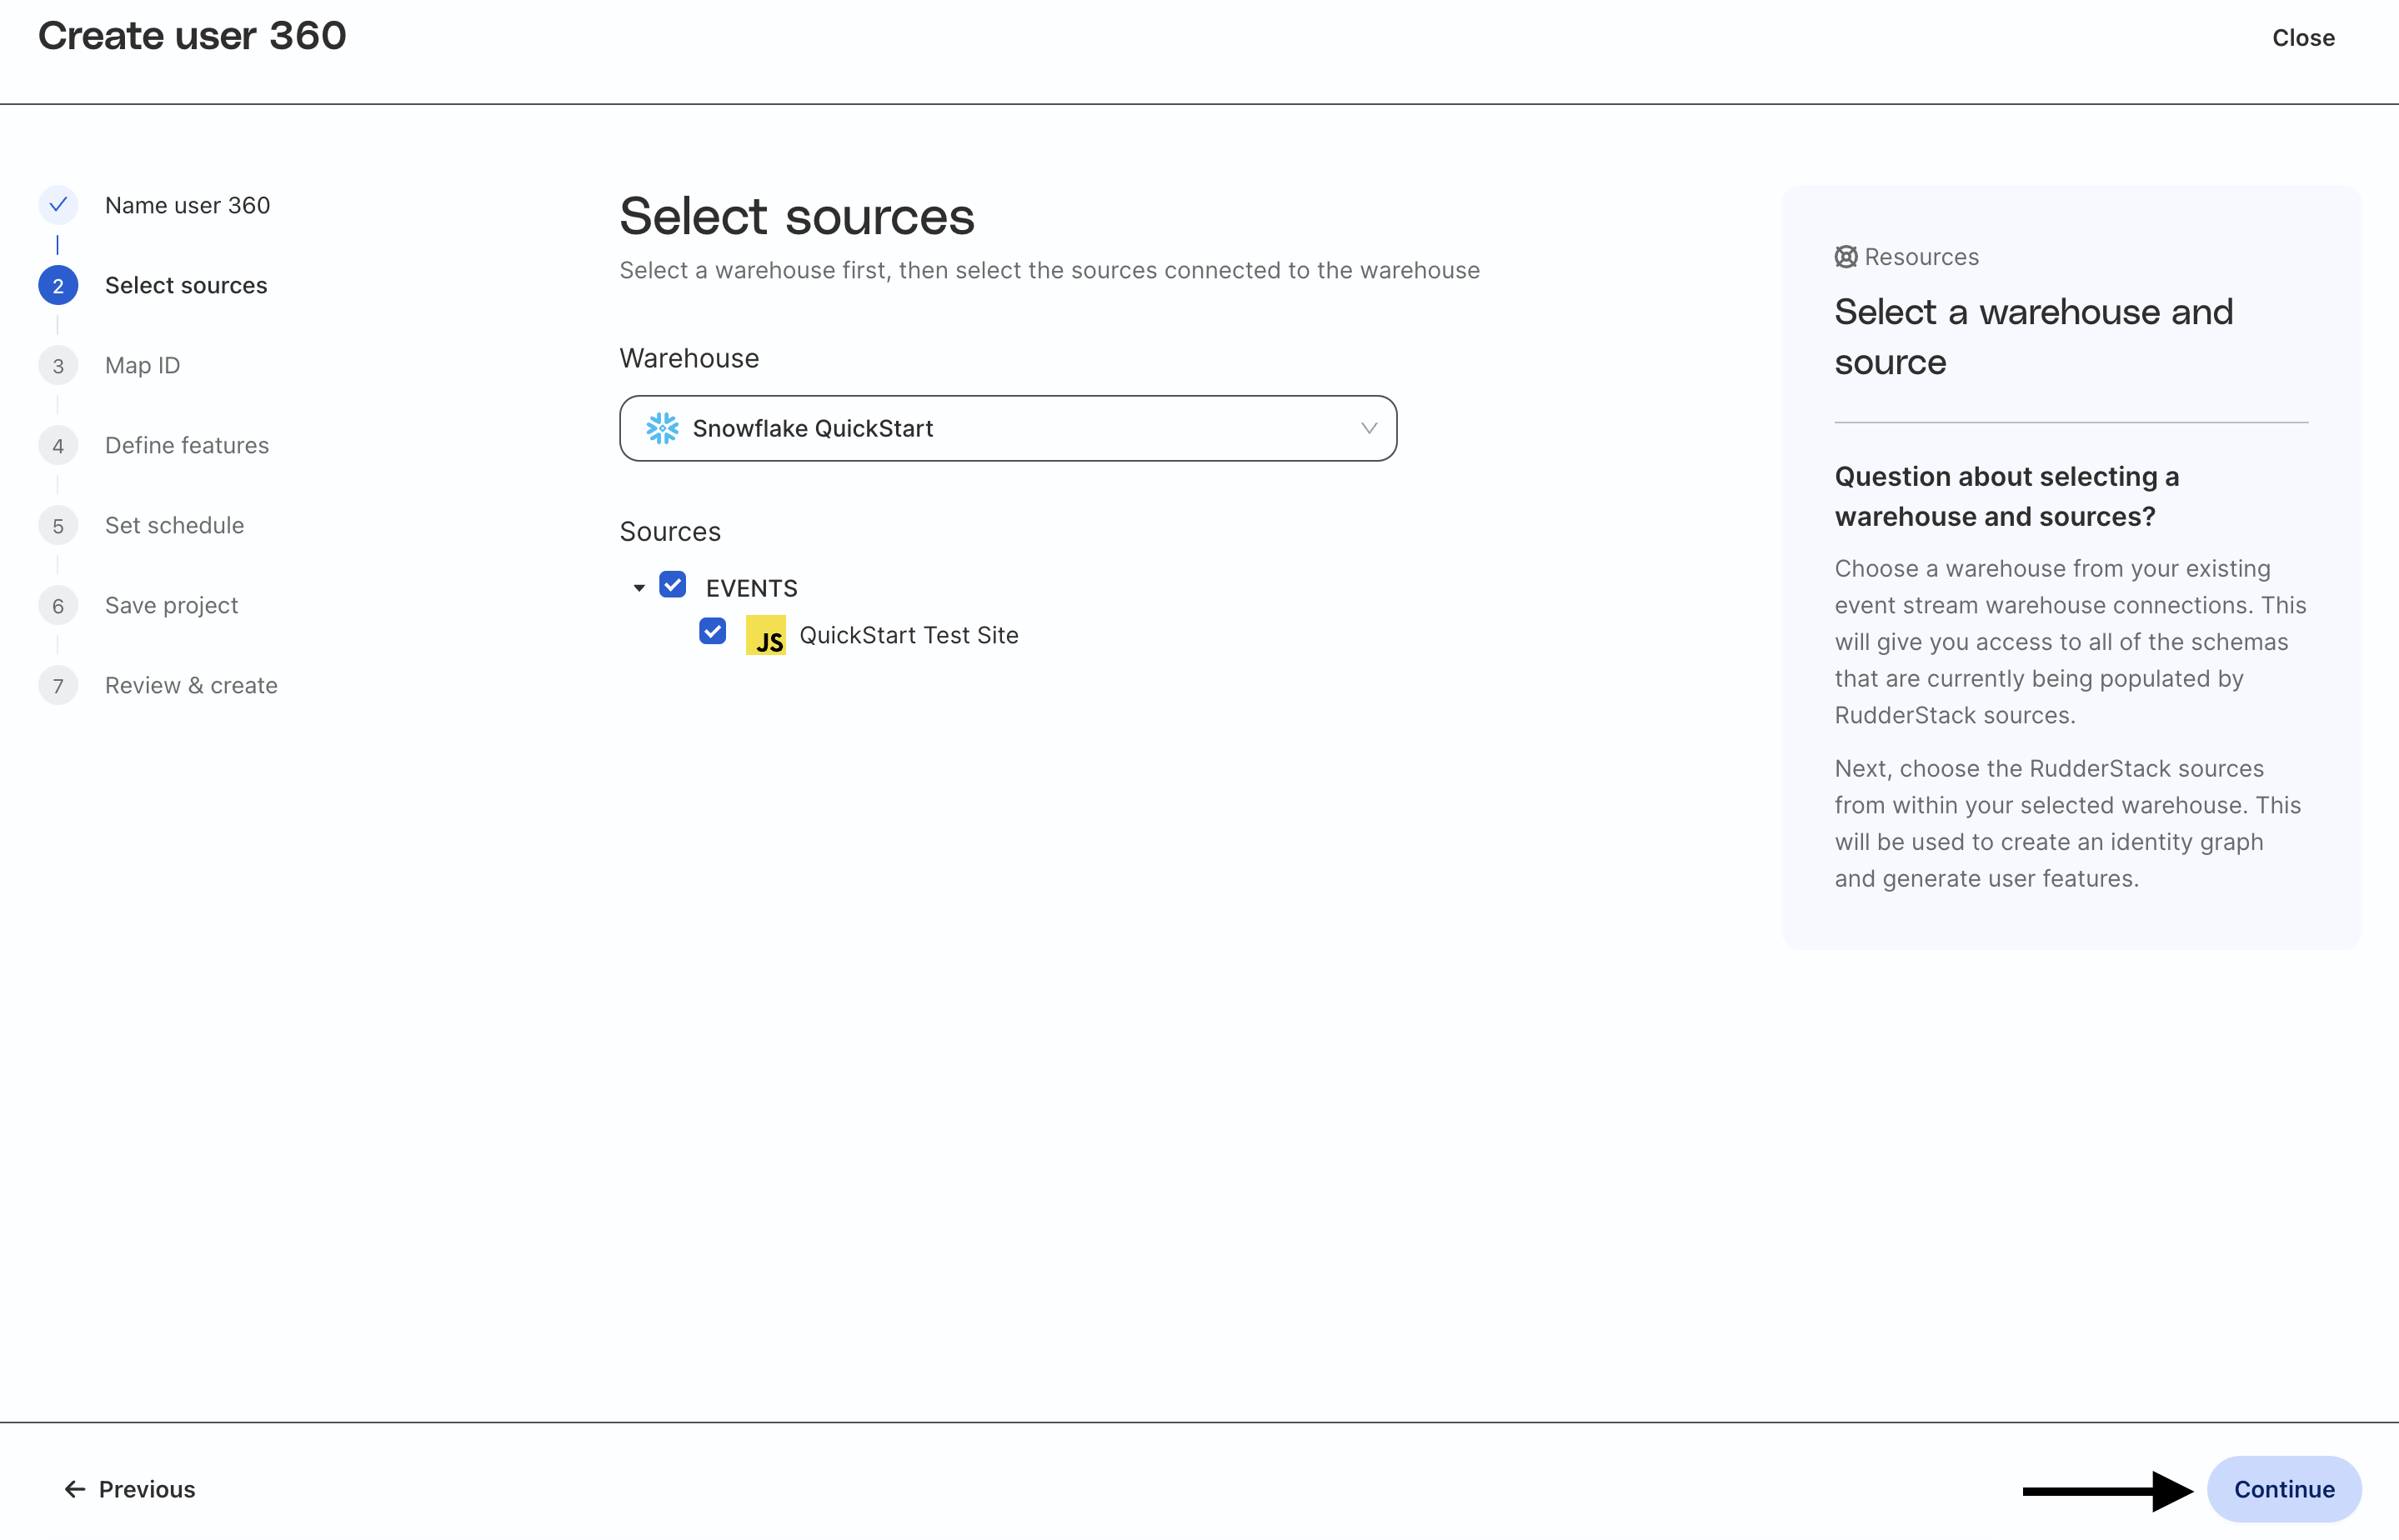
Select sources
Select your Snowflake warehouse. If you have not configured the Snowflake warehouse, set up an event stream connection to Snowflake in RudderStack (see details here) and refer to the setup steps above.
Once you select the warehouse, you will be able to choose from RudderStack event sources that are connected to Snowflake. In this example, the JavaScript source created above is used to write to the same schema as the sample data. Profiles will use the PAGES, TRACKS, IDENTIFIES, and ORDER_COMPLETED tables from that schema to build automated and predictive features.
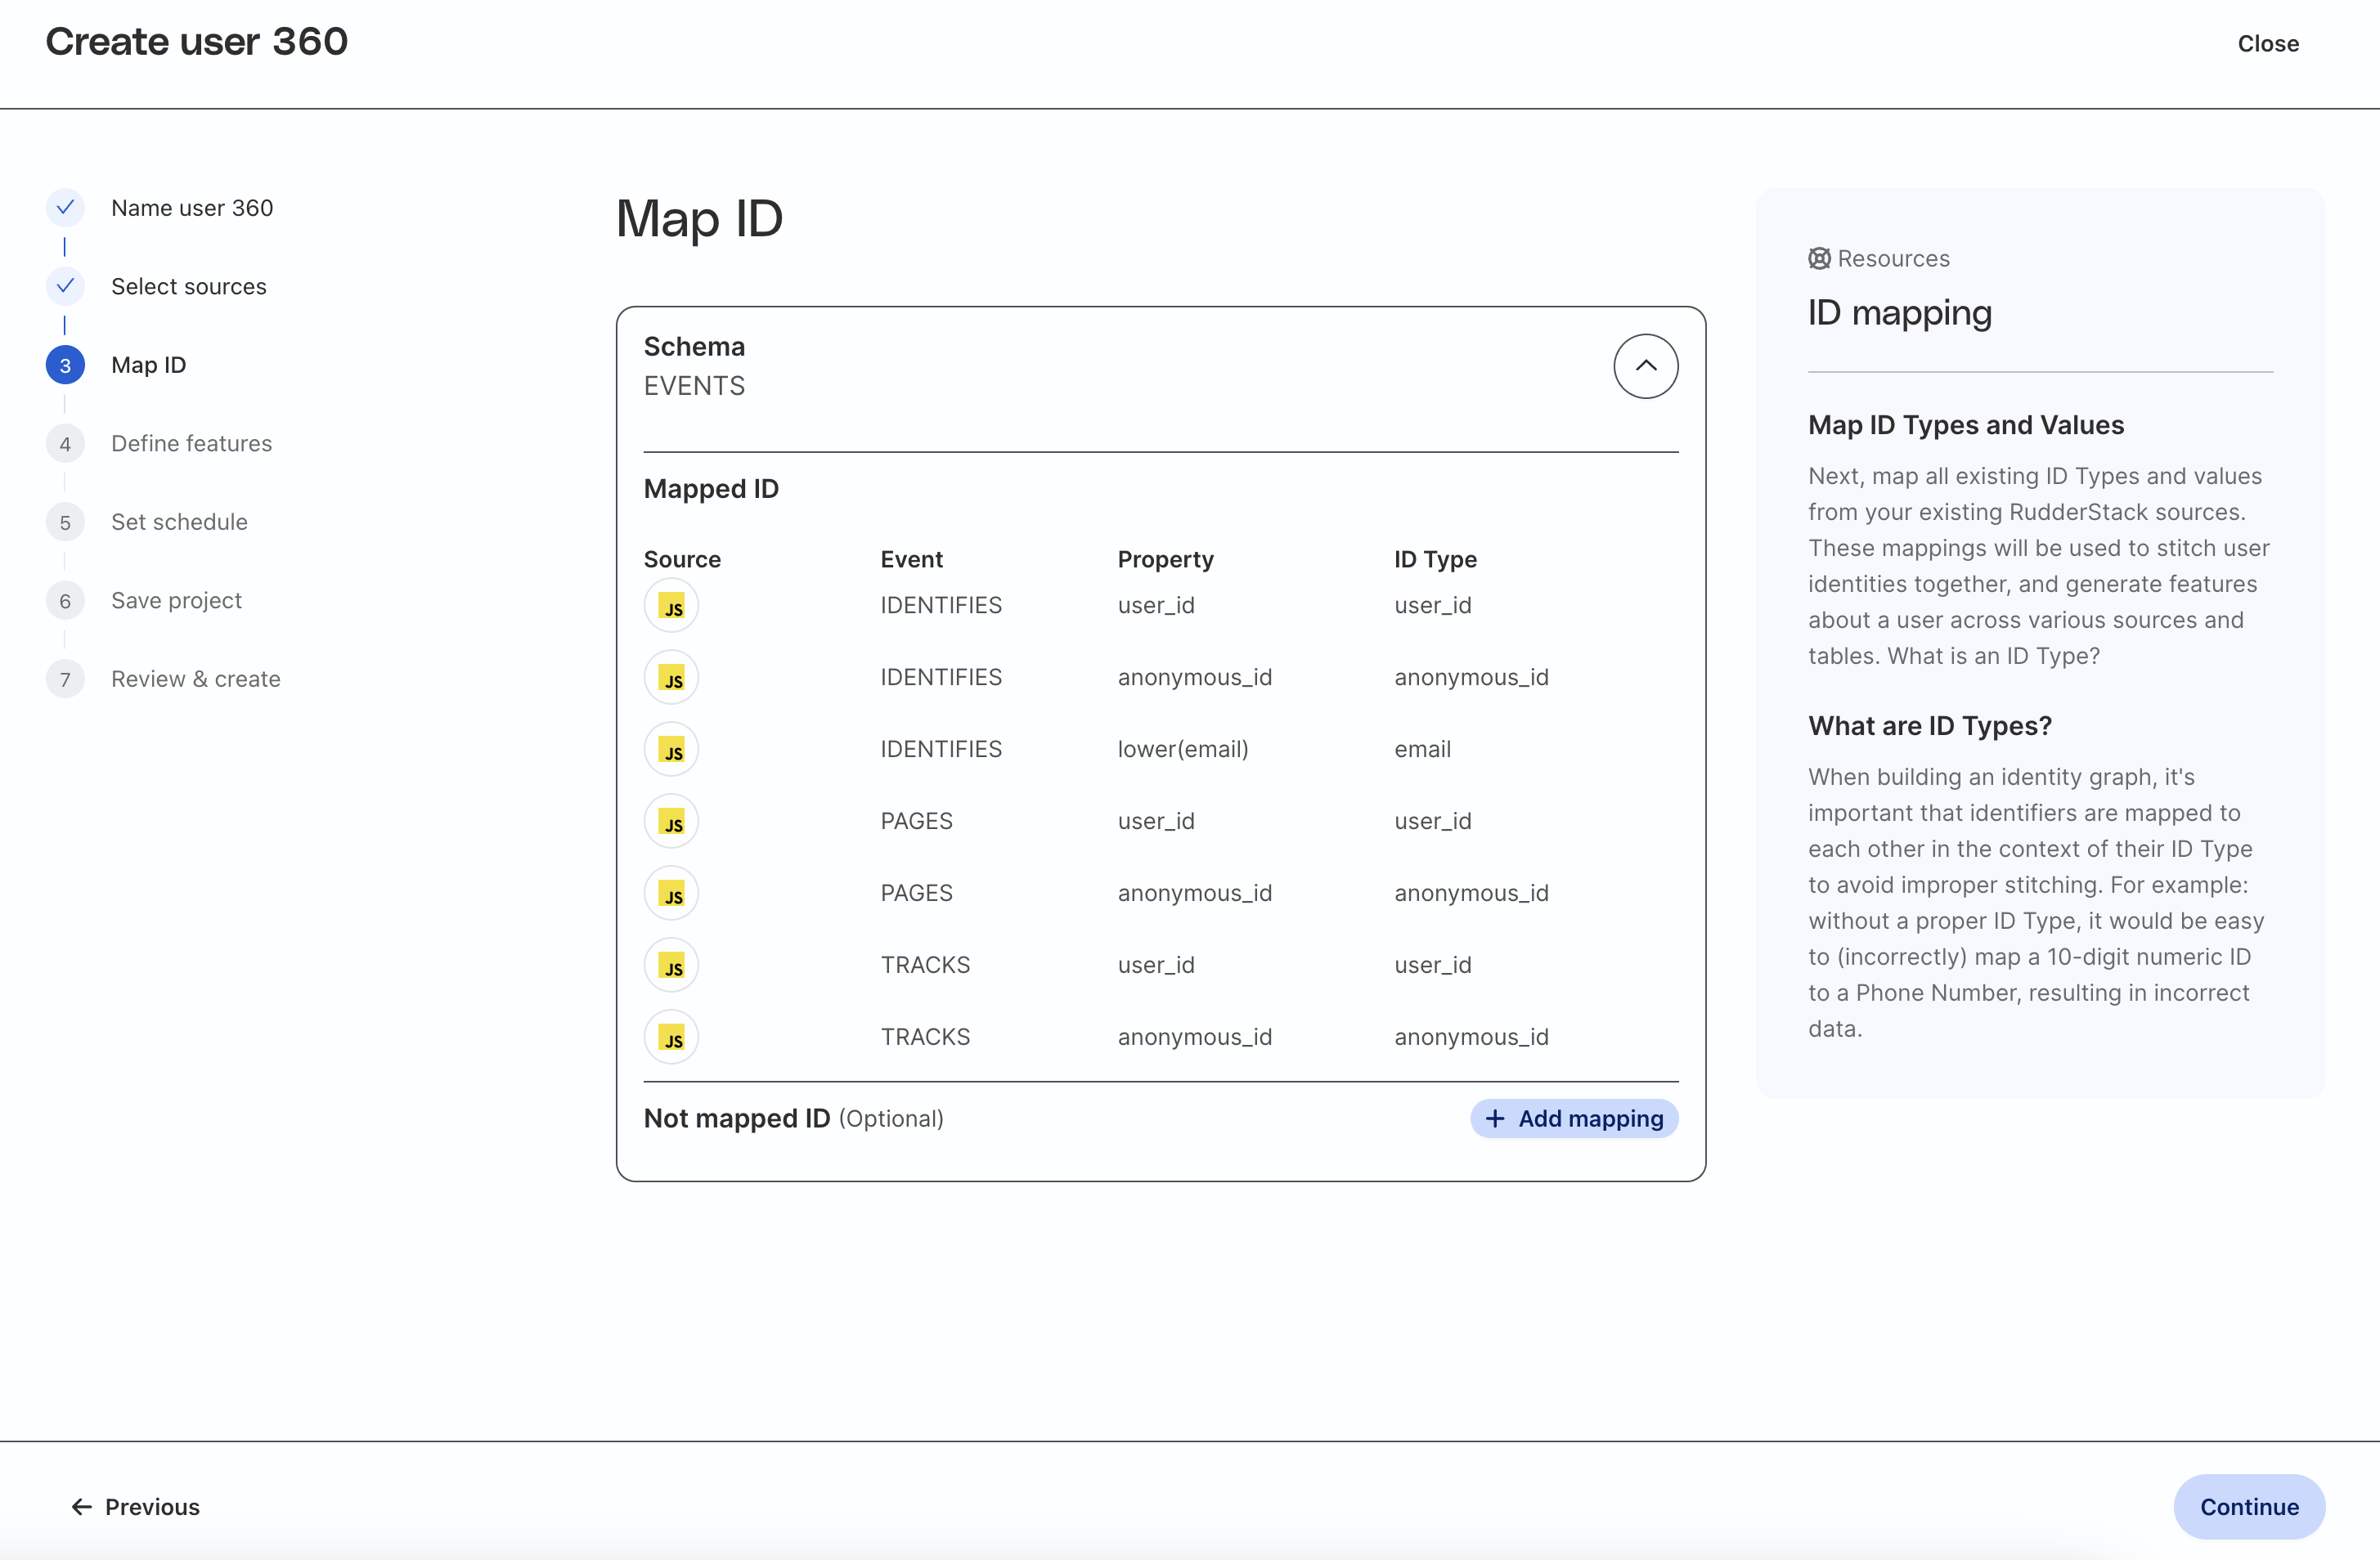
Map ID fields
Map the fields from the source table(s) to the correct type of ID. The standard ID types are:
user_id
anonymous_id
email
Note that for RudderStack event sources, standard ID column names will be mapped for you automatically. If you have included additional identifiers in your payloads, you can map those custom column names to standard identifiers by clicking Add mapping at the bottom of the table.
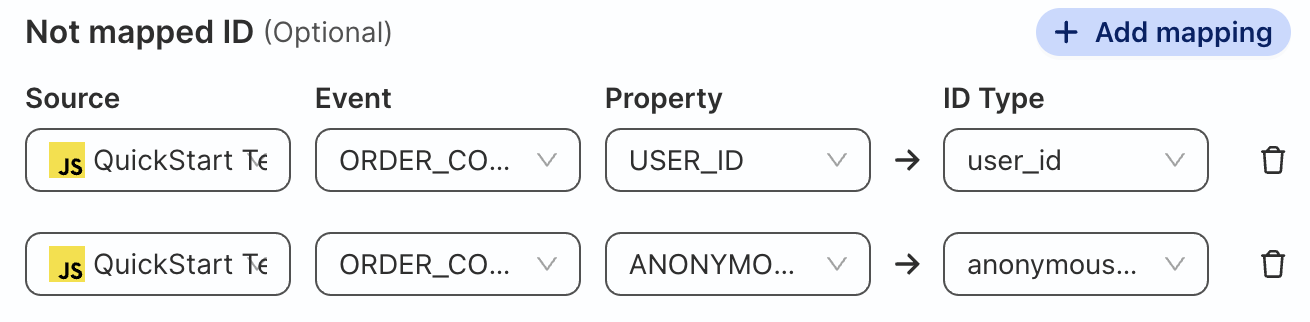
Map Order_Completed table
Click on Add mapping and map the USER_ID and ANONYMOUS_ID columns to standard identifiers to include the ORDER_COMPLETED table as a source for the identity graph and user features.
Source
Event
Property
ID Type
QuickStart Test Site
ORDER_COMPLETED
USER_ID
user_id
QuickStart Test Site
ORDER_COMPLETED
ANONYMOUS_ID
anonymous_id
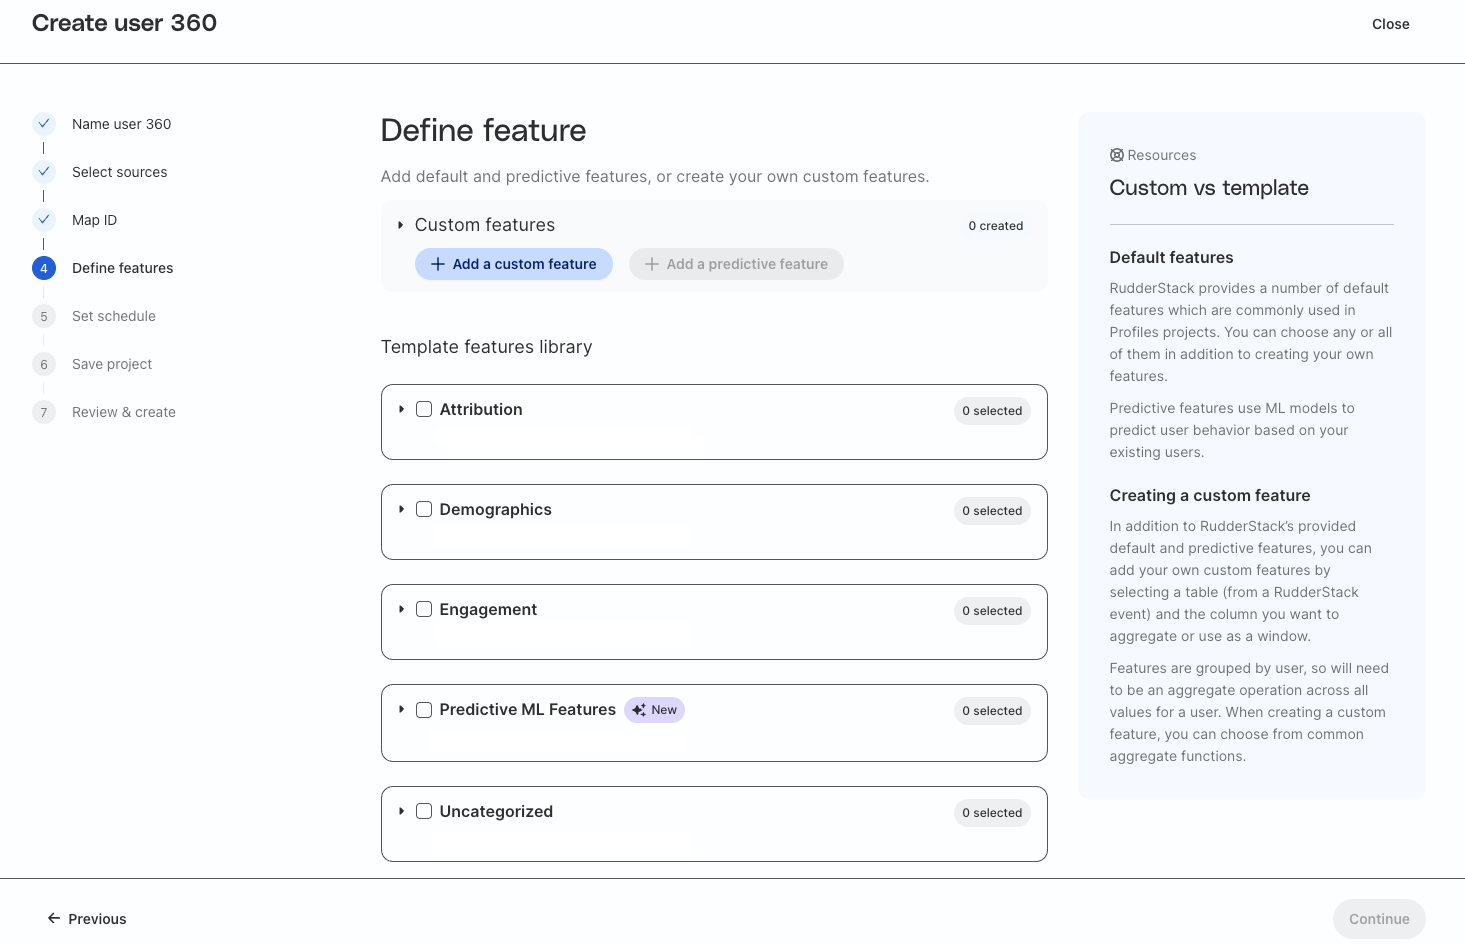
Create default features in the UI
There are two types of automated features you can define in the UI:
Default features
Custom features
This guide focuses on the default features that are automatically generated.
Set up default features
Default features are features commonly used in Profiles projects. RudderStack provides a template library for these features to make them easy to add to your project. Templated features give you access to over 40 different standard and predictive features, which are generated in Snowflake automatically.
Default features are divided into 4 categories:
Attribution - campaign, source, and churn features
Demographics - user trait features
Engagement - user activity features
Predictive ML Features - predictive features
You can open the drop down menu for each category and select as many as you would like for your project.
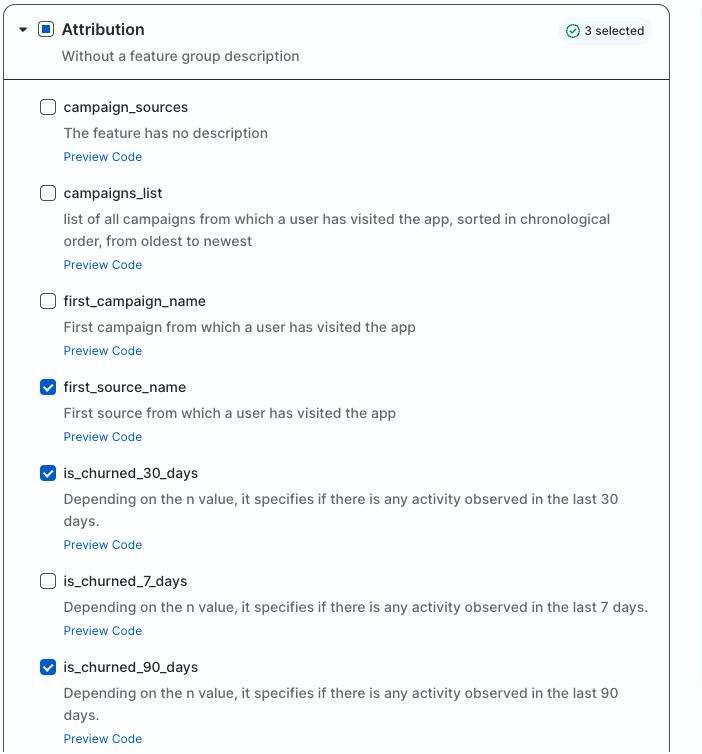
For this guide, select:
Attribution
first_source_name
is_churned_30_days
is_churned_90_days
Demographics
first_name
last_name
state
Engagement
first_date_seen
last_date_seen
total_sessions_90_days
total_sessions_last_week
Predictive ML Features
percentile_churn_score_30_days
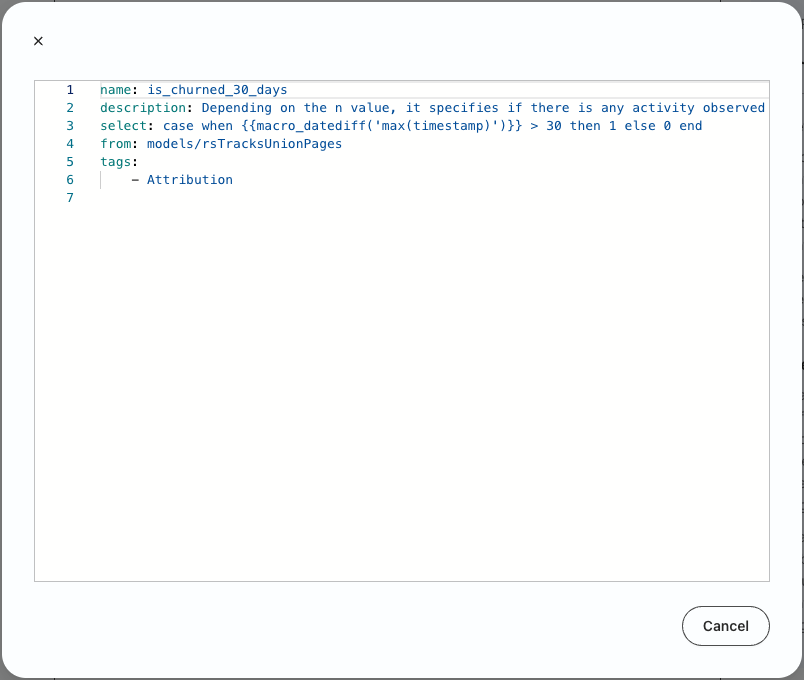
It is important to remember that RudderStack runs all of the feature-generation code transparently in Snowflake. For any of the default features, other than Predictive ML Features, you can click on Preview Code and get a yaml code snippet defining that feature (the yaml definition is used to generate SQL). This is helpful for technical users who want a deeper understanding of feature logic (and a running start for coding their own features).
Churn definition
RudderStack Predictions automatically generates a binary churn value for every user based on inactivity over a 7, 30, or 90-day period.
For example, to calculate the is_churned_7_days value, RudderStack looks for any activity timestamp for a particular user in the TRACKS and PAGES tables over the previous 7 day period. Practically, this means that RudderStack executes a ‘max timestamp’ query against those tables to see if users have viewed a page or performed other tracked actions (like clicks, form submits, add to carts, etc.) and then calculates the difference from today. If the query returns 7 or more, that means they haven’t performed any activity over the last 7 days and their is_churned_7_days trait is set to 1.
How Predictions models percentile churn scores
Using the standard definition (no activity over a defined period), RudderStack Predictions automatically runs a python-based churn model in Snowpark that predicts whether users will become inactive (churn) over the next 7, 30, or 90-day period. This model is trained on existing user data, using the Profiles identity graph, so it is recommended that you have a minimum of 5,000-10,000 unique users to achieve accurate output for business use cases.
How Predictions automates ML with Snowpark
Predictions streamlines integration with Snowpark by using the authentication from your existing Snowflake integration in RudderStack.
In order to run models in Snowpark, there is one additional set of permissions required. To run Predictions jobs, you must have permission to create stages within your schema. For more information see the CREATE STAGEdocumentation.
Once permissions are granted, you will be able to run jobs that produce predictive features. If you have followed the steps in Prerequisite guide, that permission has already been granted.
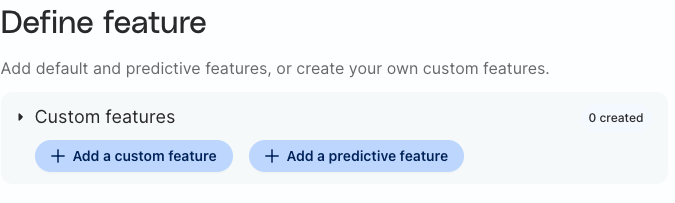
Create custom features in the UI
If a needed feature is not in the template library, you can define a custom feature in the UI. Custom features can be standard or predictive features.
Add Custom Features
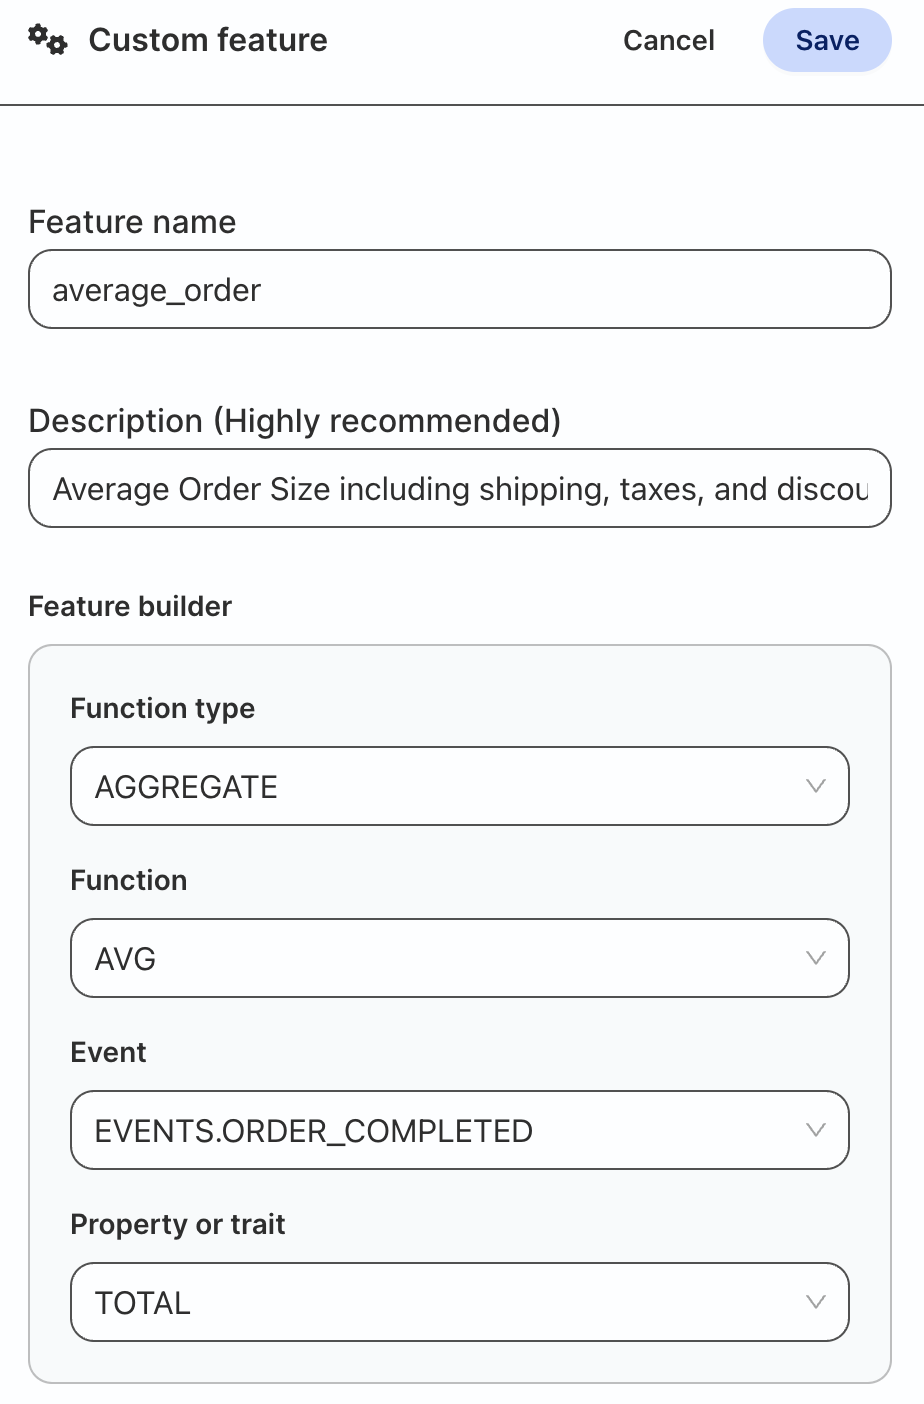
Click on Add a custom feature at the top of the page and build an average_order feature with the following values:
Field
Value
Name
average_order
Description
Average Order Size including shipping, taxes, and discounts
Function Type
AGGREGATE
Function
AVG
Event
EVENTS.ORDER_COMPLETED
Property or Trait
TOTAL
Once complete click Save. The custom feature will be added to the top of the page.
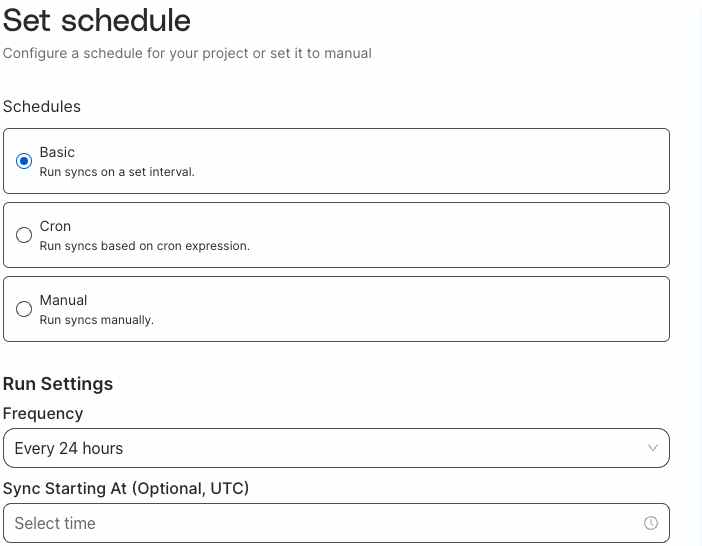
Set Schedule
There are three options to set a schedule for how often the feature generation job runs:
Basic
Cron
Manual
Basic
Schedule on a predetermined interval.
The frequency can be every:
30 minutes
1 hour
3 hours
6 hours
12 hours
24 hours
Then select a starting time for the initial sync.
Cron
Schedule using cron expressions for more specific scheduling (i.e. Daily on Tuesdays and Thursdays).
If you are not familiar with cron expressions, you can use the builder in the UI.
Manual
Only runs when manually triggered within the UI. For this guide, select Manual.
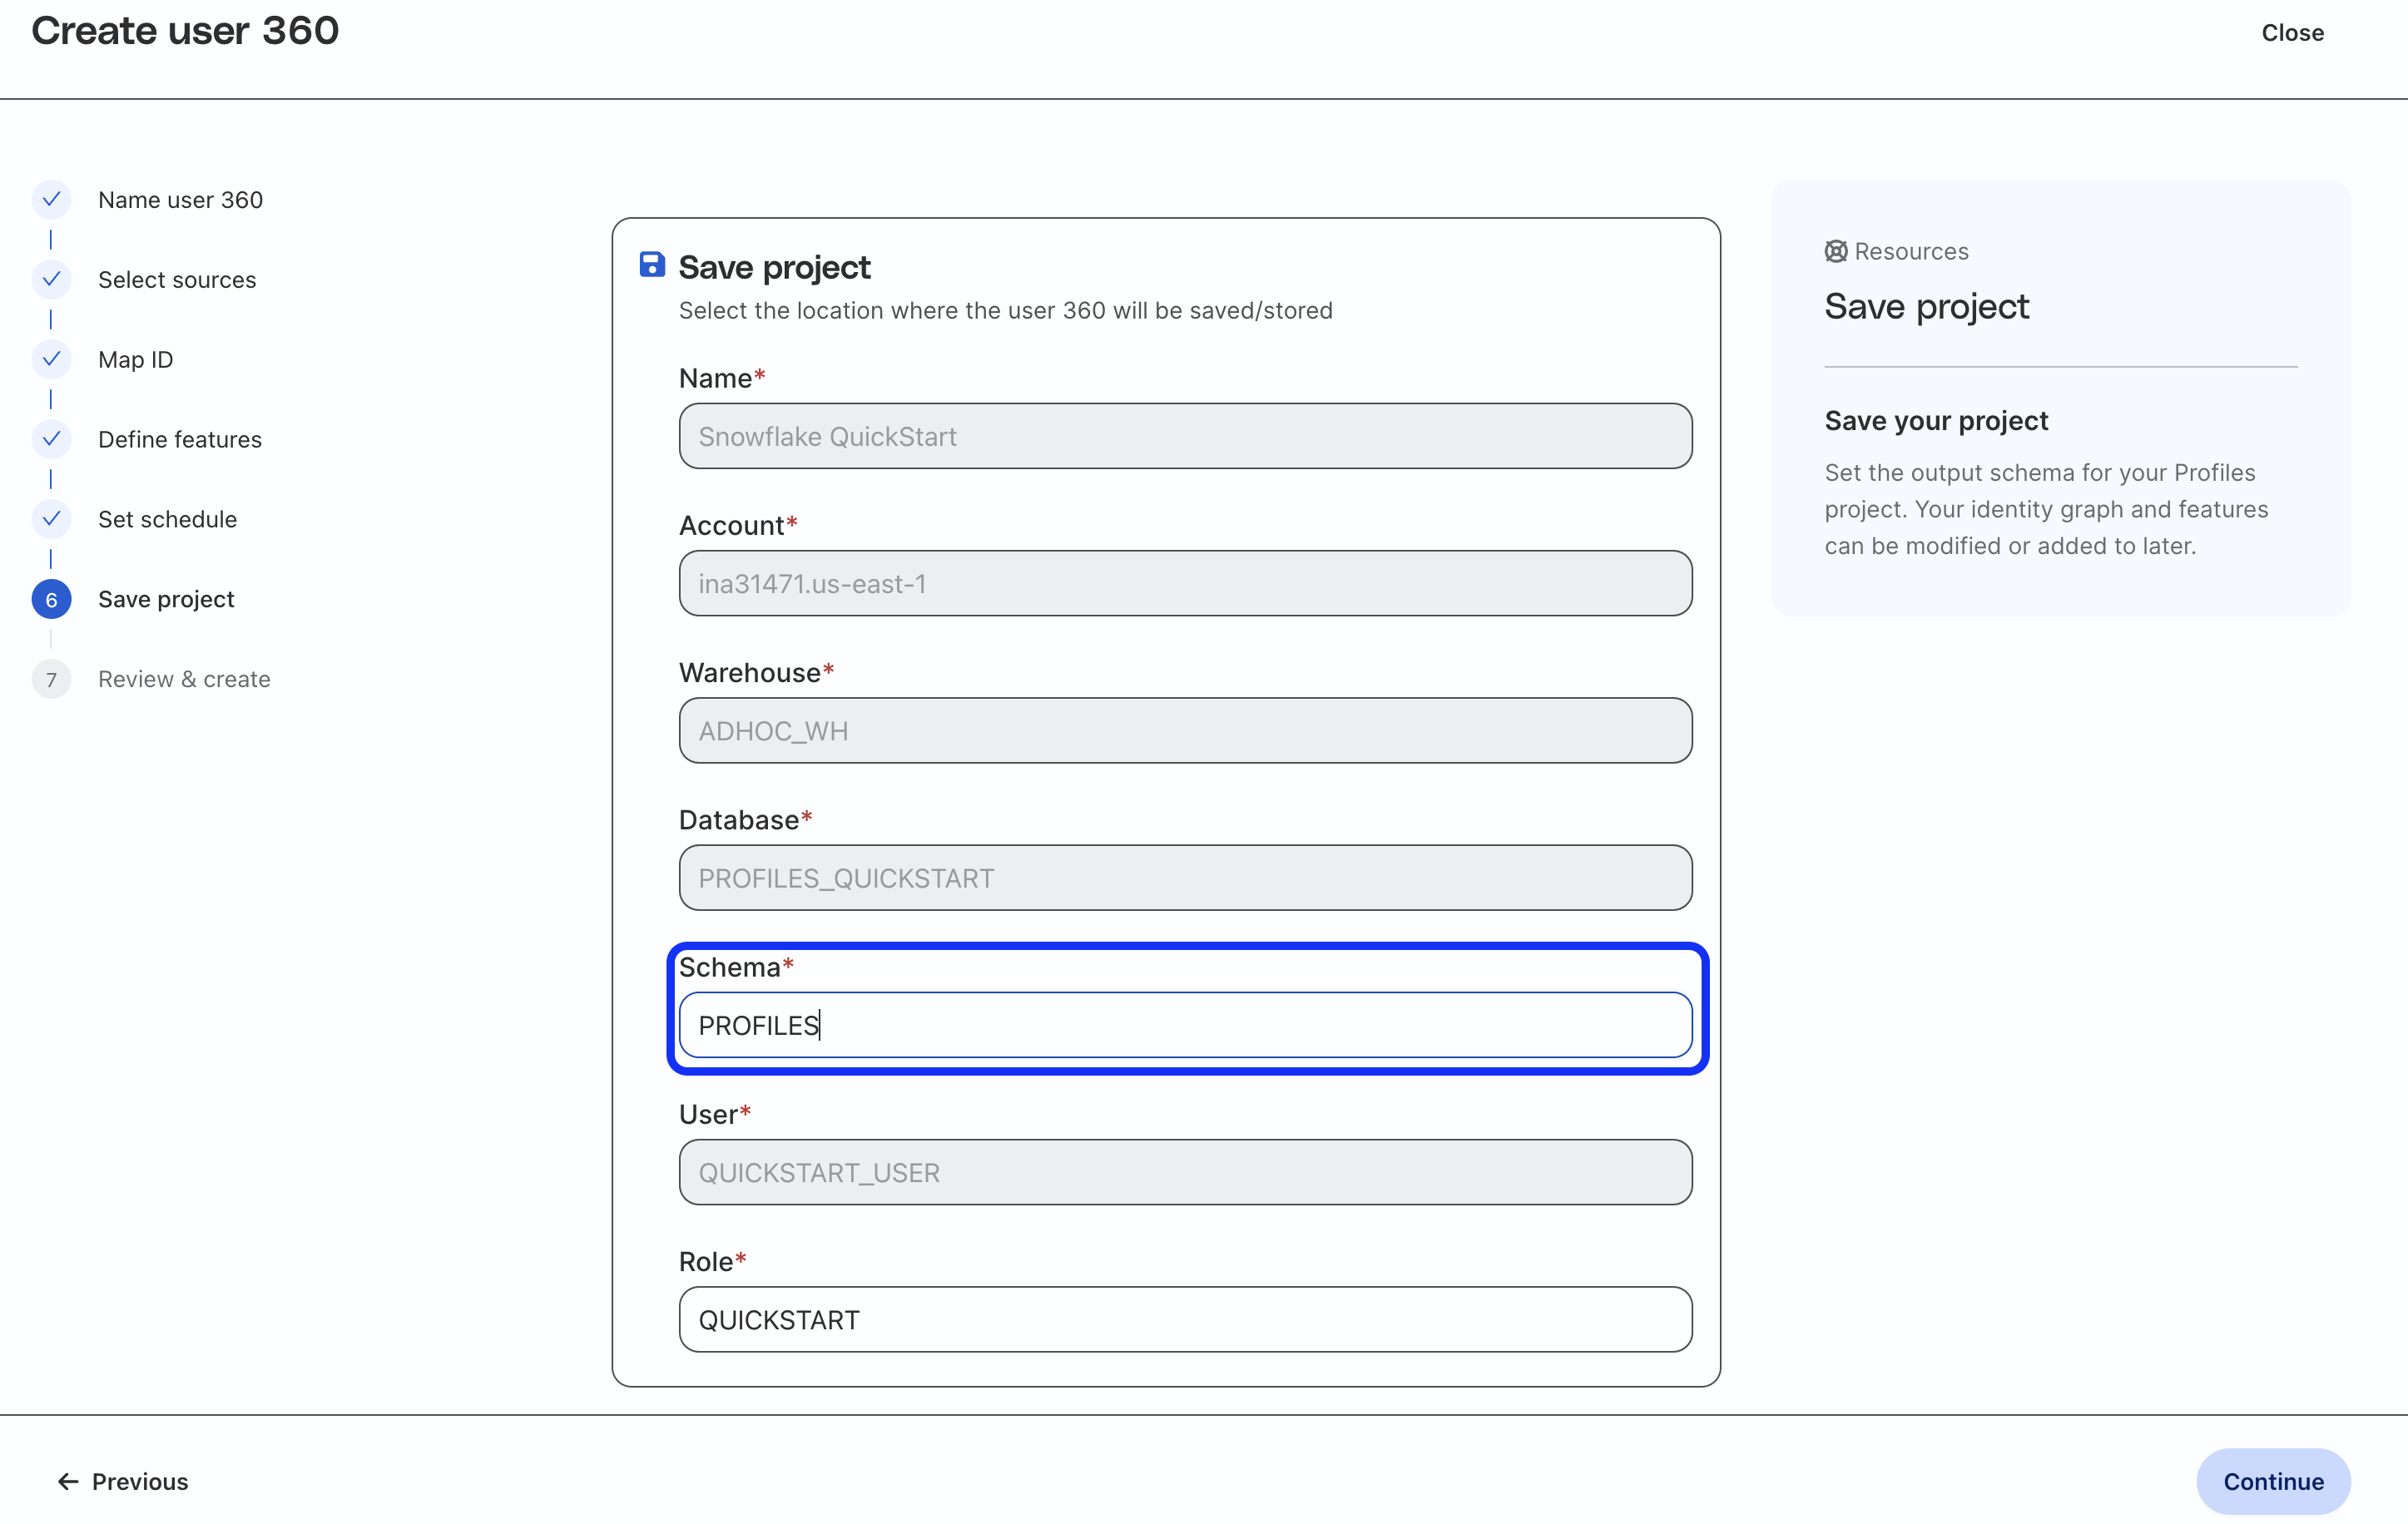
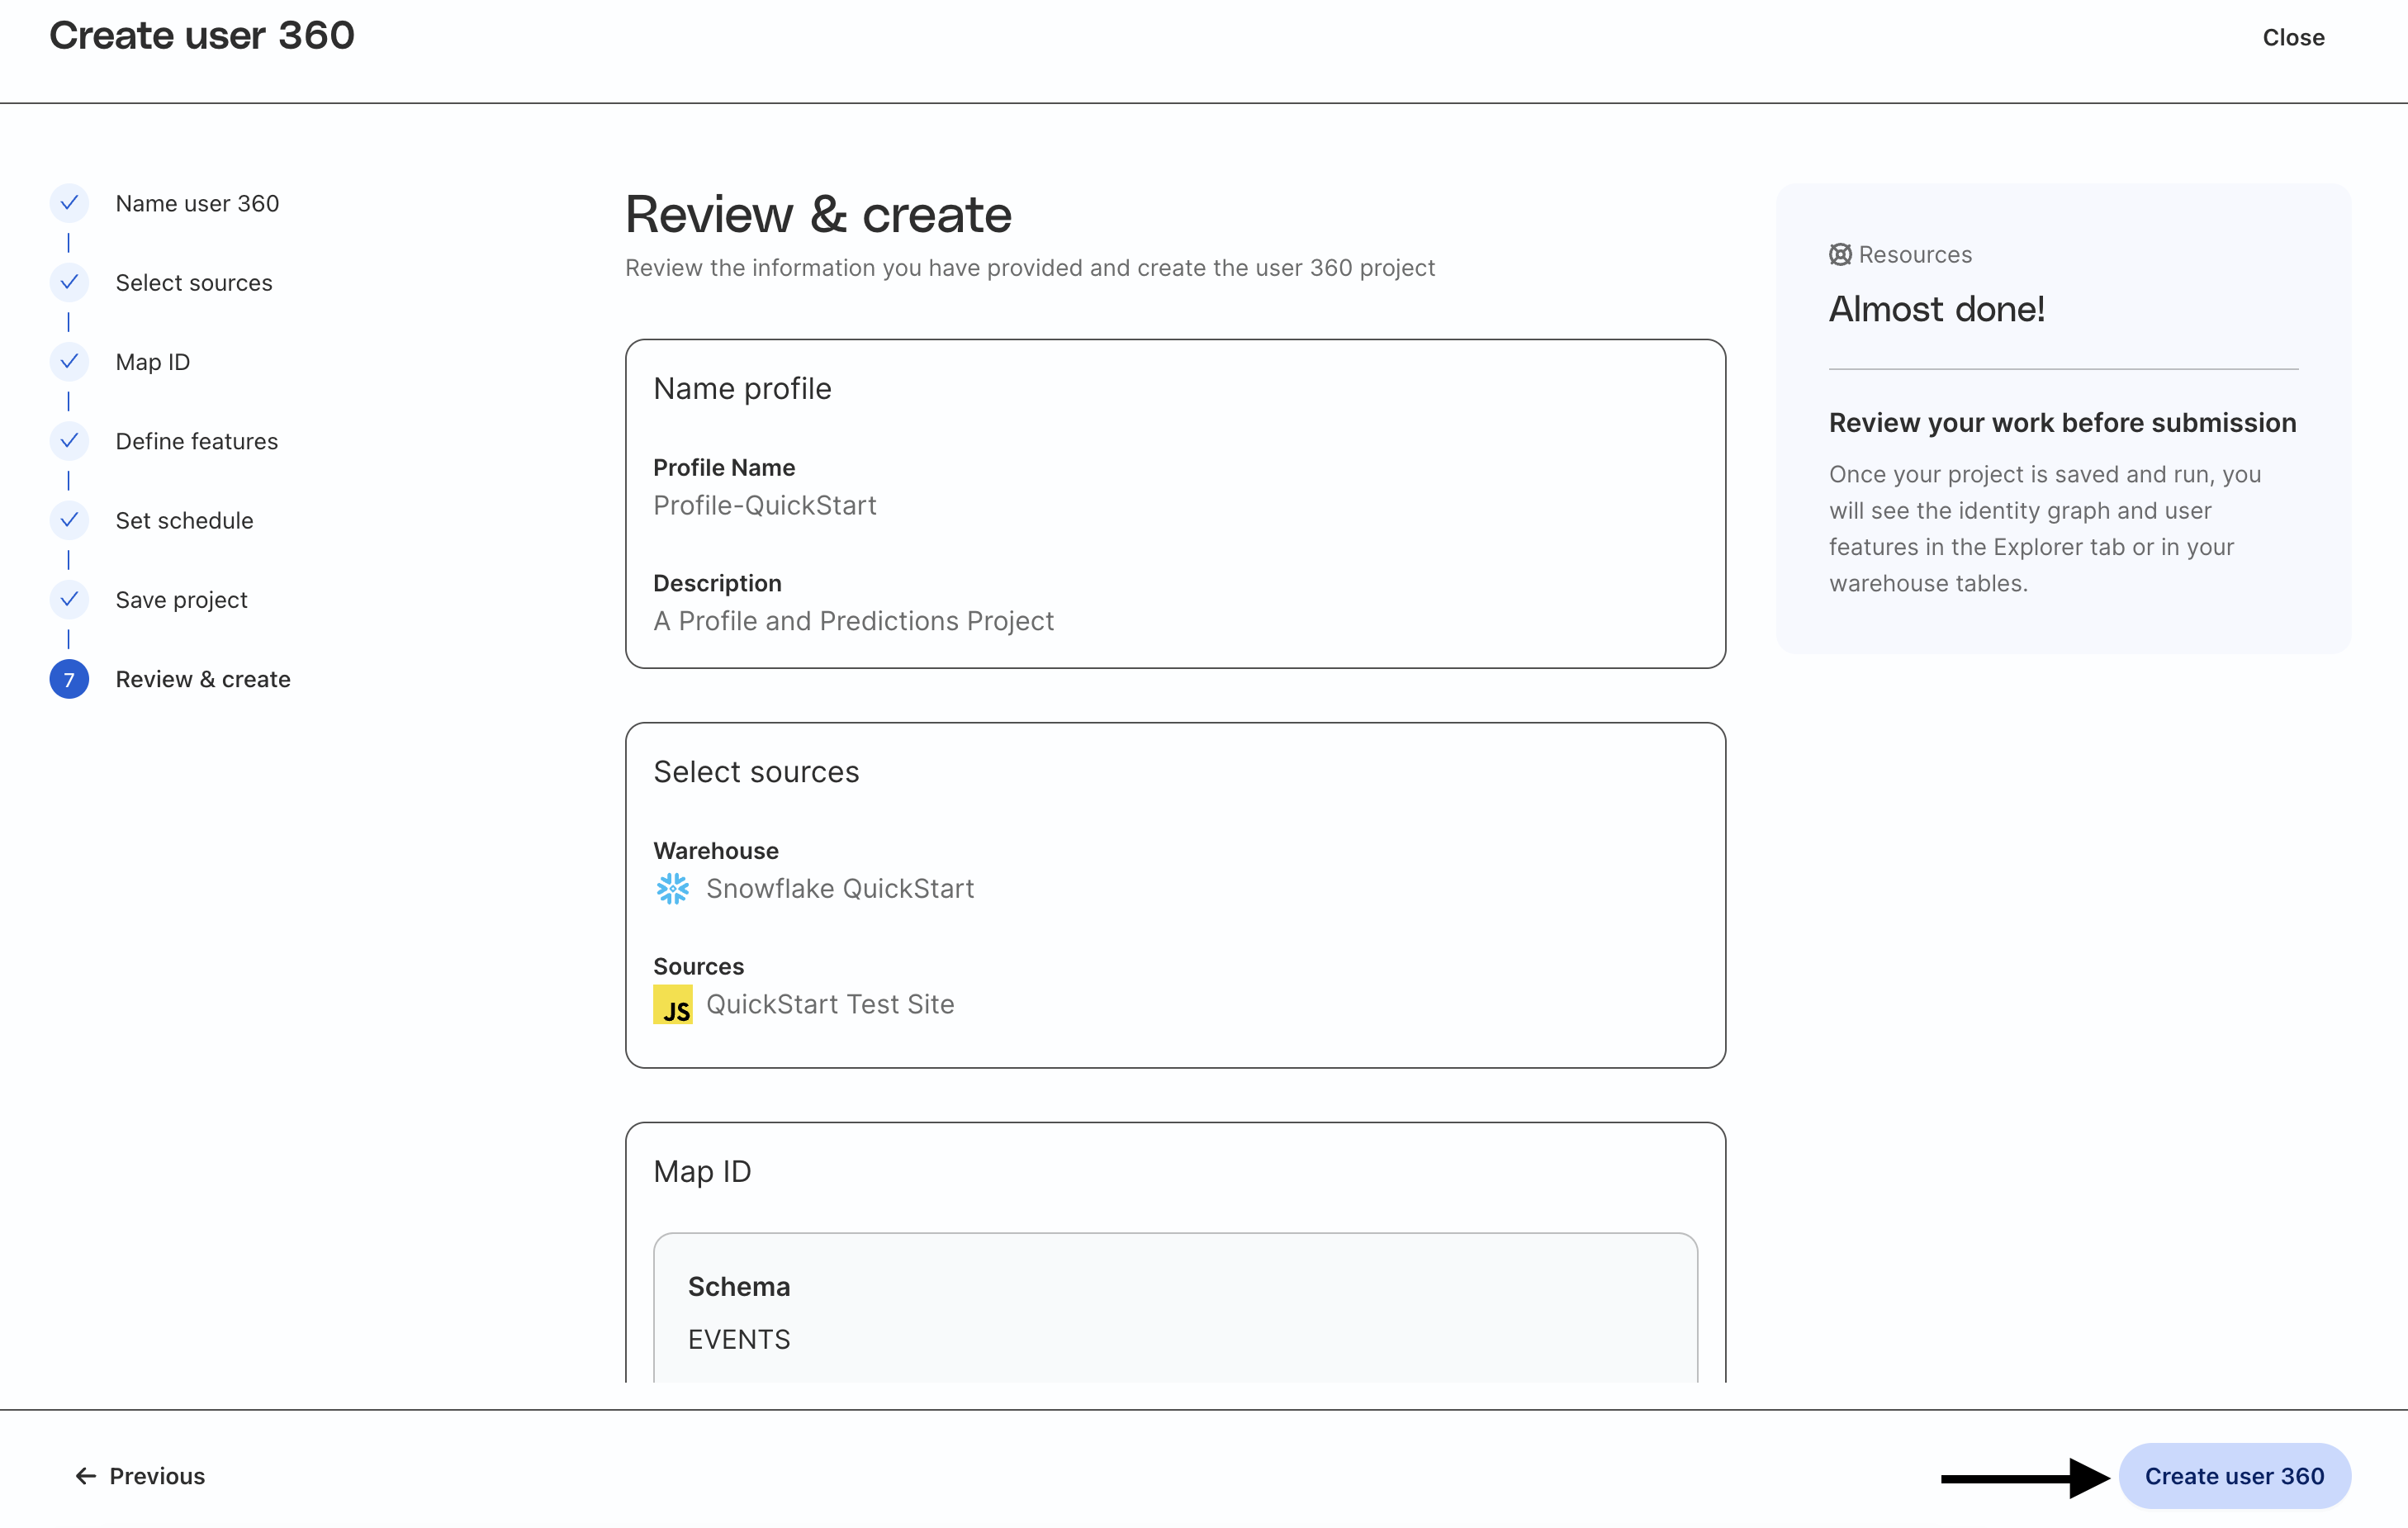
Save, review, and create project
Save project
Fill in the Schema field with PROFILES (to match what we created earlier). This is where the feature table will be written to in Snowflake.
Review and create project
Finally, review all the settings and when ready, click Create user 360.
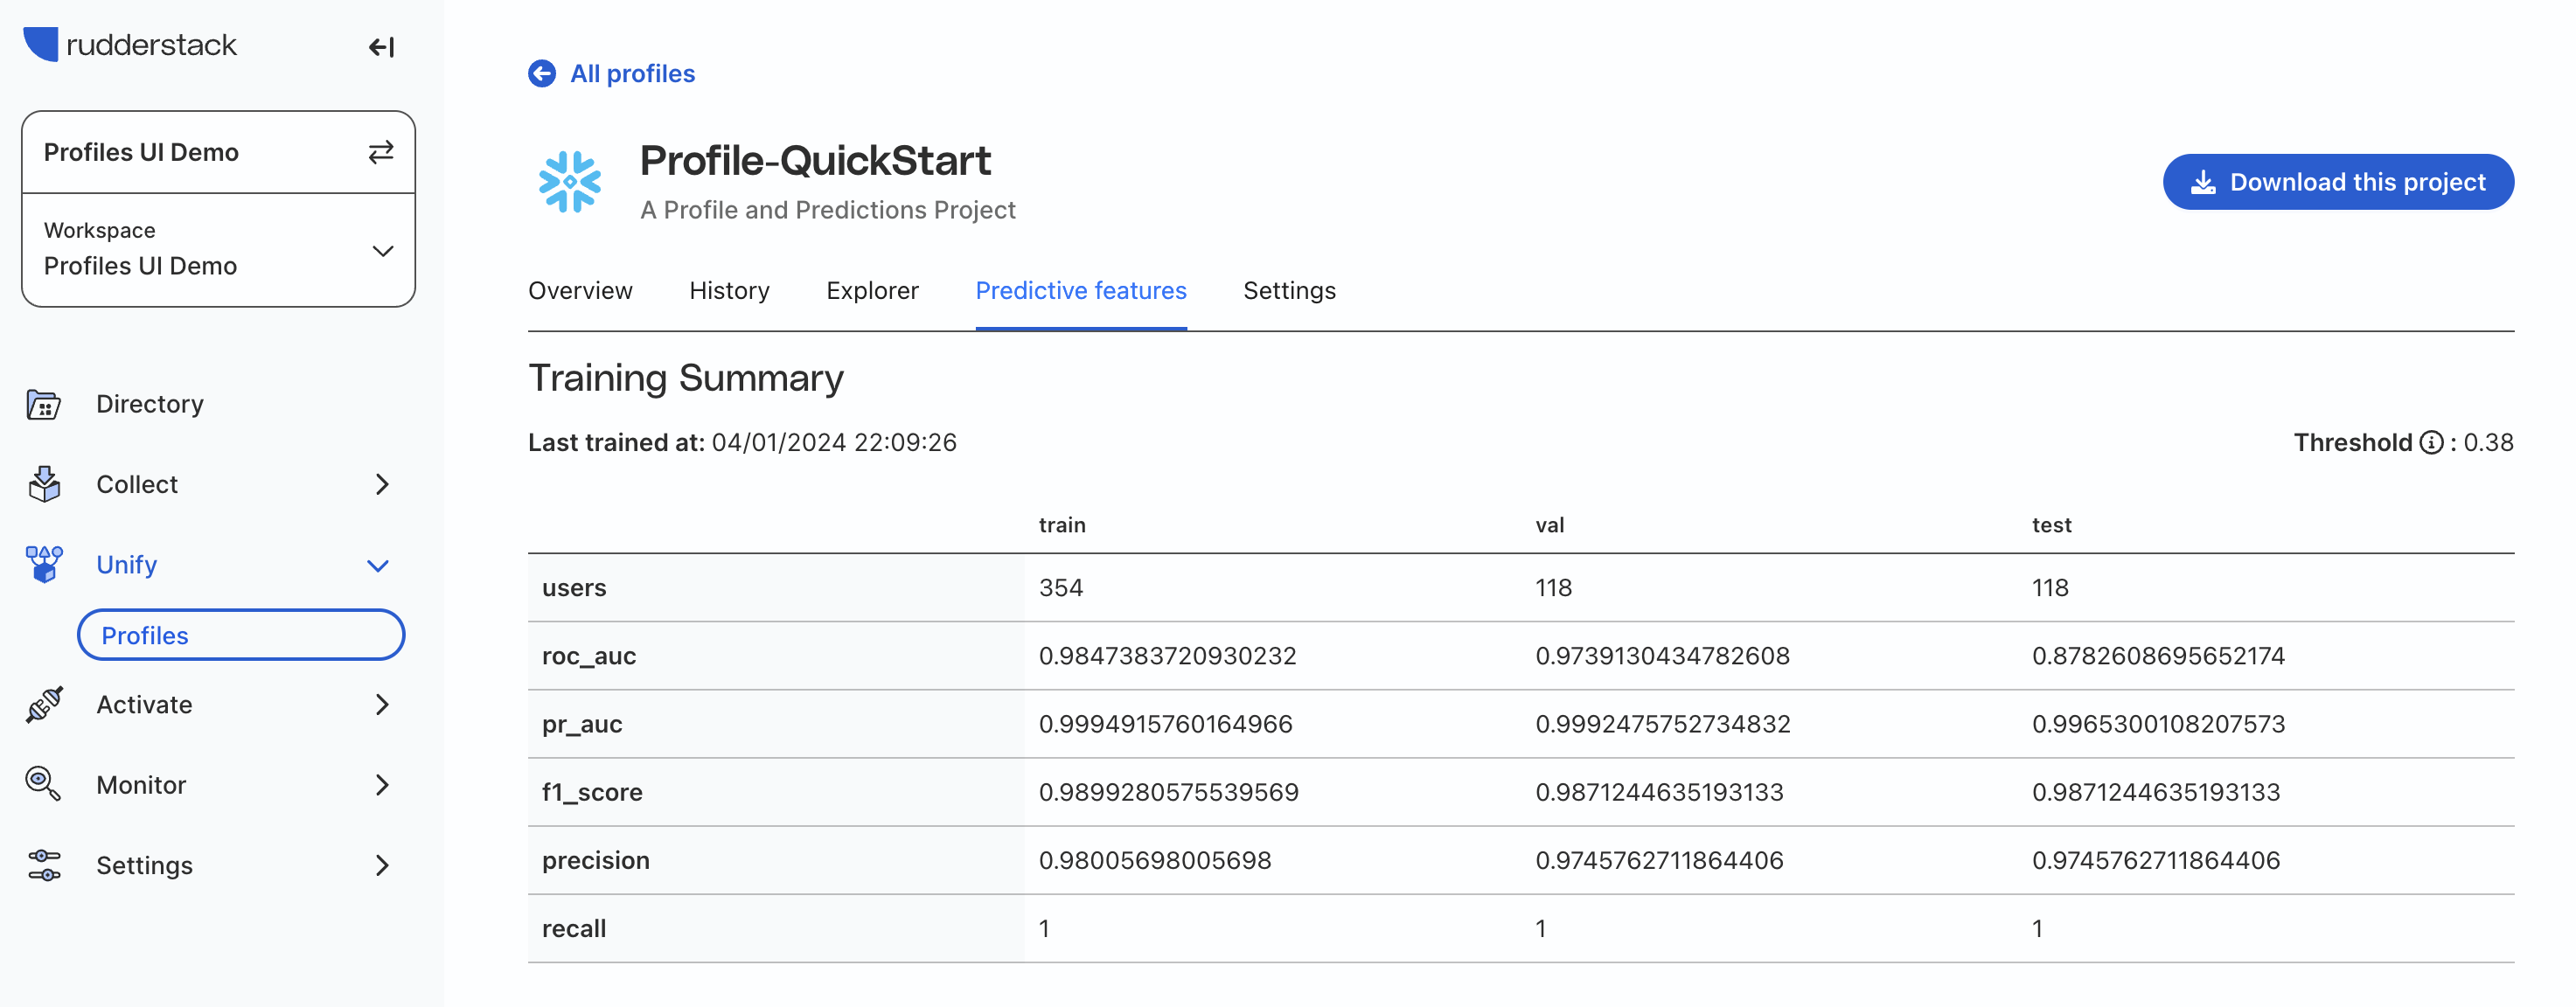
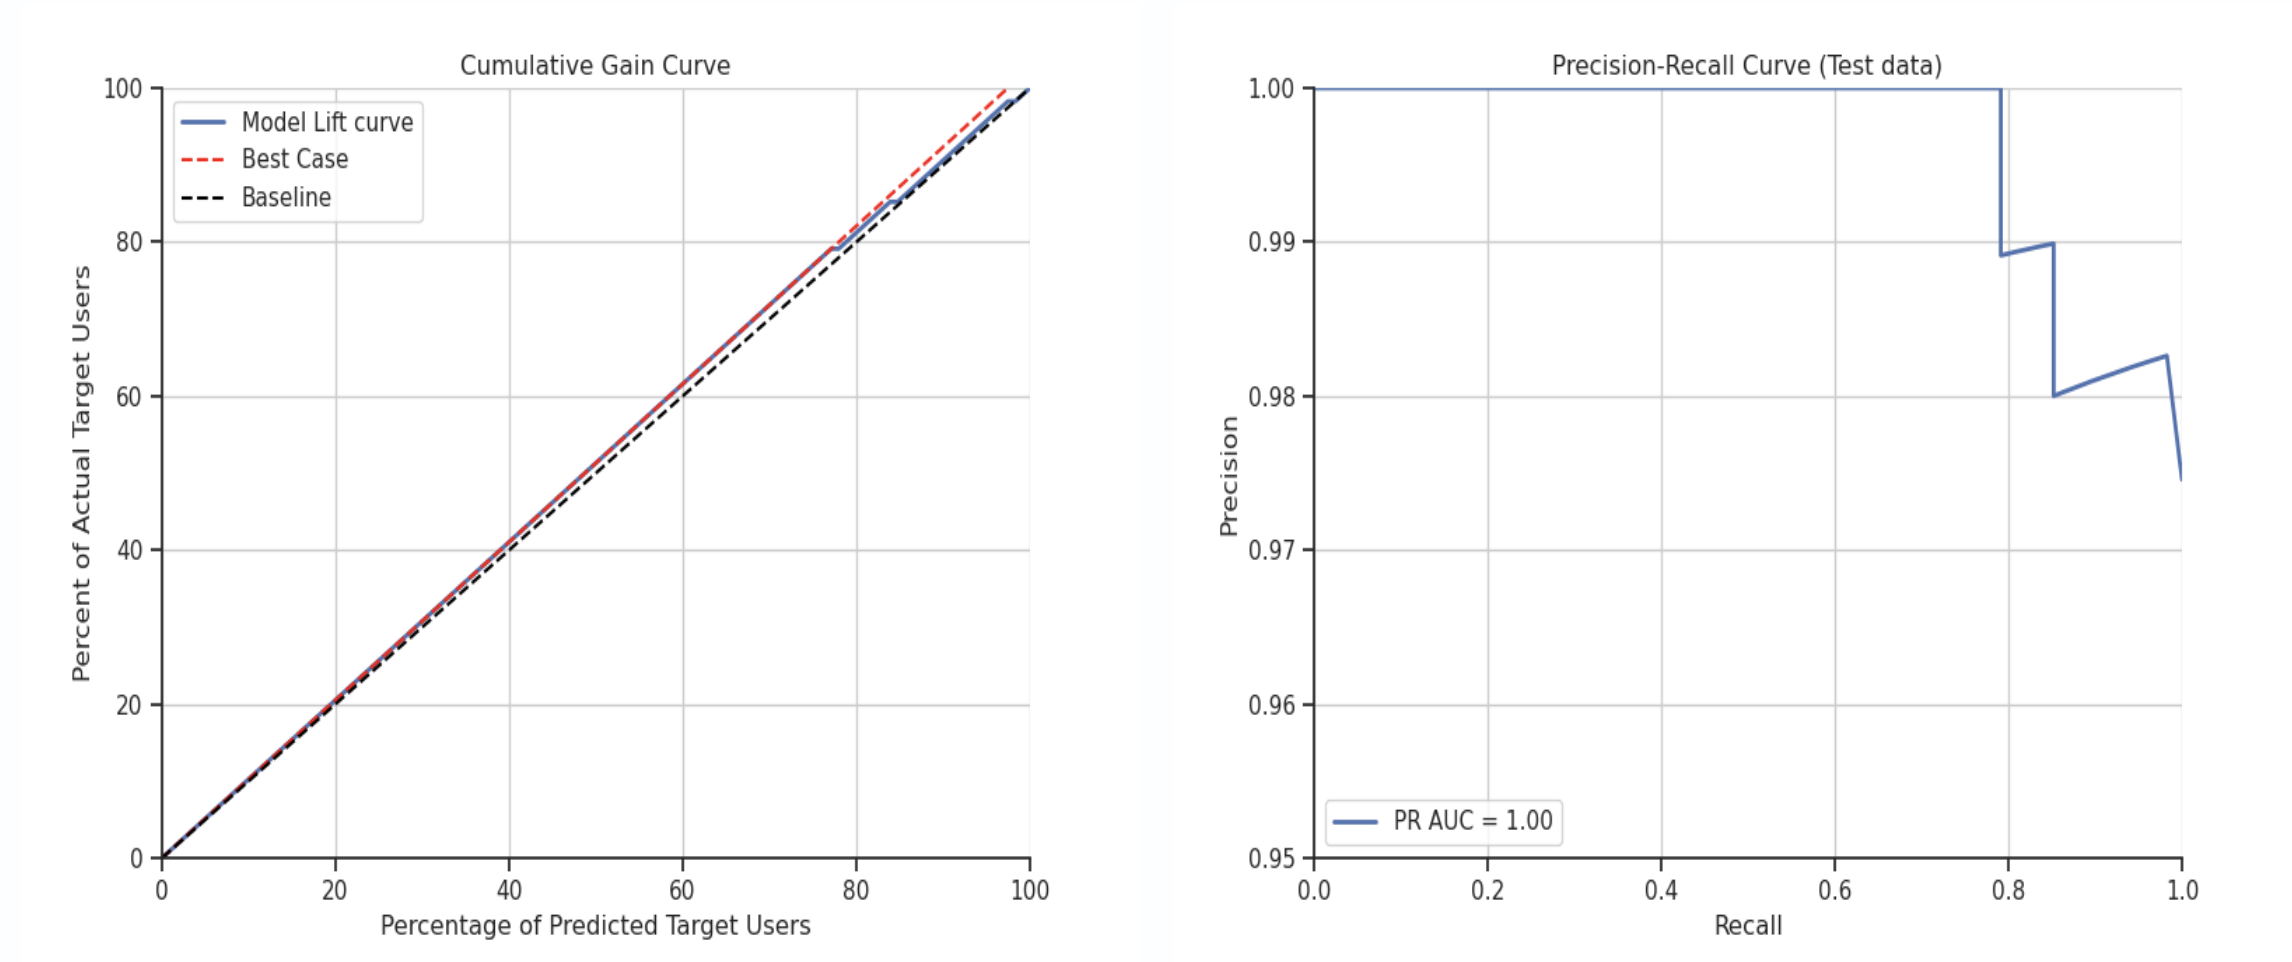
Review created features
Once the initial project run is initiated, it may take up to 25-30 minutes to complete. Once the job is done, you are able to explore the data in RudderStack’s UI, including model fit charts for predictive features and individual user records with all features.
This site uses cookies to improve your experience while you navigate through the website. Out of
these
cookies, the cookies that are categorized as necessary are stored on your browser as they are as
essential
for the working of basic functionalities of the website. We also use third-party cookies that
help
us
analyze and understand how you use this website. These cookies will be stored in your browser
only
with
your
consent. You also have the option to opt-out of these cookies. But opting out of some of these
cookies
may
have an effect on your browsing experience.
Necessary
Always Enabled
Necessary cookies are absolutely essential for the website to function properly. This
category only includes cookies that ensures basic functionalities and security
features of the website. These cookies do not store any personal information.
This site uses cookies to improve your experience. If you want to
learn more about cookies and why we use them, visit our cookie
policy. We'll assume you're ok with this, but you can opt-out if you wish Cookie Settings.