Control Plane Lite
4 minute read
RudderStack’s control plane provides a UI to manage your source and destination configurations.
You can use the Control Plane Lite utility to self-host your control plane. Control Plane Lite lets you manage your data pipelines locally by exporting or importing your configurations from a JSON file.
Control Plane Lite is now deprecated. It will not work with the latest
rudder-serverversions (after v1.2).Using RudderStack Open Source to set up your control plane is strongly recommended.
Though we encourage contributions from the open-source community, note that RudderStack will not support any new functionality for Control Plane Lite.
Prerequisites
Before using Control Plane Lite to set up your self-hosted control plane, ensure you have installed Node.js.
Use Node.js v14 for the best experience, as the higher versions are not supported.
Control plane setup
- Clone the RudderStack Control Plane Lite repository.
- Open your terminal and navigate to the Config Generator folder. Then, run the following commands:
npm install
npm start- After the setup is complete, you can access the dashboard at
http://localhost:3000.
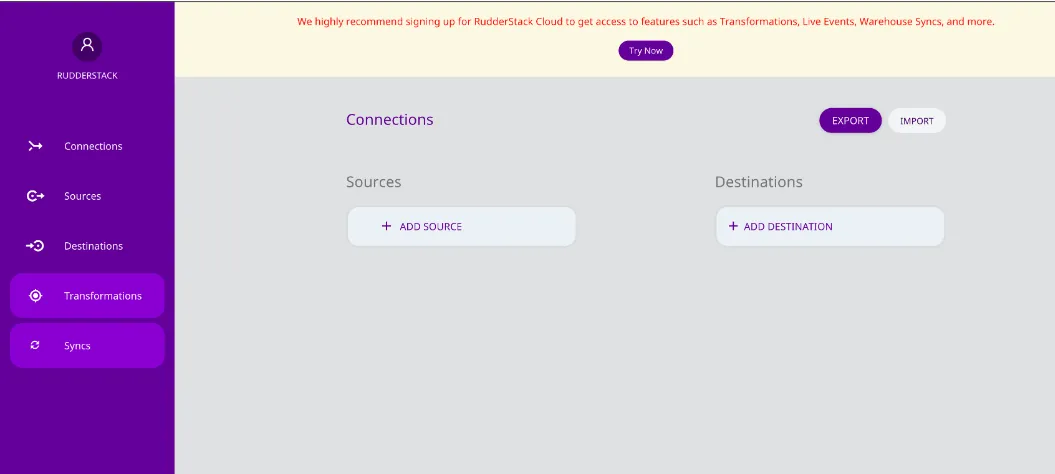
Export workspace configuration
- Set up your connections by adding the sources and destinations in the dashboard.
- Click the EXPORT button on the top right to export your workspace configuration as a JSON file.
RudderStack requires this JSON file (workspaceConfig.json) to start the RudderStack server.
Data plane setup and usage
Depending on your setup environment, follow the steps in the below sections to start the RudderStack server (data plane) using the exported workspace configuration file.
Docker
- Download and open
rudder-docker.yml. - In the
environmentsection underbackendservice, uncomment the following lines:
  - RSERVER_BACKEND_CONFIG_CONFIG_FROM_FILE=true
- RSERVER_BACKEND_CONFIG_CONFIG_JSONPATH=<workspace_config_filepath_in_container>- Replace
<workspace_config_filepath_in_container>in the above line with your container file path. By default, you can set it to/etc/rudderstack/workspaceConfig.json. - In the
volumessection under thebackendservice, uncomment the following line:
- <absolute_path_to_workspace_config>:<workspace_config_filepath_in_container>- Replace
<absolute_path_to_workspace_config>with the local path of yourworkspaceConfig.json(where your workspace configuration file is saved locally). Also, replace<workspace_config_filepath_in_container>with the container file path set in Step 3.
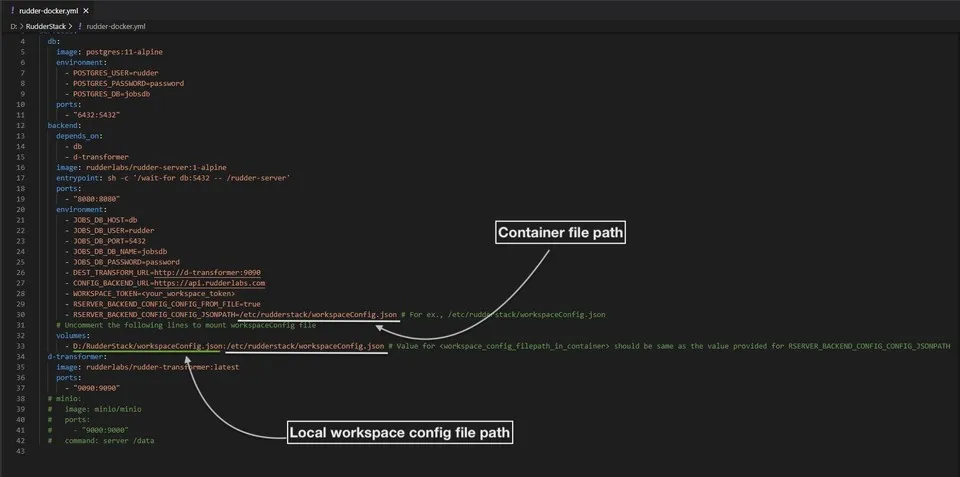
The value for<workspace_config_filepath_in_container>should be exactly as the value you set for theRSERVER_BACKEND_CONFIG_CONFIG_JSONPATHvariable. Otherwise, your workspace configuration will not be loaded, and you will get an error.
- Navigate to the directory where the RudderStack data plane (
rudder-server) is installed and run the following command:
docker-compose -f rudder-docker.yml up- Send test events to verify your installation.
Kubernetes
- Clone the RudderStack Helm repository containing the Helm chart:
git clone git@github.com:rudderlabs/rudderstack-helm.git- Navigate to the folder.
cd rudderstack-helm/- Open the
values.yamlfile. - Set the
controlPlaneJSONparameter totrue. - Export the workspace configuration by following the steps in Export workspace configuration. Place the exported file in the
rudderstack-helmfolder. - Run the following command:
helm install my-release ./ --set backend.controlPlaneJSON=trueSee Configuration for information on the configurable parameters during deployment.
- Send test events to verify your installation.
Developer machine setup
- Set up the database in your preferred directory:
createdb jobsdb
createuser --superuser rudder
psql "jobsdb" -c "alter user rudder with encrypted password 'rudder'";
psql "jobsdb" -c "grant all privileges on database jobsdb to rudder";- Clone the
rudder-serverrepository. - Run
git submodule initandgit submodule updateto fetch therudder-transformerrepository. - Navigate to the
rudder-transformerdirectory using thecd rudder-transformercommand. - Install the dependencies using the
npm icommand. - Start the destination transformer:
node destTransformer.js- Navigate back to the main directory using the
cd rudder-servercommand. - Copy
sample.envto the main directory:
cp config/sample.env .env- Go to the
configfolder and openconfig.yaml. - Under
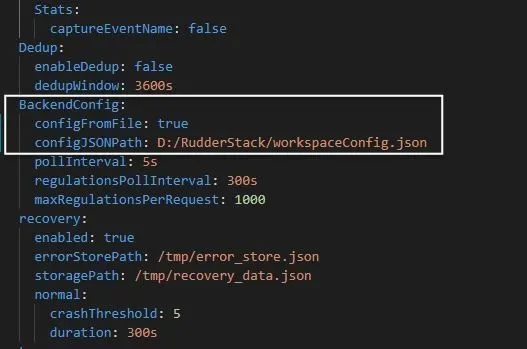
[BackendConfig], look forconfigFromFile, and set it totrue. - Change the value of
configJSONPathto the local path of yourworkspaceConfig.json(where your workspace configuration file is saved locally):
- Run the RudderStack server using the following command:
go run main.go- Send test events to verify your installation.
Use SDK sources in self-hosted control plane
To use the RudderStack SDKs set up in the self-hosted control plane, follow these steps:
- Set up the control plane using Control Plane Lite.
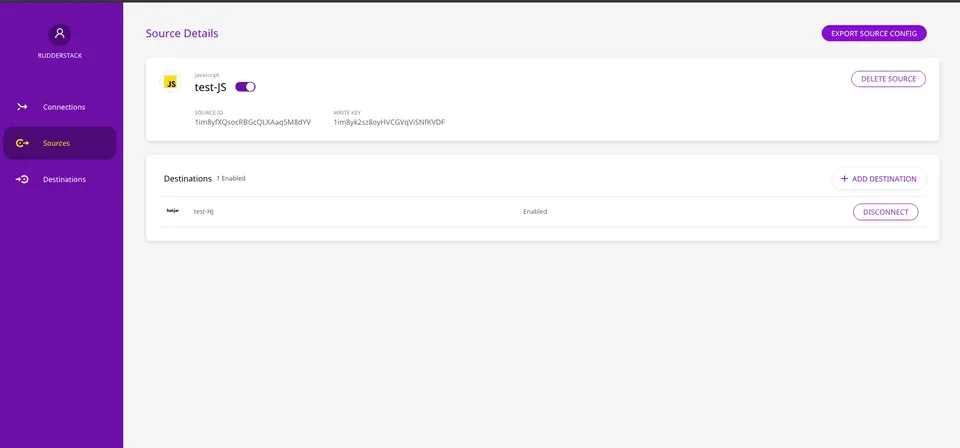
- Go to the dashboard, set up your source, and export the source configuration by clicking the EXPORT SOURCE CONFIG button:
- Host the exported file on your server such that it can be accessed via the path
<CONTROL_PLANE_URL>/sourceConfig. - Provide the base URL of your server (
<CONTROL_PLANE_URL>) serving this file in your SDK initialization code snippet. For more information on SDK initialization, see the following sections in the respective SDK guides:
- JavaScript SDK instructions
- Android (Java) SDK instructions
- iOS (Obj-C) SDK instructions
- React Native SDK instructions
- Flutter SDK instructions
The RudderStack SDKs automatically append/sourceConfigto the base server URL to fetch the configuration. For example,{CONTROL_PLANE_URL}/sourceConfig.
A sample source configuration exported from the dashboard:
{
  "source": {
    "config": {},
    "id": "<SOURCE_ID>",
    "name": "test-JS",
    "writeKey": "<SOURCE_WRITE_KEY>",
    "enabled": true,
    "sourceDefinitionId": "<SOURCE_DEFINITION_ID>",
    "deleted": false,
    "createdAt": "Mon Oct 12 2020 16:51:54 GMT+0530 (India Standard Time)",
    "updatedAt": "Mon Oct 12 2020 16:51:54 GMT+0530 (India Standard Time)",
    "sourceDefinition": {
      "id": "<ID>",
      "name": "JavaScript",
      "displayName": "JavaScript",
      "category": null,
      "createdAt": "2019-11-12T12:39:19.885Z",
      "updatedAt": "2020-06-18T11:54:06.114Z"
    },
  },
  "metadata": {
    "version": "1.0.2"
  }
}