By default, the Tracking Plan configuration is in JSON format. RudderStack’s Tracking Plan spreadsheet is a no-code, spreadsheet representation of your Tracking Plan configuration. It lets you easily create or use an existing Tracking Plan.
This guide details the various options and spreadsheet settings to configure your Tracking Plan.
Get started
To use the Tracking Plan spreadsheet, go to the default Tracking Plan spreadsheet and click File > Make a copy in the Google Sheets menu.
Spreadsheet overview
The Tracking Plan spreadsheet uses the Google Sheets’ scripts functionality to integrate with the Tracking plan API.
The configuration settings for your Tracking Plan are listed in the Homepage and Additional Features tabs of the spreadsheet. They are linked to the actions listed in the RudderStack Tracking Plan menu in the Google Sheets top bar:
Note that:
The Tracking Plan spreadsheet supports the Null, String, Number, Integer, Boolean, Array, and Object data types.
You can create, delete, or update the events and the associated properties. Once you upload the changes, RudderStack creates a new version of the Tracking Plan to keep track of your changes.
Create Tracking Plan from scratch
Enter the sheet name containing the Tracking Plan to upload.
You can replicate the sheet in Example Tracking Plan tab and make necessary changes to it. Then, rename this tab and specify the name above.
Assign a name for this Tracking Plan. RudderStack creates a new Tracking Plan if a plan with this name does not exist.
Specify the Email associated with your RudderStack workspace.
Click RudderStack Tracking Plan > Upload Tracking Plan to RudderStack in the top bar.
Verify if the Tracking Plan is created. See Get all Tracking Plans for more information.
Create Tracking Plan from existing event data
This is the easiest way to kickstart your Tracking Plan program without having to start from scratch.
RudderStack lets you create a Tracking Plan from an existing event data source. This option leverages the Event Audit API and Tracking plan API features to generate an initial plan.
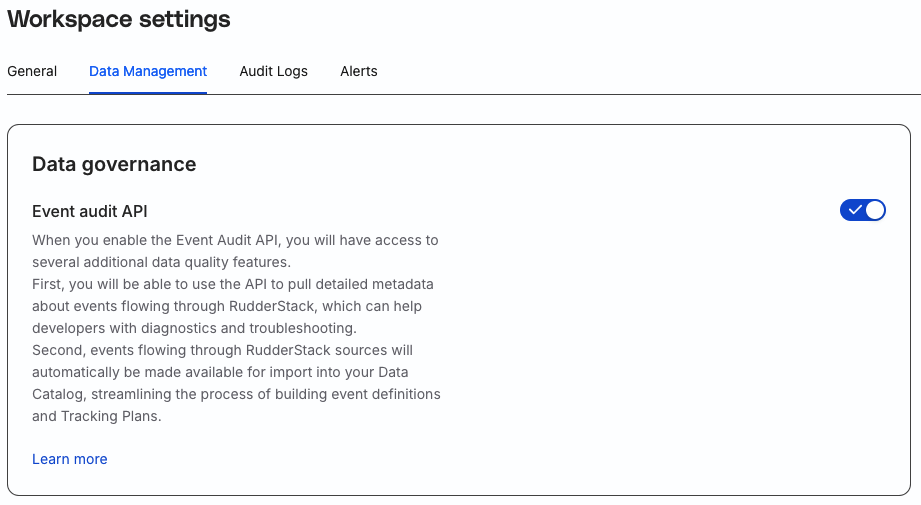
Before you proceed, make sure the Event Audit API setting is turned on in your RudderStack dashboard.
Go to Settings > Workspace and click the Data Management tab. Scroll down to the Data governance section and turn on the Event Audit API toggle.
Email: Enter the email ID associated with your RudderStack account
Go to the Additional Features tab of your Tracking Plan spreadsheet. Enter the following settings:
Write Key: Enter the write key for the source with which you want to link the Tracking Plan.
Tracking plan name: Enter the name for the new Tracking Plan.
Click RudderStack Tracking Plan > Create Tracking Plan from Existing Source Events in the top bar to create a new Tracking Plan.
For the first time you use the spreadsheet, you will be prompted with an approval request. Select Allow to permit Google Apps to execute the scripts. See Google Apps Permissions for more information.
Verify if the Tracking Plan is created. See Get all Tracking Plans for more information.
Upload Tracking Plan
You can use this option to create or update a Tracking Plan in RudderStack.
To upload a Tracking Plan to RudderStack, follow these steps:
Go to Upload Tracking Plan to RudderStack section of your spreadsheet’s Homepage tab.
Enter the following settings:
Sheet Name (for Upload): Enter the tab name of the sheet containing the Tracking Plan.
Tracking Plan name: Enter the name of the Tracking Plan you want to upload to RudderStack.
Note that:
RudderStack creates a new Tracking Plan if the name does not exist.
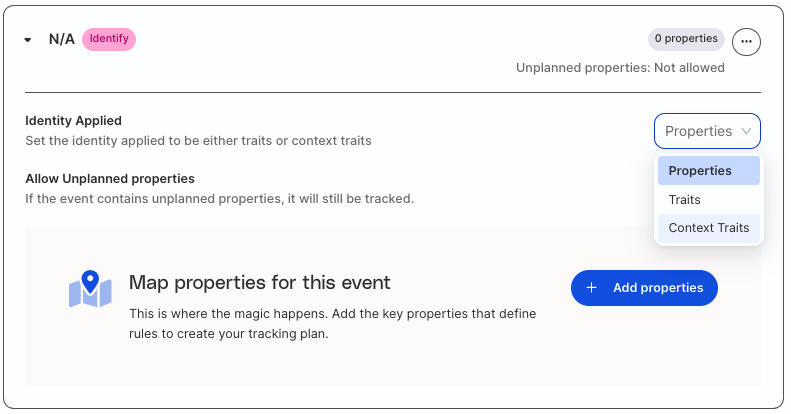
If you have instrumented your identify events such that the user traits are captured in the traits object of the events, make sure you select traits as shown, before creating or updating the Tracking Plan.
Upload the Tracking Plan by going to RudderStack Tracking Plan in the top nav bar > Upload Tracking Plan to RudderStack.
Download existing Tracking Plans
To download existing Tracking Plans from RudderStack, follow these steps:
Get a list of all your Tracking Plans by going to RudderStack Tracking Plan > Show All Tracking Plans. Note the Tracking Plan ID.
Go to Download Tracking Plan from RudderStack in the spreadsheet and enter the Tracking Plan ID:
Click RudderStack Tracking Plan > Download Tracking Plan from RudderStack in the top bar. This creates a new sheet with your Tracking Plan.
Get all Tracking Plans
To get a list of all your existing Tracking Plans, go to RudderStack Tracking Plan > Show All Tracking Plans.
This option lists all your existing Tracking Plans along with their respective IDs in the List of Tracking Plans sheet.
Link Tracking Plan to source
When you link a Tracking Plan to a source, all events are processed in accordance with that plan.
This option lets you define the events that RudderStack will drop or allow to pass through, and the permissible errors in the event’s context field.
See Server-side validation for more information on how RudderStack enforces the Tracking Plans on your source events.
To link a Tracking Plan to a source, follow these steps:
In the Additional Features tab, go to the Link Tracking Plan to Source section.
Then, enter the following settings:
Tracking Plan ID: Enter the Tracking Plan ID. See Get all Tracking Plans section for more information.
Source ID: Enter your source ID. You can find it by going to the Settings tab of your source.
A source ID uniquely identifies a RudderStack source. It is different to the source write key which is used by RudderStack to send events from the source to your specified destinations.
After finalizing the settings, go to RudderStack Tracking Plan > Link Tracking Plan to Source in the top bar.
Event settings
Allow unplanned events: This setting is exclusive to track events and has the following options:
Option
Description
TRUE
RudderStack will not drop the events not defined in your Tracking Plan.
FALSE
RudderStack will drop the events not defined in the Tracking Plan.
Unplanned Properties: This setting has the following options:
Option
Description
FORWARD
The event’s context field will be updated with the erroneous/unplanned property and forwarded to RudderStack.
DROP
RudderStack will drop the event containing the unplanned properties.
Other Violations: These violations include discrepancies such as data type mismatch, missing required properties, etc.
Option
Description
FORWARD
The event’s context field will be updated with these violations and forwarded to RudderStack.
DROP
RudderStack will drop the event containing the violations.
Propagate Errors: This setting has the following options:
Option
Description
TRUE
The validation errors are captured in the event’s context and sent downstream (user transformations, destinations)
FALSE
RudderStack will drop the event containing the validation errors.
Other spreadsheet settings
This section contains the noteworthy spreadsheet settings required to interact with your Tracking Plan.
Email: Enter the email ID associated with your RudderStack account
Advanced settings
These settings define how RudderStack should pick the data (event/property values) from the Tracking Plan.
Do not change these settings unless absolutely necessary as it may impact the entire Tracking Plan workflow.
Google Apps permissions
When you run the RudderStack Tracking Plan menu options for the first time, Google Apps will prompt you to authorize the scripts using the Tracking plan API.
Click Allow to set the permissions required for the script to work.
Server-side validation
RudderStack uses server-side validation to enforce your Tracking Plans. When you link a Tracking Plan to a source, RudderStack will check all new events against the Tracking Plan.
The validation adds two new columns for each table and each row that specify:
Which Tracking Plan was used
The error message associated with the plan
These columns will then propagate to both your data warehouse as well as cloud destinations. This lets you monitor the state of your violations and choose to act on them through manual operations or through the transformations.
FAQ
What does the Format Excess Rows (>1500) option do?
For the downloaded Tracking Plans, the formatting and dropdown selection for rule types and data types applies only to the first 1500 rows, as that is the number of rows the sheet displays initially.
In case the Tracking Plan rules spill over to more than 1500 rows, you can use the Format Excess Rows (>1500) button to reformat the excess rows.
How does the RudderStack Tracking Plan spreadsheet apply the validations for different event types?
By default, RudderStack applies the Tracking Plan validation on the supported event types as follows:
context.traits object for identify events.
traits for group events.
properties for track, page, and screen events.
If you have instrumented your identify events such that the user traits are captured in the traits object of the events, make sure you select traits as shown, before creating or updating the Tracking Plan.
Questions? We're here to help.
Join the RudderStack Slack community or email us for support
This site uses cookies to improve your experience while you navigate through the website. Out of
these
cookies, the cookies that are categorized as necessary are stored on your browser as they are as
essential
for the working of basic functionalities of the website. We also use third-party cookies that
help
us
analyze and understand how you use this website. These cookies will be stored in your browser
only
with
your
consent. You also have the option to opt-out of these cookies. But opting out of some of these
cookies
may
have an effect on your browsing experience.
Necessary
Always Enabled
Necessary cookies are absolutely essential for the website to function properly. This
category only includes cookies that ensures basic functionalities and security
features of the website. These cookies do not store any personal information.
This site uses cookies to improve your experience. If you want to
learn more about cookies and why we use them, visit our cookie
policy. We'll assume you're ok with this, but you can opt-out if you wish Cookie Settings.