End-to-End Walkthrough: Destinations with Rudder CLI
Beta- free
- growth
- enterprise
3 minute read
This tutorial shows you how to use Rudder CLI to:
- Authenticate against your RudderStack workspace
- Create a project directory and define an Amazon S3 destination in YAML
- Validate and deploy the destination to your workspace
For feature overview and supported types, see Manage Destinations using Rudder CLI. To wire the destination to a source, continue with the Connections walkthrough.
Prerequisites
- Rudder CLI tool (
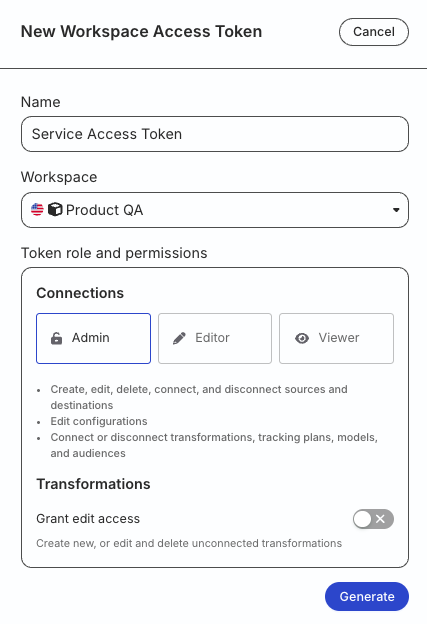
rudder-cli) installed locally, v0.25.0 or later. - In your RudderStack workspace, create a workspace-level Service Access Token with the following permissions to manage destinations:
| Resource | Permissions | Description |
|---|---|---|
| Destinations | Create & Delete | Create or delete destinations in the workspace |
| Destinations | Edit | Change destination configuration |
| Destinations | Connect | Connect a destination to a source or a transformation |
- If you’re on Free or self-hosted plan, or for testing and development only: Generate a Personal Access Token with Read-Write role
Any action authenticated by a Personal Access Token will break if the user generating the token is removed from the organization or there is a breaking change to their permissions.
Token permissions for legacy RBAC system
If you are on the legacy Permissions Management (RBAC) system, your workspace-level Service Access Token should have minimum Admin permissions.
See Generate a workspace-level Service Access Token for steps to create the token.
1. Authenticate the CLI tool
Run the following command and enter your access token when prompted:
rudder-cli auth login2. Create a project directory
Create a project directory to store your destination YAML files:
mkdir ~/tutorial-destinationsIf you already manage Event Stream sources or other CLI resources, add the destination file to the same project directory. Rudder CLI processes all YAML files in the directory recursively.
This tutorial uses Amazon S3. See Supported destinations for the destinations you can define with Rudder CLI.
If you use access-key authentication, see How to Use Variable Substitution in Rudder CLI. This tutorial uses IAM role authentication, so you don’t need a var file.
3. Review the YAML reference
Before you define the destination, review the Destination YAML Reference for:
- The
destinationspec envelope (id,display_name,type,definition_version,enabled,config) - Amazon S3
configkeys, including role-based vs access-key authentication - How
display_nameuniqueness andtypeimmutability work
4. Define an Amazon S3 destination
Create ~/tutorial-destinations/s3.yaml:
version: rudder/v1
kind: destination
metadata:
  name: s3
spec:
  id: s3
  display_name: "S3 Destination"
  type: s3
  definition_version: 1
  enabled: true
  config:
    bucket_name: "my-rudder-bucket"
    prefix: "rudder-events"
    role_based_auth: true
    iam_role_arn: "arn:aws:iam::<AWS_ACCOUNT_ID>:role/<ROLE_NAME>"
Replace <AWS_ACCOUNT_ID> and <ROLE_NAME> with values from your AWS account. role_based_auth is required. When it is true, you must set iam_role_arn and must not set access keys.
idis the project identifier other specs use in#destination:s3references.display_nameis what the dashboard shows and must be unique among destinations in the project.
5. Validate and deploy
- Validate your files:
rudder-cli validate -l ~/tutorial-destinations- Optional: Preview the workspace changes:
rudder-cli apply -l ~/tutorial-destinations --dry-run- Deploy the destination:
rudder-cli apply -l ~/tutorial-destinations