End-to-End Walkthrough: Data Governance with Rudder CLI
Beta- free
- growth
- enterprise
12 minute read
This tutorial shows you how to use the Rudder CLI tool to:
- Create new events, properties, and custom data types in your Data Catalog
- Create a Tracking Plan from scratch using the events and properties
- Deploy the Tracking Plan to your RudderStack workspace
- Update your Tracking Plan
Prerequisites
Rudder CLI tool (
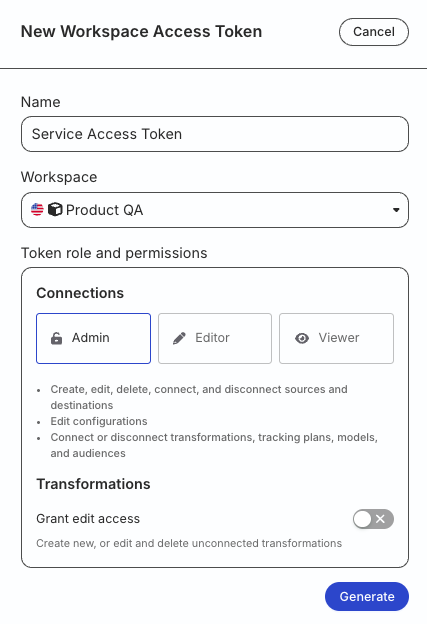
rudder-cli) installed locally and available in your pathGenerate a workspace-level Service Access Token in the RudderStack dashboard with the following permissions to manage Data Catalog and Tracking Plans:
| Resource | Permissions |
|---|---|
| Tracking Plans | Create & Delete, Edit |
| Data Catalog | Edit |
- If you’re on Free or self-hosted plan, or for testing and development only: Generate a Personal Access Token with Read-Write role
Any action authenticated by a Personal Access Token will break if the user generating the token is removed from the organization or there is a breaking change to their permissions.
Token permissions for legacy RBAC system
If you are on the legacy Permissions Management (RBAC) system, your workspace-level Service Access Token should have minimum Admin permissions.
See Generate a workspace-level Service Access Token for steps to create the token.
1. Authenticate the CLI tool
Authenticate the Rudder CLI tool (rudder-cli) with the access token from the prerequisites section — this is required to perform operations on the target RudderStack workspace.
Run the below command:
rudder-cli auth loginYou will then see a prompt to enter your access token. Specify the token and press Enter to continue — this stores the token locally and makes it available for all the future rudder-cli commands that need access to RudderStack.
The CLI maintains a local configuration file in your home directory (~/.rudder/config.json). After authentication, the configuration file will contain the unencrypted access token.
2. Prepare your Data Catalog project
The rudder-cli tool expects the Data Catalog resources to be described in YAML files present in your system. If you’re working with a Unix-compatible shell, run the following command to create a directory to contain these YAML files:
mkdir ~/tutorial-catalogThe above command creates a tutorial-catalog folder in your home directory, which you will use in this walkthrough to start populating the Data Catalog files.
See Data Catalog YAML Reference for more information on the YAML files containing the definitions of your Data Catalog resources.
3. Create events
Before defining your Tracking Plan, you need to define the events you want to track. Using your preferred text editor, create a file ~/tutorial-catalog/my-events.yaml and add the following lines:
rudder-clidoes not have any requirements for the file names or their location in the project directory, other than them having theyamlor.ymlsuffix. You can use any names or structure that makes sense for your project.
version: rudder/v1
kind: events
metadata:
  name: myeventgroup
spec:
  events:
    - id: product_viewed
      name: "Product Viewed"
      event_type: track
      description: "This event is triggered every time the user views a product."
The above file defines an event you want to track in your application (Product Viewed). Before continuing, run the below command that validates the contents of the above file to make sure there are no issues:
rudder-cli validate -l ~/tutorial-catalogNote that:
- If the file has no errors, the command returns no output.
- If there is any problem with the contents of the file, it outputs an error in the console.
4. Create event categories
Referencing categories in events is optional — you can skip this step if you don’t want to specify categories for your events.
See Manage Event Categories using Rudder CLI for more information.
You can also define event categories in YAML files with the required validation rules and reference them in your event definitions.
Using your preferred text editor, create a file ~/tutorial-catalog/my-event-categories.yaml that defines the event categories, as shown:
version: rudder/v1
kind: categories
metadata:
  name: event-categories
spec:
  categories:
    - id: signup_category
      name: Signup
    - id: login_category
      name: Login
    - id: browsing_category
      name: Browsing
    - id: miscellaneous_category
      name: Miscellaneous
You can later reference these categories in your event definitions, as shown:
version: rudder/v1
kind: events
metadata:
  name: myevents
spec:
  events:
    - id: product_viewed
      name: "Product Viewed"
      event_type: track
      description: "Triggered when a user views a product"
      category: "#category:browsing_category" # Reference to the Browsing category

    - id: signup_completed
      event_type: track
      name: "Signup Completed"
      category: "#category:signup_category" # Reference to the Signup category
Before continuing, run the below command that validates the contents of the above file to make sure there are no issues:
rudder-cli validate -l ~/tutorial-catalogNote that:
- If the file has no errors, the command returns no output.
- If there is any problem with the contents of the file, it outputs an error in the console.
5. Create properties
Each event in the Tracking Plan can be associated with various properties. Also, some properties might be shared across events. Create a file ~/tutorial-catalog/my-properties.yaml that defines the properties to track, as shown:
version: rudder/v1
kind: properties
metadata:
  name: mypropertygroup
spec:
  properties:
    - id: product_sku
      name: "SKU"
      type: string
      description: "Product SKU"
    - id: category
      name: "Category"
      type: string
      description: "Product's category"
This file defines two string properties that you can later associate with our Events, SKU and Category. Validate the project again using the same command (mentioned in Step 3):
rudder-cli validate -l ~/tutorial-catalogAgain, the command gives no output if there are no issues with the file’s content.
6. Create custom types
You can define custom data types in YAML files with the required validation rules and reference them in your property definitions.
Create a file ~/tutorial-catalog/my-custom-types.yaml that defines the custom data types, as shown:
version: rudder/v1
kind: custom-types
metadata:
  name: identifier-types
spec:
  types:
    - id: sku_type
      name: "SKUType"
      description: "Custom type for SKU validation"
      type: string
      config:
        min_length: 5
        max_length: 255
        pattern: "^SKU-[0-9]+$"
    - id: category_type
      name: "CategoryType"
      description: "Custom type for product identifiers"
      type: string
      config:
        min_length: 10
        max_length: 20
        pattern: "^PROD-[0-9]+$"
This file defines two custom types (SKU Type and Category Type) that you can later reference in your properties, as shown:
version: rudder/v1
kind: properties
metadata:
  name: mypropertygroup
spec:
  properties:
    - id: product_sku
      name: "SKU"
      type: "#custom-type:sku_type" # Reference to custom type
      description: "Product SKU"
    - id: category
      name: "Category"
      type: "#custom-type:category_type" # Reference to custom type
      description: "Product's category"
Validate the project again using the same command (mentioned in Step 3):
rudder-cli validate -l ~/tutorial-catalogSee the Custom Data Types guide for more information.
6.1 Define custom type variants
Custom Type Variants let you define different property requirements for reusable object types based on a discriminating property value. This is particularly useful when an object needs different validation rules depending on the context in which it is used.
For example, you can create an address type with variants based on the country:
version: rudder/v1
kind: custom-types
metadata:
  name: address_types
spec:
  types:
    - id: address_object
      name: "AddressObject"
      type: object
      description: "Address with region-specific requirements"

      properties:
        - property: "#property:country"
          required: true
        - property: "#property:street_address"
          required: true
        - property: "#property:city"
          required: true
        - property: "#property:postal_code"
        - property: "#property:state_province"

      variants:
        - type: discriminator
          discriminator: "#property:country"
          cases:
            - display_name: "US Address"
              match:
                - "US"
                - "USA"
                - "United States"
              description: "US address format with state and ZIP"
              properties:
                - property: "#property:state_province"
                  required: true
                - property: "#property:postal_code"
                  required: true

            - display_name: "UK Address"
              match:
                - "UK"
                - "GB"
                - "United Kingdom"
              description: "UK address format with postcode"
              properties:
                - property: "#property:postal_code"
                  required: true

          default:
            - property: "#property:postal_code"
              required: false
Validate the project again using the same command:
rudder-cli validate -l ~/tutorial-catalogSee Custom Type Variants for more examples and detailed information.
7. Create Tracking Plan
With both events and properties defined, you can now create a Tracking Plan that references them. Create a file ~/tutorial-catalog/my-tracking-plan.yaml and add the following:
version: rudder/v1
kind: tracking-plan
metadata:
  name: mytrackingplan
spec:
  id: mytrackingplan
  display_name: "Product Tracking Plan"
  description: "Contains all the events and properties for the Product Tracking Plan."
  rules:
    - type: event_rule
      id: product_viewed_rule
      event: "#event:product_viewed"
      additional_properties: false
      properties:
        - property: "#property:product_sku"
          required: true
        - property: "#property:category"
          required: false
        - property: "#property:product_details" # Object property
          required: true
          properties: # Nested properties
            - property: "#property:product_name"
              required: true
            - property: "#property:product_price"
              required: true
The above file defines a Tracking Plan that contains the event (Product Viewed) that you defined previously along with the properties SKU, Category, and Product Details containing two nested properties Product Name and Product Price.
Note that you can associate the events and properties with the Tracking Plan by providing URN references to them. The references point to specific entities defined in the project without strictly depending on the files they were defined in. Instead, they rely on the entity’s resource type and id fields to uniquely refer to them.
For example, the Product Viewed event is defined with:
- resource type:
event id:product_viewed
Therefore, you can refer to it using the #event:product_viewed reference.
Validate the Tracking Plan again before proceeding to the next step:
rudder-cli validate -l ~/tutorial-catalog7.1 Define event rule variants
Event Rule Variants let you define different property requirements for the same event based on a discriminating property value. This is useful when an event needs different validation rules depending on the context in which it occurs.
For example, you can extend the product_viewed event to have different requirements based on the page type.
- Add the required properties:
version: rudder/v1
kind: properties
metadata:
  name: mypropertygroup
spec:
  properties:
    - id: page_type
      name: "page_type"
      type: string
      description: "Type of page being viewed"
    - id: page_url
      name: "page_url"
      type: string
      description: "URL of the page"
    - id: search_term
      name: "search_term"
      type: string
      description: "Search query entered by user"
    - id: product_sku
      name: "SKU"
      type: string
      description: "Product SKU"
    - id: category
      name: "Category"
      type: string
description: "Product's category"- Update the Tracking Plan to use variants:
version: rudder/v1
kind: tracking-plan
metadata:
  name: mytrackingplan
spec:
  id: mytrackingplan
  display_name: "Product Tracking Plan"
  description: "Contains all the events and properties for the Product Tracking Plan."
  rules:
    - type: event_rule
      id: product_viewed_rule
      event: "#event:product_viewed"
      additional_properties: false

      properties:
        - property: "#property:page_type"
          required: true
        - property: "#property:product_sku"
          required: false
        - property: "#property:category"
          required: false
        - property: "#property:search_term"
          required: false

      variants:
        - type: discriminator
          discriminator: "#property:page_type"
          cases:
            - display_name: "Search Results Page"
              match:
                - "search"
                - "search_results"
                - "category_search"
              description: "When user is on search or category pages"
              properties:
                - property: "#property:search_term"
                  required: true

            - display_name: "Product Detail Page"
              match:
                - "product"
                - "product_detail"
              description: "When user is viewing a specific product"
              properties:
                - property: "#property:product_sku"
                  required: true
                - property: "#property:category"
                  required: true

          default:
            - property: "#property:page_url"
              required: true
Make sure to:
- Define all properties used in variants in the common properties section
- Mark the discriminator property (
page_type) as required- Set
additional_properties: falsein the event rule
Validate the project again using the same command:
rudder-cli validate -l ~/tutorial-catalogSee Event Rule Variants for more examples and detailed information.
8. Deploy Data Catalog resources
With your events, properties, and Tracking Plan defined, deploy them to your RudderStack workspace.
- Review the changes to ensure there are no mistakes by running the following command:
rudder-cli apply -l ~/tutorial-catalog --dry-runThe --dry-run option simulates the application of changes without making actual updates to your workspace. Instead, the rudder-cli tool reports all the resources as New resources, as seen in the below output:
New resources:
  - event:product_viewed
  - property:category
  - property:product_sku
  - tracking_plan:mytrackingplan
If the list matches your expectations, run the following command to apply the changes to your workspace:
rudder-cli apply -l ~/tutorial-catalogThe output will be similar, but with an additional confirmation prompt:
New resources:
  - event:product_viewed
  - property:category
  - property:product_sku
  - tracking_plan:mytrackingplan

? Do you want to apply these changes? (y/N)
Continue by typing y and pressing the Enter key. rudder-cli then starts creating the new resources one by one in your Data Catalog and reports if the process was successful, as shown:
✔ Create event:product_viewed
✔ Create property:category
✔ Create property:product_sku
✔ Create tracking_plan:mytrackingplan
9. Update Tracking Plan
In the above steps, you created and deployed a Tracking Plan containing rules for the Product Viewed event. You can use the rudder-cli tool to update the Tracking Plan by adding another event (Added to Cart) and property (price), and deploy the changes to your workspace.
- Define a new event
Added to Cartby opening the~/tutorial-catalog/my-events.yamlfile and adding the following content underspec.events:
version: rudder/v1
kind: events
metadata:
  name: myeventgroup
spec:
  events:
    - id: product_viewed
      name: "Product Viewed"
      event_type: track
      description: "This event is triggered every time a user views a product."
    - id: added_to_cart
      name: "Added To Cart"
      event_type: track
      description: "This event is triggered everytime the user adds a product to their cart."
Note that you can also define the new event in a different file. In this case, you can add it in the existing file to group together events that are used in the same context.
- Define a new property
priceby opening the~/tutorial-catalog/my-properties.yamlfile and adding the following details underspec.properties:
version: rudder/v1
kind: properties
metadata:
  name: mypropertygroup
spec:
  properties:
    - id: product_sku
      name: "SKU"
      type: string
      description: "Product SKU"
    - id: category
      name: "Category"
      type: string
      description: "Product's category"
    - id: price
      name: "Price"
      type: integer
description: "Product's price"- Add the newly-defined event and property in the Tracking Plan by updating the
~/tutorial-catalog/my-tracking-plan.yamlfile by adding the new event rule and property underspec.rules, as shown:
version: rudder/v1
kind: tracking-plan
metadata:
  name: mytrackingplan
spec:
  id: mytrackingplan
  display_name: "Product Tracking Plan"
  description: "Contains all the events and properties for the Product Tracking Plan."
  rules:
    - type: event_rule
      id: product_viewed_rule
      event: "#event:product_viewed"
      additional_properties: false
      properties:
        - property: "#property:product_sku"
          required: true
        - property: "#property:category"
          required: false
        - property: "#property:product_details" # Object property
          required: true
          properties: # Nested properties
            - property: "#property:product_name"
              required: true
            - property: "#property:product_price"
              required: true
    - type: event_rule # New event rule
      id: added_to_cart_rule
      event: "#event:added_to_cart"
      properties:
        - property: "#property:product_sku"
          required: true
        - property: "#property:price" # New property
          required: true
As described in Step 8: Deploy Data Catalog resources, review the changes and apply them to your workspace by running the below commands:
rudder-cli apply -l ~/tutorial-catalog --dry-runrudder-cli apply -l ~/tutorial-catalogYou can also run the below command to deploy the Tracking Plan changes to your workspace directly and skip any confirmation:
rudder-cli apply -l ~/tutorial-catalog --confirm=falseThe output of this command should look like:
New resources:
  - event:added_to_cart
  - property:price

Updated resources:
  - tracking_plan:mytrackingplan

✔ Create event:added_to_cart
✔ Create property:price
✔ Update tracking_plan:mytrackingplan
The above output informs that a new event and property along with a change in the Tracking Plan is detected. It also informs that the new resources are created and the update operation is completed successfully.
