Snowflake is a popular cloud-based data warehouse known for its speed, scalability, and reliability.
See the Warehouse Schema guide for how events are mapped to Snowflake tables.
Find the open source code for this destination in the GitHub repository.
Set user permissions in Snowflake
Log in with the ACCOUNTADMIN role, or ask your Snowflake admin to grant your account the MANAGE GRANTS privilege. Then, follow the below sections to create a warehouse, database, role, and user in Snowflake.
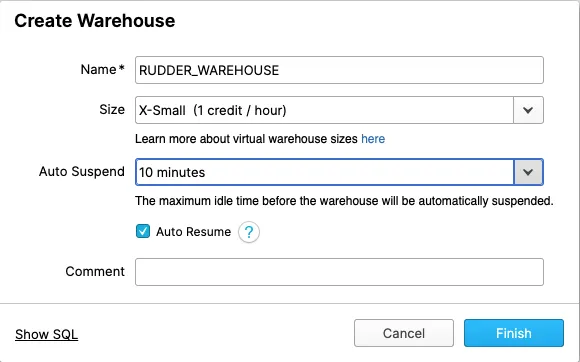
Optional: Create a warehouse
Skip this step to use an existing warehouse.
In your Snowflake console, create a warehouse depending on your data volume requirements.
Alternatively, run the following SQL commands to create a new warehouse:
In your RudderStack dashboard, add a source. Then select Snowflake from the list of destinations.
Assign a name to your destination and click Continue.
Connection settings
Setting
Description
Account
Enter the account ID of your Snowflake warehouse. This ID is part of the Snowflake URL. See the Snowflake account ID examples below for more information.
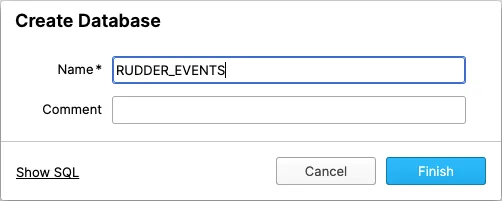
Database
Enter the name of the database created in the Create a database section.
Warehouse
Enter the name of the warehouse created in the Create a warehouse section.
User
Enter the name of the user created in the Create a user section.
Role
Specify the role to assign to the above user. If not specified, the default role is used. Make sure your role has the necessary permissions to load data into the warehouse.
Visible only if Use Key Pair Authentication is toggled off. Enter the password for the user specified above.
Namespace
Enter the schema name where all tables are created. If not specified, the namespace defaults to the source name. You cannot change the namespace later.
Sync Frequency
Specify how often data syncs to your Snowflake warehouse.
Sync Starting At
(Optional) Specify the time of day (in UTC) to start the sync.
Exclude Window
(Optional) Set a time window during which data will not sync to the warehouse.
For AWS, .aws is present in the account locator for some regions and must be included in the Account setting. See the Snowflake documentation for account locator formats by region and cloud provider.
Key pair authentication
For enhanced security, use key pair authentication over basic authentication (username and password).
See the Migration Guide to migrate from username/password to key pair authentication.
Role Based Authentication: Enable this setting to use the RudderStack IAM role for authentication. For more information on creating an AWS IAM role for RudderStack, see this guide.
IAM Role ARN: Enter the ARN of the IAM role.
Enable this setting as the access keys-based authentication method is now deprecated.
If Role-based Authentication is disabled, you need to enter the AWS Access Key ID and AWS Secret Access Key to authorize RudderStack to write to your S3 bucket. Refer to these S3 permissions.
Enable Server-side Encryption for S3: Toggle on this setting to enable server-side encryption for your S3 bucket.
Staging Azure Blob Storage Container Name: Specify the name of your Azure container where data is staged before loading into Snowflake.
Prefix: If specified, a folder is created in the bucket with this prefix and all data is pushed within that folder.
Credentials: Paste the contents of your GCP service account credentials JSON. The service account should have a role with storage.objectCreator access.
Clean up object storage files after successful sync: Turn on this toggle to delete the object storage files after the sync completes successfully.
Advanced settings
RudderStack provides the following advanced settings:
Warehouse Append: This setting is turned on by default - RudderStack appends your incoming Event Stream data to the existing data in your warehouse. Turning it off causes RudderStack to merge your incoming data into your warehouse to ensure 100% non-duplicate data.
The append operation helps to achieve faster data syncs while reducing warehouse costs. However, note that it may increase the number of duplicates in the warehouse, especially if the existing data is older than 7 days. A common scenario where duplication might occur is when the SDKs retry sending events in case of failures.
A merge strategy ensures deduplication but can lead to longer sync times and increased warehouse costs.
Skip Users Table: This setting is toggled on by default and sends events exclusively to the identifies table while skipping the users table. This eliminates the need for a merge operation on the users table. If toggled off, RudderStack sends the events to both the identifies and users tables.
Skip Tracks Table: Toggle on this setting to skip sending events to the tracks table.
JSON Columns: Lets you ingest semi-structured event data not defined by a fixed schema. You can specify the required JSON column paths in this setting in dot notation, separated by commas. This option applies to all incoming track events for this destination. See JSON Column Support for more information.
Configure cloud storage integration with Snowflake
Use the storage integration to run the COPY command. Configure the Storage Integration setting specified in the Configure object storage section above.
If you have Amazon Web Services (AWS) as your cloud provider and want to use S3 as your object storage, follow the steps below. You can find detailed instructions in the Snowflake documentation.
Create a policy in AWS: In the following JSON, replace <BUCKET_NAME> and <PREFIX> with the name of your S3 bucket and the prefix set in the Configure object storage section above, and create the policy with a name of your choice.
Create a role and attach the above policy in AWS: Follow the steps listed below:
Create a role of type Another AWS account.
Enter your AWS account ID and enable the Require External ID option.
For external ID, you can add a placeholder value like 0000. This can be modified later.
Attach the policy created in Step 1. Assign a name to this role and keep the role ARN handy for the next step.
Create the cloud storage integration in Snowflake: Replace <INTEGRATION_NAME> with the name of your choice (note this name for the later steps) and <IAM_ROLE> with the role ARN obtained in Step 2 and run the following command:
Retrieve the AWS IAM user for your Snowflake account:
DESCINTEGRATION<INTEGRATION_NAME>;
Grant the IAM user permissions to access the bucket objects in S3. Choose the role you created in Step 2 and edit the trust relationship as shown in the following JSON:
Both statements in the JSON below are mandatory — one is required for RudderStack ingestion and the other for Snowflake access.
Data is loaded via an external location, so the following command listed in the Snowflake documentation is not required:
GRANTCREATESTAGEONSCHEMApublictorole<ROLE>;
To use Azure Blob Storage as your object storage, follow the instructions below. You can find detailed instructions in the Snowflake documentation.
Create a storage account and container in Azure: First, create a storage account in Azure. Then, navigate to Storage Explorer > Blob Containers > Create a Blob Container.
Run the following commands to create a cloud storage integration in Snowflake:
You can get your <TENANT_ID> by navigating to Azure Active Directory > Properties > Directory ID.
Grant Snowflake access to the storage locations: Run the following command and replace <INTEGRATION_NAME> with the integration name created in Step 2.
DESCINTEGRATION<INTEGRATION_NAME>;
Record the values for AZURE_CONSENT_URL and AZURE_MULTI_TENANT_APP_NAME.
Go to the URL obtained in AZURE_CONSENT_URL and accept the consent requirements.
Grant Snowflake access to the container: Navigate to Azure Services > Storage Accounts and select the storage account created in Step 1.
Add the role: Navigate to Access Control (IAM) > Add Role Assignment. Select either Storage Blob Data Reader with Read access, or Storage Blob Data Contributor with Read and Write access.
Add Assign Access: Add Service Principal as the security principal type for the role. Search for AZURE_MULTI_TENANT_APP_NAME that you obtained in Step 3.
Grant integration access to the Snowflake role you created in the Create a role for RudderStack section by running the following command:
Replace <INTEGRATION_NAME> with the name of your Cloud Storage integration, <bucket> with Staging GCS Object Storage Bucket Name, and <PATH> with the prefix set in the Configure object storage section above.
Retrieve the Cloud Storage service account ID created for your Snowflake account, where <INTEGRATION_NAME> is the integration name you specified in Step 1:
DESCSTORAGEINTEGRATION<INTEGRATION_NAME>;
The output of this command has a property named STORAGE_GCP_SERVICE_ACCOUNT. Retrieve this property value. It should be of the format service-account-id@UNIQUE_STRING.iam.gserviceaccount.com.
Grant service account permissions to access the bucket objects: Create a custom IAM role with the required permissions to access the bucket and fetch the objects:
Log into the GCP console as a Project Editor.
From the dashboard, go to IAM & Admin > Roles.
Click CREATE ROLE.
Enter the title and description for the custom role.
Click ADD PERMISSIONS.
Filter the following permissions in the Enter property name or value and add them to the list:
storage.buckets.get
storage.objects.get
storage.objects.list
storage.objects.create
Assign the custom role to the Cloud Storage service account:
In your GCP console dashboard, go to Cloud Storage > Browser.
Select the bucket to configure the access.
Select SHOW INFO PANEL in the upper right corner. The information panel for the bucket appears.
In the Add Members section, get the service account name from the DESC command run in Step 2.
From the Select a role dropdown, select Storage > Custom > <role>, where <role> is the custom Cloud Storage role.
Click ADD. The service account name is added to the Storage Object Viewer role dropdown in the information panel.
Grant integration access to the Snowflake role you created in the Create a role for RudderStack section by running the following command:
This site uses cookies to improve your experience while you navigate through the website. Out of
these
cookies, the cookies that are categorized as necessary are stored on your browser as they are as
essential
for the working of basic functionalities of the website. We also use third-party cookies that
help
us
analyze and understand how you use this website. These cookies will be stored in your browser
only
with
your
consent. You also have the option to opt-out of these cookies. But opting out of some of these
cookies
may
have an effect on your browsing experience.
Necessary
Always Enabled
Necessary cookies are absolutely essential for the website to function properly. This
category only includes cookies that ensures basic functionalities and security
features of the website. These cookies do not store any personal information.
This site uses cookies to improve your experience. If you want to
learn more about cookies and why we use them, visit our cookie
policy. We'll assume you're ok with this, but you can opt-out if you wish Cookie Settings.