Snowflake Streaming is a powerful tool for handling real-time data streams. It allows you to stream data rows directly in Snowflake tables with minimal latency.
Find the open source code for this destination in the GitHub repository.
Snowflake Streaming is ideal for the following scenarios:
Continuous data streams: If your data sources produce a steady stream of data in small batches, for example, clickstream data, event logs, etc.
Low latency requirements: When your application requires immediate/frequent updates to the Snowflake table as new data arrives. Some use cases include real-time dashboards, streaming analytics, etc.
Cost optimization for streaming data: Snowflake Streaming can potentially reduce costs for real-time pipelines as it allows micro-batch ingestion without needing a traditional Snowflake warehouse running constantly.
Prerequisites
Before setting up the Snowflake Streaming destination in RudderStack:
You will need to have the ACCOUNTADMIN system role or any account with MANAGE GRANTS privilege.
You will need to set the correct user permissions in Snowflake for RudderStack to send the data correctly.
The following sections walk you through the process of setting up a virtual warehouse, database, role, and user in Snowflake.
1. (Optional) Create a warehouse
Note the following:
You can skip this step if you wish to use an existing warehouse.
For this integration, RudderStack uses the warehouse only to run some queries for performing connection validations as well as schema evolution management. It does not use the warehouse for data loading.
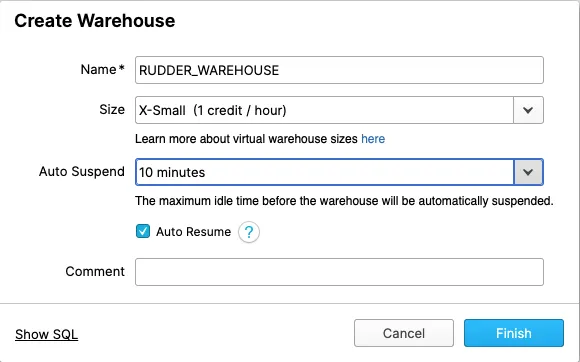
In your Snowflake console, create a X-Small warehouse.
Alternatively, run the following SQL commands to create a new warehouse:
Make sure to set AUTO_SUSPEND to ~10 minutes and enable AUTO_RESUME to avoid any extra costs.
2. Create a database
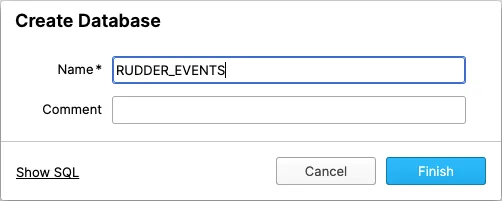
RudderStack recommends creating a new database to avoid conflicts with your existing data. Note that RudderStack creates its own tables within this database while storing your events.
Alternatively, you can create a new database by running the following SQL command:
CREATEDATABASE"<DATABASE_NAME>";
3. Create a role for RudderStack
To create a new role with the required permissions to load your data into the above database, run the following SQL commands in the exact order. Make sure to replace the placeholder names with your preferred names.
You can also create a custom role with the necessary permissions and specify it in the dashboard settings while setting up the Snowflake Streaming destination in RudderStack.
4. Create a user
Since Snowflake is in the process of deprecating password-only authentication, the Snowflake Streaming destination only supports key-pair authentication.
Use the following query to create a Snowflake user that connects RudderStack to your warehouse. Make sure to replace the placeholder names with your preferred values.
Tip:
If your sources send data to different schemas, create multiple Snowflake Streaming destinations (each with a different namespace) and connect the relevant sources accordingly.
In your RudderStack dashboard, add a source. Then select Snowflake Streaming from the list of destinations.
Assign a name to your destination and click Continue.
Connection settings
Setting
Description
Account
Enter the account ID of your Snowflake warehouse. This ID is part of the Snowflake URL.
See the Snowflake account ID examples for more information on how this ID varies depending on various cloud providers.
Database
Enter the name of the database created in the Create database section.
Warehouse
Enter the name of your warehouse.
User
Enter the name of the user created in the Create user section.
Role
Specify the role to be assigned to the above user. If not specified, RudderStack uses the default role.
Make sure your role has the necessary permissions for RudderStack to load the data into the warehouse.
Private Key
Generate a private key and specify it in this field. Make sure to include the delimiters.
See the following sections in the Snowflake documentation to generate and use the key pair:
Specify the password you set while encrypting the private key. Leave this field blank if your private key is not encrypted.
The user authentication will fail if your private key is encrypted and you do not specify the passphrase.
Namespace
Enter the schema name for the warehouse where RudderStack creates all tables. If not specified, RudderStack sets the namespace to the source name by default.
You cannot change the namespace later.
Snowflake account ID examples
The below table illustrates the slight differences in the account IDs depending on the various cloud providers. See the Snowflake documentation for more information on the account locator formats depending on your region or cloud provider.
Toggle on this setting to skip sending events to the tracks table.
Skip Users Table
This destination does not support the users table.
Merge Mode
This destination does not support merge mode.
JSON Columns
This setting lets you ingest semi-structured event data not defined by a fixed schema. Specify the required JSON column paths in the dot notation, separated by commas.
Make sure to update your SDK code to use this feature correctly for snowflake streaming.
Consent settings
Setting
Description
Consent management provider
Configure the consent management settings for the specified source by choosing the Consent management provider from the dropdown and entering the relevant consent category IDs.
This site uses cookies to improve your experience while you navigate through the website. Out of
these
cookies, the cookies that are categorized as necessary are stored on your browser as they are as
essential
for the working of basic functionalities of the website. We also use third-party cookies that
help
us
analyze and understand how you use this website. These cookies will be stored in your browser
only
with
your
consent. You also have the option to opt-out of these cookies. But opting out of some of these
cookies
may
have an effect on your browsing experience.
Necessary
Always Enabled
Necessary cookies are absolutely essential for the website to function properly. This
category only includes cookies that ensures basic functionalities and security
features of the website. These cookies do not store any personal information.
This site uses cookies to improve your experience. If you want to
learn more about cookies and why we use them, visit our cookie
policy. We'll assume you're ok with this, but you can opt-out if you wish Cookie Settings.