PostgreSQL Destination
8 minute read
PostgreSQL is an enterprise-grade, open source database management system. It supports both SQL and JSON for relational and non-relational queries respectively. Many companies in the market use PostgreSQL as their low-cost data warehousing solution in order to deliver efficient analytics and user insights.
Find the open source code for this destination in the GitHub repository.
Refer to the Warehouse Schema guide for more information on how the events are mapped to the PostgreSQL tables.
If you are using the PgBouncer connection pooler with PostgreSQL, RudderStack supports only the session pooling mode and not the transaction and statement pooling modes.
Setting user permissions in PostgreSQL
After setting up your PostgreSQL database, create a user with the necessary privileges to create schemas and temporary tables in this database.
Run the following query to create a new user in PostgreSQL:
CREATE USER <username> WITH PASSWORD '<password>';Run the following query to grant permissions to the user to create new schemas and temporary tables in the database:
GRANT CREATE, TEMPORARY ON DATABASE <databasename> TO <username>;You must grant theCREATE, TEMPORARYprivileges to the user. Otherwise, RudderStack will not be able to export the events to PostgreSQL.
Configuring PostgreSQL destination in RudderStack
To send event data to PostgreSQL, you first need to add it as a destination in RudderStack and connect it to your data source. Once the destination is enabled, events will automatically start flowing to PostgreSQL via RudderStack.
To configure PostgreSQL as a destination in RudderStack, follow these steps:
- In your RudderStack dashboard, set up the data source. Then, select PostgreSQL from the list of destinations.
- Assign a name to your destination and click Next.
Connection settings
- Host: Enter the host name of your PostgreSQL service.
- Database: Enter your PostgreSQL database name where RudderStack will load the data.
- User: Enter the name of the user created in the Setting user permissions in PostgreSQL section above.
- Password: Enter the password you set for the above user.
- Port: Enter the port number associated with your PostgreSQL instance.
- Namespace: Enter the schema name where RudderStack will create all tables. If you don’t specify any namespace, RudderStack will set this to the source name, by default.
You cannot change the namespace later.
SSH connection
This feature is available only for the Enterprise plan users.
SSH tunneling is a method of transferring data over an encrypted SSH connection. You can use it to add encryption to your legacy applications and achieve compliance with regulations like HIPAA, PCI-DSS, etc., without having to modify the existing applications.
RudderStack lets you connect to your PostgreSQL database securely over an SSH connection by configuring these settings:
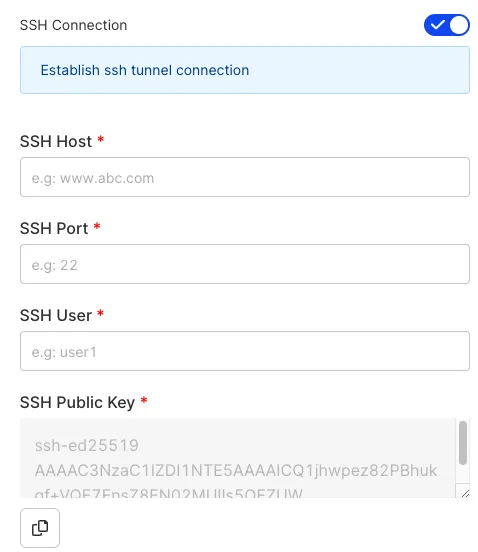
- SSH Connection: Enable this setting to use the SSH connection while connecting to your PostgreSQL database.
- SSH Host: Enter the IP address of your bastion host.
- SSH Port: Enter the port for the above host.
- SSH User: Enter the username you use to access the bastion host.
- SSH Public Key: Copy the public key provided in this field and add it to the
authorized_keysfile on your bastion host. RudderStack uses the private key corresponding to this public key to establish the connection successfully.
To enable the SSH connection for an existing PostgreSQL destination, navigate to the destination’s Configuration tab, select Edit configuration and enable the SSH connection setting.
Sync settings
- SSL Mode: Choose the SSL mode through which RudderStack will connect to your PostgreSQL instance. RudderStack provides three options - disable, require, and verify-ca. For more information on these options, refer to the SSL Modes section below.
- Sync Frequency: Specify how often RudderStack should sync the data to your PostgreSQL database.
- Sync Starting At: This optional setting lets you specify the particular time of the day (in UTC) when you want RudderStack to sync the data to the warehouse.
- Exclude Window: This optional setting lets you set a time window when RudderStack will not sync the data to your database.
Configuring the object storage
RudderStack lets you configure the following object storage configuration settings while setting up your PostgreSQL destination:
- Use RudderStack-managed object storage: Enable this setting to use RudderStack-managed buckets for object storage.
This option is applicable only for RudderStack-hosted data planes. For self-hosted data planes, you will have to specify your own object storage configuration settings.
Choose your storage provider: If Use RudderStack-managed object storage is disabled in the dashboard, select the cloud provider for your object storage and enter the relevant settings:
See How RudderStack stores data in an object storage platform for more information.
- Clean up object storage files after successful sync: Turn on this toggle to delete the object storage files after the sync has completed successfully.
Advanced settings
RudderStack provides the following advanced settings:
- Warehouse Append: This setting is turned on by default - RudderStack appends your incoming Event Stream data to the existing data in your warehouse. Turning it off causes RudderStack to merge your incoming data into your warehouse to ensure 100% non-duplicate data.
The append operation helps to achieve faster data syncs while reducing warehouse costs. However, note that it may increase the number of duplicates in the warehouse, especially if the existing data is older than 7 days. A common scenario where duplication might occur is when the SDKs retry sending events in case of failures.
A merge strategy ensures deduplication but can lead to longer sync times and increased warehouse costs.
- Skip Users Table: This setting is toggled on by default and sends events exclusively to the
identifiestable while skipping theuserstable. This eliminates the need for a merge operation on theuserstable. If toggled off, RudderStack sends the events to both theidentifiesanduserstables. - Skip Tracks Table: Toggle on this setting to skip sending events to the
trackstable. - JSON Columns: Lets you ingest semi-structured event data not defined by a fixed schema. You can specify the required JSON column paths in this setting in dot notation, separated by commas. This option applies to all incoming
trackevents for this destination. See JSON Column Support for more information.
SSL modes
Based on your security preferences, RudderStack lets you specify the SSL mode through which you can send the data to PostgreSQL.
RudderStack supports the following three SSL modes defined by PostgreSQL:
| SSL mode | Eavesdropping protection | MITM (Man in the middle) protection | Description |
|---|---|---|---|
| disable | No | No | SSL mode is disabled. Use it in cases where security is not an issue and you don’t want the encryption overhead. |
| require | Yes | No | Use this mode when you want to encrypt your data and can deal with the resulting encryption overhead. |
| verify ca | Yes | Dependent on the CA policy | Use this mode when you want to encrypt your data, can bear the encryption overhead, and want to be sure that you connect to a server you trust. |
For more information, refer to the PostgreSQL SSL Support documentation.
Using verify-ca to configure PostgreSQL destination
To use verify-ca as the SSL mode while configuring your PostgreSQL destination, you need to copy the contents of the following three files from your SSL certificate:
- Client Key Pem File
- Client Cert Pem File
- Server CA Pem File
Although you can use an existing certificate to obtain the above credentials, it is recommend you create a new SSL certificate to avoid any issues.
The following steps demonstrate how you can create a new SSL certificate in Google Cloud SQL and obtain the above-mentioned credentials:
- Go to your PostgreSQL instance in your Cloud SQL console.
- In the left panel, click Connections and go to the SECURITY tab.
- Under Manage client certificates, click CREATE CLIENT CERTIFICATE.
- Assign a unique identifier for your SSL certificate and click CREATE. Your new SSL certificate will be created:
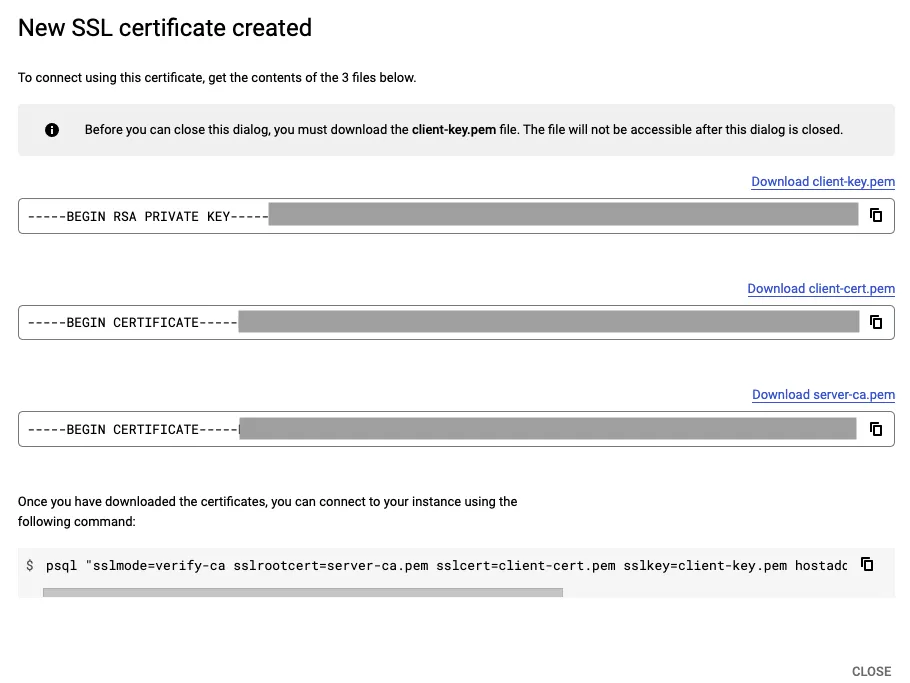
- Finally, copy the contents of the three fields and paste it in the RudderStack dashboard settings as seen below:
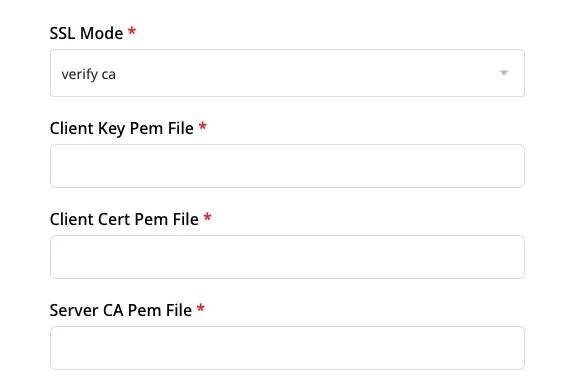
For other cloud providers, this procedure might vary slightly.
IPs to be allowlisted
To enable network access to RudderStack, allowlist the following RudderStack IPs depending on your region and RudderStack plan:
| Plan | |||
|---|---|---|---|
| Free and Growth |
|
| |
| Enterprise |
|
|
|
All the outbound traffic is routed through these RudderStack IPs.
FAQ
RudderStack does not create the corresponding PostgreSQL tables when I press on ‘sync’. What do I do?
- Firstly, check the status of your data sync in the RudderStack dashboard.
- Make sure you have set up the user permissions for your PostgreSQL instance.
- Check if your database is accessible to RudderStack by Warehouse FAQ.
- Ensure that all security group policies are appropriately set.
How does RudderStack handle reserved words?
There are some limitations when it comes to using reserved words in a schema, table, or column names. If such words are used as event names, traits or properties, they will be prefixed with a _ when RudderStack creates tables or columns for them in your schema.
Also, it is important to note that integers are not allowed at the start of the schema or table name. Hence, RudderStack prefixes such schema, column or table names with a _.
For instance, '25dollarpurchase' will be changed by RudderStack to '_25dollarpurchase’.
How does RudderStack handle cases when loading data into PostgreSQL?
RudderStack converts the event keys into the lower case before exporting the data into PostgreSQL, so that it does not create multiple tables if the event name is written in different cases.
For a more comprehensive FAQ list, refer to the Warehouse FAQ guide.
