Sync data from RudderStack to BigQuery Stream (All Events).
9 minute read
The BigQuery Stream (All Events) destination is currently in Private Beta.
Reach out to Customer Success if you are interested in enabling this destination for your workspace.
This guide helps you set up the BigQuery Stream (All Events) destination in RudderStack.
Overview
The BigQuery Stream (All Events) destination lets you stream all RudderStack events to BigQuery in near real-time using BigQuery Storage Write API.
Advantages of using BigQuery Stream (All Events)
This destination provides the near real-time speed of streaming and the full schema management you’d normally only get from batch loading without the trade-offs of either approach:
vs. BigQuery Stream: Adds automatic schema management and support for all event types (not just track events), and uses BigQuery’s modern, lower-cost Storage Write API.
vs. BigQuery (Batch destination): Delivers data in near real-time instead of waiting for each sync, while keeping the same warehouse schema you’re used to.
With this integration, you get fresh data in BigQuery within seconds, full schema parity with your other warehouse tables, and lower streaming costs.
Prerequisites
Follow the steps in this section before setting up the BigQuery Stream (All Events) destination in RudderStack.
1. Important considerations
Before you set up the BigQuery Stream (All Events) destination in RudderStack, note the following limitation:
No merge mode support
This destination does not support merge mode. The BigQuery Storage Write API only supports inserts and writes rows directly into tables to reduce latency.
Create a Google Cloud Platform project if you don’t have one already. See BigQuery documentation for more information.
Make sure to enable billing for the project to allow RudderStack to load data into your BigQuery cluster.
Enable the BigQuery API for your existing project if not done already.
Log in to your BigQuery console and copy the project ID – this ID is required for configuring the destination in RudderStack.
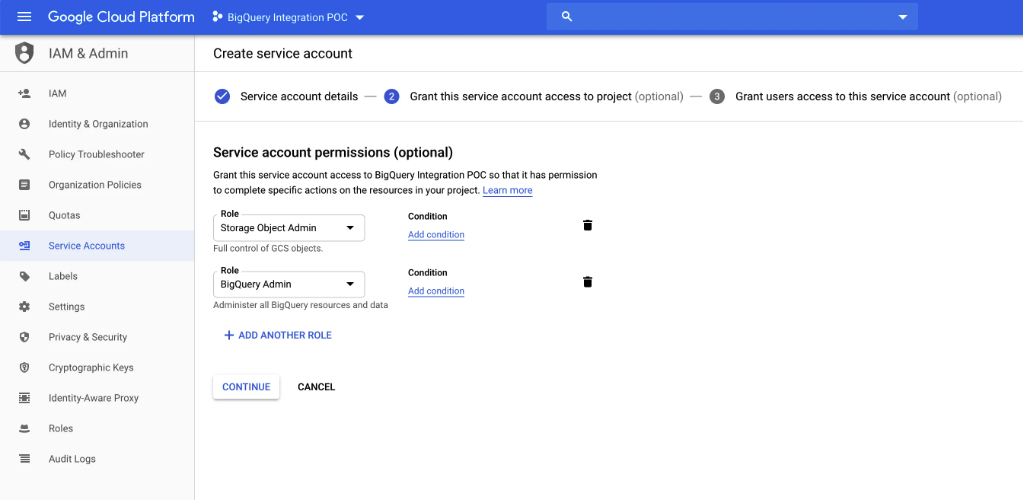
3. Set up the RudderStack service account
Create the service account for the BigQuery project you set up above by following these steps:
Go to IAM & Admin > Service Accounts.
Create a new role with the following permissions:
bigquery.datasets.create // Skip if the dataset already exists.
bigquery.datasets.get
bigquery.jobs.create
bigquery.routines.get
bigquery.routines.list
bigquery.tables.create
bigquery.tables.delete
bigquery.tables.get
bigquery.tables.getData
bigquery.tables.list
bigquery.tables.update
bigquery.tables.updateData
Tip:
Skip the bigquery.datasets.create permission if the dataset already exists.
Assign the role to the service account.
If you do not want to add the above fine-grained permissions to the service account individually, add the below roles to your service account:
BigQuery Job User
BigQuery Data Owner
If the dataset name already exists (configurable by the Namespace setting during the destination setup), you can assign the BigQuery Data Editor role instead of BigQuery Data Owner.
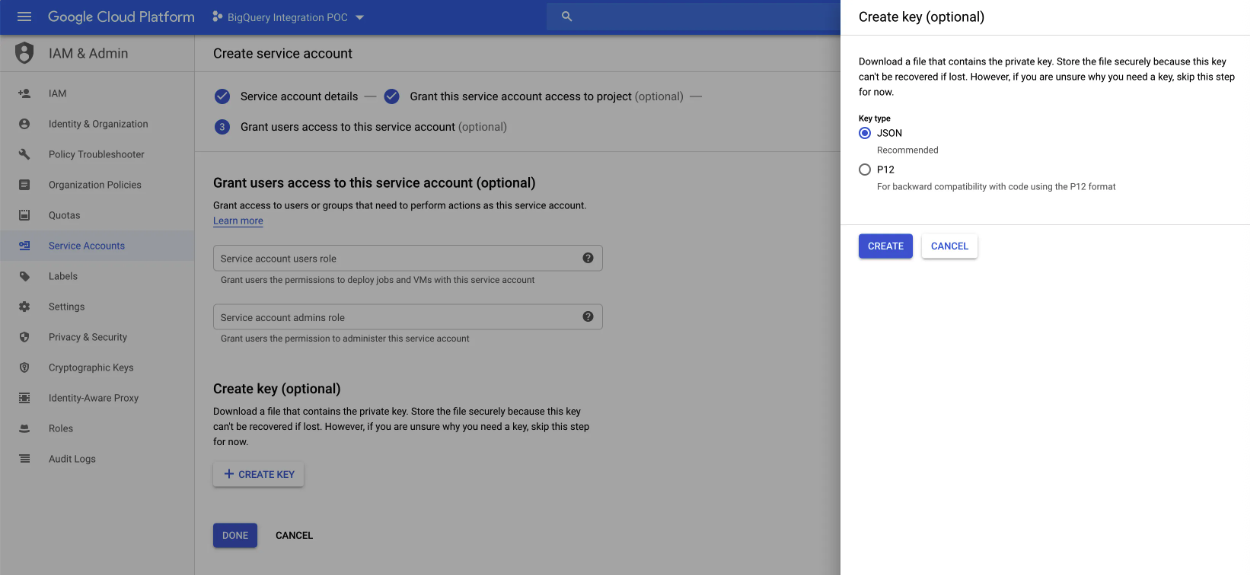
Optional: Create and download the private JSON key required for accessing the service account. You need this key to configure the destination in RudderStack.
IPs to allowlist
By default, you can access BigQuery via the Google APIs, which are publicly accessible. As such, allowlisting any IPs is not required.
Time at which RudderStack loads the data in the warehouse (loaded_at column).
Received At
Time at which RudderStack receives the data (received_at column).
Timestamp
Timestamp calculated by RudderStack to account for the client-side clock skew (timestamp column).
Sent At
Time at which the data was sent from the client to RudderStack (sent_at column).
Original Timestamp
Time at which the data was generated at the source (original_timestamp column).
See Time-unit column partitioning for more information on how BigQuery puts the data into the partition based on the values in the Loaded At, Received At, Timestamp, Sent At, and Original Timestamp columns.
Partition Type
Specify the partition’s granularity level from the dropdown. RudderStack provides two options - Hour and Day.
Partition settings for existing destinations are not editable
You cannot edit the partition settings for existing BigQuery destinations through the dashboard. RudderStack automatically sets their partitioning type to Ingestion time partitioning with a day level granularity.
To change your partition configuration, RudderStack recommends creating a new BigQuery destination and deprecating the old one.
To apply partition changes to an existing destination, contact RudderStack Support.
Advanced settings
Setting
Description
Skip Users Table
This destination does not support the users table.
Skip Tracks Table
Toggle on this setting to skip sending events to the tracks table.
Skip Views Creation
Toggle on this setting to disable views creation in BigQuery. See Partitioned tables and views for more information.
This setting is configurable only while creating a new BigQuery destination and cannot be changed later.
JSON Columns
This setting lets you ingest semi-structured event data not defined by a fixed schema. Specify the required JSON column paths in the dot notation, separated by commas.
RudderStack uses the source name (written in snake case, for example, source_name) to create a dataset in BigQuery.
See the Warehouse Schema guide for more details on the tables and columns created by RudderStack.
By default, RudderStack uses the partitioned tables method to ingest data into BigQuery.
Partitioned tables
RudderStack creates ingestion-time partition tables based on the load date, so you can take advantage of it to query a subset of data.
For information on how RudderStack creates these tables on load, see the Creating partitioned tables section of the BigQuery documentation.
RudderStack does not discard duplicate data while loading it into BigQuery.
Views
In addition to tables, RudderStack creates a view (<table_name>_view) for every table for de-duplication purposes, ensuring that queried events are unique and contain the latest records.
Note that:
RudderStack recommends using the corresponding view (containing the events from the last 60 days) to avoid duplicate events in your query results.
Since BigQuery views are merely logical views and are not cached, you can create a native table from it to save costs - by avoiding running the query that defines the view every time.
You can modify the view query to change the time window of the view - the default value is set to 60 days.
Skip views creation
Toggle on the Skip Views Creation connection setting to disable creating views in BigQuery.
RudderStack recommends skipping views creation only if:
You do not need views and want to take care of deduplication by yourself.
You have alternative deduplication methods (for example, partition columns and types).
You have any security reasons and want to limit access to the tables.
FAQ
I am getting an “Failed to add columns for table <table_name> in the name ” error even though the table column limit is not reached. How do I resolve this issue?
According to BigQuery documentation, the maximum columns in a table, query result, or view definition cannot exceed 10000 columns. This includes recently deleted columns that persist in the total columns quota until it resets.
To circumvent the “Failed to add columns for table <table_name> in the name ” error when the table column limit is not reached, you can create a new table using CLONE and take a backup of the existing table to resolve the issue:
Create new table using CLONE by using the below query:
By default, BigQuery is accessible via publicly accessible Google APIs. As such, allowlisting any IPs is not required. However, if your VPC service restricts the BigQuery APIs, you will need to allowlist the IPs by setting up network access control for BigQuery.
What happens if my custom property name matches a standard RudderStack property?
RudderStack normalizes property keys to snake case when building warehouse columns.
If a property name (in properties or traits) matches a standard RudderStack property, RudderStack drops your property value in favor of the standard mapping.
For example, the user_id column is populated from root-level userId of an event, not from a separate properties.user_id field, so if you send a property named user_id, its value will not appear in the table.
Note that warehouse loads will still complete successfully, which means you might not see a sync failure when this happens. To capture the data under another name, use a different property (for example user_id_v2) or rename the field using a transformation.
This behavior is not the same as SQL reserved keyword handling.
How does RudderStack handle SQL reserved keywords in dataset, table, or column names?
BigQuery treats certain words as SQL reserved keywords. If you use them in event names, traits, or properties, RudderStack prefixes an underscore (_) when creating the corresponding tables or columns in your dataset.
Integers are not allowed at the start of a schema or table name. In those cases, RudderStack also prefixes the name with an underscore. For example, 25dollarpurchase becomes _25dollarpurchase.
When sending data into a data warehouse, how can I change the table where this data is sent?
Set the Namespace field in the destination settings to change the table. If you don’t specify any namespace, RudderStack sets the namespace to the source name, by default.
How can I understand what data is populated in each column?
See the Warehouse Schema guide for details on how RudderStack generates the schema in the warehouse and populates the data in each column.
Do I need to stop the running pipeline to change my sync frequency? Or will the new change be effective even without stopping the pipeline?
To change the sync frequency, you need not stop the pipeline.
When configuring the BigQuery destination, where does Google use the credentials JSON from?
BigQuery uses the credentials JSON from the dashboard configuration when setting up the destination.
This site uses cookies to improve your experience while you navigate through the website. Out of
these
cookies, the cookies that are categorized as necessary are stored on your browser as they are as
essential
for the working of basic functionalities of the website. We also use third-party cookies that
help
us
analyze and understand how you use this website. These cookies will be stored in your browser
only
with
your
consent. You also have the option to opt-out of these cookies. But opting out of some of these
cookies
may
have an effect on your browsing experience.
Necessary
Always Enabled
Necessary cookies are absolutely essential for the website to function properly. This
category only includes cookies that ensures basic functionalities and security
features of the website. These cookies do not store any personal information.
This site uses cookies to improve your experience. If you want to
learn more about cookies and why we use them, visit our cookie
policy. We'll assume you're ok with this, but you can opt-out if you wish Cookie Settings.