MoEngage Destination
15 minute read
MoEngage is an intelligent customer engagement platform. It lets you personalize every customer interaction and drive better engagement, retention, loyalty, and lifetime value.
Find the open source transformer code for this destination in the GitHub repository.
Connection compatibility
| Destination Information | |||
|---|---|---|---|
| |||


MoEngage native web SDK URL
In the web device mode integration, that is, using JavaScript SDK as a source, RudderStack loads the MoEngage native SDK from the below URL:
https://cdn.moengage.com/release/${moeDataCenter}/versions/${sdkVersion}/moe_webSdk.min.latest.jsWhere:
moeDataCenteris the MoEngage data centersdkVersionis the MoEngage SDK version
Based on your website’s content security policy, you might need to allowlist this domain to load the MoEngage SDK successfully.
Get started
- In your RudderStack dashboard, set up a source.
- Go to the Overview tab of your source and select Add Destination > Create new destination.
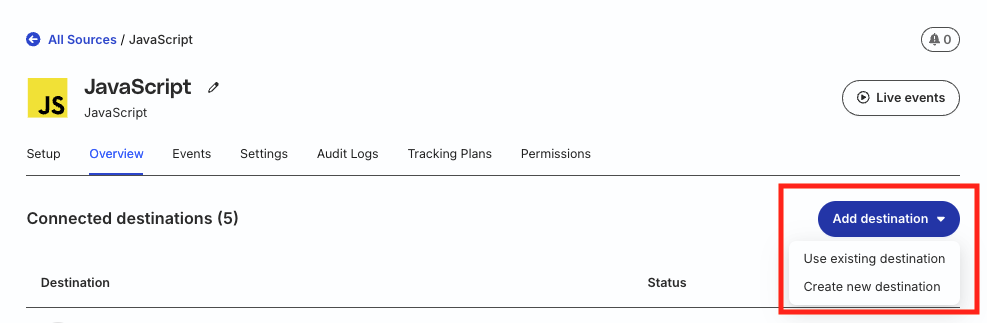
- Select MoEngage from the list of destinations. Then, click Continue.
Connection settings
| Setting | Description |
|---|---|
| API ID | Enter your MoEngage API ID. |
| API Key | Enter your MoEngage API key. |
| Region | Choose the MoEngage server region to send your events. RudderStack supports the following regions:
|
Web SDK settings
The following settings are applicable for the RudderStack JavaScript SDK:
| Setting | Description |
|---|---|
| Use device mode to send events | Toggle on this setting to send events to MoEngage in device mode. |
| Debug mode | Toggle on this setting to get the debug logs for events sent using the JavaScript SDK. You can then see the events under the Test section of your MoEngage app. |
| Enable Identity Resolution | Toggle on this setting to use MoEngage’s Unified Identity (Identity Resolution) feature.
|
Other settings
| Setting | Description |
|---|---|
| Client-side Events Filtering | This setting is applicable only for sending events in device mode. It lets you specify which events should be blocked or allowed to flow through to MoEngage. For more information on this setting, refer to the Client-side Events Filtering guide. |
| Consent management settings | Configure the consent management settings for the specified source by choosing the Consent management provider from the dropdown and entering the relevant consent category IDs. See Consent Management in RudderStack for more information on this feature. |
Add device mode integration
Follow these steps to add MoEngage to your project depending on your integration platform:
- Add the RudderStack-MoEngage module to your app by running the following command:
npm install @rudderstack/rudder-integration-moengage-react-native
// OR //
yarn add @rudderstack/rudder-integration-moengage-react-native- Import the above module and add it to your SDK initialization:
import rudderClient from "@rudderstack/rudder-sdk-react-native"
import moengage from "@rudderstack/rudder-integration-moengage-react-native"
const config = {
  dataPlaneUrl: <data_plane_url>,
  trackAppLifecycleEvents: true,
  withFactories: [moengage],
}
rudderClient.setup( <write_key> , config)- Add the following dependencies in the
android/app/build.gradle(Module: app) file in the Android folder of your React Native project:
implementation 'com.rudderstack.android.sdk:core:1.+'
implementation 'com.rudderstack.android.integration:moengage:1.0.0'
implementation 'com.moengage:moe-android-sdk:10.5.00'

//jet pack library required by moengage
implementation 'androidx.core:core-ktx:1.3.2'
implementation 'androidx.appcompat:appcompat:1.2.0'
implementation 'androidx.lifecycle:lifecycle-process:2.2.0'

//firebase messaging dependency
implementation 'com.google.firebase:firebase-messaging:21.0.0'

// if you don't have Gson included already
implementation 'com.google.code.gson:gson:2.8.6'- In the
android/build.gradle(Module: Project) file, add the following lines:
repositories {
  mavenCentral()
}- Add the following in the
buildscriptdependencies inandroid/build.gradle(Module: Project) file:
// For Push Notification
buildscript {
  dependencies {
    classpath 'com.google.gms:google-services:4.3.4'
  }
}- Add the following plugin at the top of
android/app/build.gradle(Module: app):
// For Push Notification
apply plugin: 'com.google.gms.google-services'- Initialize the MoEngage SDK in the
Applicationclass’onCreate()method:
// MoEngage SDK initialisation: Replace "xxxxxxx" with your APP ID.
MoEngage moEngage = new MoEngage
  .Builder(MainActivity.this.getApplication(), "xxxxxxx")
  .enableLogs(LogLevel.VERBOSE)
  .build();
MoEngage.initialise(moEngage);- Go to your
Podfileand add theRudder-Moengageextension.
pod 'Rudder-Moengage'- After adding the dependency followed by
pod install, add the imports to yourAppDelegate.mfile:
#import "RudderMoengageFactory.h"- Finally, change the initialization of your
RudderClient:
RudderConfigBuilder *builder = [[RudderConfigBuilder alloc] init];
[builder withDataPlaneUrl:DATA_PLANE_URL];
[builder withFactory:[RudderMoengageFactory instance]];
[RudderClient getInstance:WRITE_KEY config:[builder build]];
This device mode integration is supported for MoEngage v6.1.0 and above.
- Install
RudderMoEngage(available through CocoaPods) by adding the following line to yourPodfile:
pod 'RudderMoEngage', '~> 1.0.0'- Run the
pod installcommand. - Import the SDK depending on your preferred platform:
import RudderMoEngage@import RudderMoEngage;- Add the imports to your
AppDelegatefile under thedidFinishLaunchingWithOptionsmethod:
let config: RSConfig = RSConfig(writeKey: WRITE_KEY)
            .dataPlaneURL(DATA_PLANE_URL)

RSClient.sharedInstance().configure(with: config)
RSClient.sharedInstance().addDestination(RudderMoEngageDestination())RSConfig *config = [[RSConfig alloc] initWithWriteKey:WRITE_KEY];
[config dataPlaneURL:DATA_PLANE_URL];
[[RSClient sharedInstance] configureWith:config];
[[RSClient sharedInstance] addDestination:[[RudderMoEngageDestination alloc] init]];- Open your
app/build.gradle(Module: app) file and add the following lines:
repositories {
    mavenCentral()
}- Add the following dependencies:
// RudderStack Android and MoEngage SDKs
implementation 'com.rudderstack.android.sdk:core:[1.0,2.0)'
implementation 'com.rudderstack.android.integration:moengage:2.0.0'

// For MoEngage core SDK initialisation
implementation("com.moengage:moe-android-sdk:12.5.04")

// Firebase messaging dependency
implementation 'com.google.firebase:firebase-messaging:23.1.1'

// If you don't have Gson included already
implementation 'com.google.code.gson:gson:2.8.9'- After
buildscript, add the below plugin:
// For Push Notification
apply plugin: 'com.google.gms.google-services'- Open your
build.gradle(Module: Project) file and add the following in thebuildscriptdependencies:
// For Push Notification
buildscript {
    dependencies {
        classpath 'com.google.gms:google-services:4.3.14'
    }
}- Initialize the RudderStack SDK in the
Applicationclass’onCreate()method:
// initializing Rudder SDK
val rudderClient = RudderClient.getInstance(
    this,
    WRITE_KEY,
    RudderConfig.Builder()
        .withDataPlaneUrl(DATA_PLANE_URL)
        .withFactory(MoengageIntegrationFactory.FACTORY)
        .build()
)- Initialize the MoEngage SDK in the
Applicationclass’onCreate()method:
// initializing MoEngage SDK and "XXXXXXXXXXX" is the APP ID from the dashboard.
val moEngage =
    MoEngage.Builder(this, "XXXXXXXXXXX")
        .configureLogs(LogConfig(LogLevel.VERBOSE, false))
        .build()

MoEngage.initialiseDefaultInstance(moEngage)
Identify
You can use the identify API to identify a user in MoEngage. You can also create a new user property or update existing user properties using the identify call.
MoEngage needs a unique identifier to identify a user. So, you must provide a userId in your identify call that RudderStack passes as the MoEngage customer_id . If userId is absent, RudderStack sends the anonymousId field instead.
A sample identify call is as shown:
rudderanalytics.identify("1hKOmRA4GRlm", {
  name: "Alex Keener",
  first_name: "Alex",
  last_name: "Keener",
  email: "alex@example.com",
  createdAt: "Thu Mar 24 2020 17:46:45 GMT+0000 (UTC)",
})
RudderStack uses theidentifycall to log the user into MoEngage in the device mode.
Identify a device in MoEngage
You can identify a device in MoEngage using the identify call to create or update your device properties.
A sample call for identifying device is shown below:
rudderanalytics.identify("name123", {
  context: {
    device: {
      id: "7ase32188a4dab669f",
      manufacturer: "Apple",
      model: "IOS SDK built for x86",
      name: "generic_x86",
      token: "devtoken",
      type: "ios",
    },
  },
})
Reserved properties
MoEngage has reserved the following property names:
namefirst_namelast_nameemailagegendermobiletransactionsrevenuemoe_unsubscribe
Also, MoEngage lets you create custom properties but you must not create properties with the names id, _id, or "" .
Track
RudderStack’s track API lets you track user events and their associated properties.
A sample track call is shown below:
rudderanalytics.track("Order Completed", {
  checkout_id: "C324532",
  order_id: "T1230",
  value: 15.98,
  revenue: 16.98,
  shipping: 3.0,
  coupon: "FY21",
  currency: "INR",
  products: [
    {
      product_id: "product-mixedfruit-jam",
      sku: "sku-1",
      category: "Food",
      name: "Food/Drink",
      brand: "Sample",
      variant: "None",
      price: 10.0,
      quantity: 2,
      currency: "INR",
      position: 1,
      value: 6.0,
      typeOfProduct: "Food",
      url: "https://www.example.com/product/bacon-jam",
      image_url: "https://www.example.com/product/bacon-jam.jpg",
    },
  ],
})
Alias
You can use the alias API to merge two different user profiles in MoEngage.
MoEngage’s user merging functionality is a closed feature and is not available by default. To enable it for your account, contact RudderStack Support or drop a mail to their support team.
A sample alias call made using the different RudderStack SDKs is shown below:
rudderanalytics.alias("12345", "1hKOmRA4GRlm")[[RSClient sharedInstance] alias:@"newId"];rudderClient.alias("newId")RudderStack maps the following alias properties to the corresponding MoEngage properties:
| RudderStack property | MoEngage property | Data type |
|---|---|---|
message.userIdRequired | merged_user | String |
message.previousIdRequired | retained_user | String |
Reset
RudderStack’s reset API resets the previously identified user and the related information.
TheresetAPI is applicable only for device mode connections.
Refer to the following snippets to implement the reset method in your mobile project:
[[RSClient sharedInstance] reset];rudderClient.reset()Supported mappings
RudderStack maps the following properties to the MoEngage properties before sending them using MoEngage’s HTTP API in cloud mode.
| RudderStack property | MoEngage property |
|---|---|
pushPreference | push_preference |
active | active |
userId | customer_id |
name | name |
firstnamefirst_namefirstName | first_name |
lastnamelast_namelastName | last_name |
email | email |
age | age |
gender | gender |
mobile | mobile |
source | source |
createdAt | created_time |
last_seenlastSeen | last_seen |
transactions | transactions |
revenue | revenue |
moe_unsubscribemoeUnsubscribe | moe_unsubscribe |
event | action |
properties | attributes |
Use Unified Identity
Note that:
- Unified Identity (Identity Resolution) is an early access feature — contact your MoEngage Customer Success Manager or raise a support ticket to enable it for your account.
- This feature is available only for web device mode connections (leveraging the JavaScript SDK).
You can leverage MoEngage’s Unified Identity feature to create a unified user identity by linking and matching their attributes across multiple data sources.
Setup
- Enable the Unified Identity feature for your MoEngage account.
- Toggle on the Enable Identity Resolution dashboard setting for your destination.
Configure user identifiers in MoEngage
In your MoEngage dashboard, you can choose identifiers to use for connecting user profiles. You can select standard identifiers like email, phone number, or your own custom identifiers.
Optionally, you can also include
anonymousIdas an identifier to track anonymous users.
How it works
- Anonymous browsing: When users browse your website without logging in, both RudderStack and MoEngage automatically track their activity. To do so, RudderStack leverages
anonymousIdwhile MoEngage uses its own internal identifier. - User login (Identify call): When the user logs in, you can call
identifywith the required identifiers (email, phone, etc.) — this creates or updates the user profile in MoEngage. MoEngage automatically merges the anonymous activity with the identified user profile. - User logout (Reset call): When the user logs out, you can call
reset— this is important if you are usinganonymousIdas an identifier. This approach prevents the activity from different users on the same device from being incorrectly merged. - Multiple users on the same device: RudderStack automatically detects different users logging in on the same device. It calls MoEngage’s
destroy_session()API to prevent merging data from different users and creates a new session for each user.
Configure push notifications
Depending on your platform, follow these steps to configure MoEngage push notifications in your project:
- Create an APNS certificate and convert it to a
.pemfile. - Upload this
.pemfile in your MoEngage dashboard. - In the target app, turn on App Groups and enable one of the app group IDs. In case if you don’t have an app group ID, then create one. The name of your app group should be
group.{bundle id}.MoEngage. - Enable Background mode by navigating to Targets > Your App > Signing & Capabilities > Select Background Modes. Then, check Remote notifications.
- Enable push notification capabilities in your app.
- Before initializing, add
[MoEngage setAppGroupID:<your app group id>]; - To keep the notifications even after the app launch, add the line
[MoEngage sharedInstance].disableBadgeReset = true;
For more information on implementing push notifications in MoEngage, see the MoEngage documentation.
In-App messaging
In-app messaging is a type of mobile messaging where the notification is displayed within the app. Some examples include popups, yes/no prompts, and more. To implement this feature, follow MoEngage’s InApp NATIV guide.
- Create an APNS certificate and convert it to a
.pemfile. - Upload this
.pemfile in your MoEngage dashboard. - Enable Background mode by navigating to Targets > Your App > Signing & Capabilities > Select Background Modes. Then, check Remote notifications.
- Then, in your
plistfile, add theMoEngageAppDelegateProxyEnabledkey and set it tofalseto disable swizzling. - Finally, implement the relevant methods in your
AppDelegatefile by referring to Supporting push notifications for device mode destinations. - To keep the push notifications even after app launch, call the below method:
MoEngage.sharedInstance().setDisableBadgeReset(true)[[MoEngage sharedInstance] setDisableBadgeReset:true];For more information on implementing push notifications in MoEngage, see the MoEngage documentation.
- Copy the Server Key from the FCM console and add it to the MoEngage dashboard. If you’re not sure where to find the server key, refer to this MoEngage guide.
- Navigate to the Settings page of your MoEngage dashboard and add the server key and package name. Make sure you add the keys both in the Test and Live environment.
- Before configuring the MoEngage SDK for receiving push notifications, make you have configured Firebase in your application.
- Add the Firebase messaging dependency in your application’s
build.gradlefile. - Add the meta tags to manifest. To show the push notifications, you need to add the notification icons (small and large) along with the app ID to the
MoEngage.Builder, as shown:
val moEngage =
    MoEngage.Builder(this, "XXXXXXXX")
        .setNotificationSmallIcon(R.drawable.icon)
        .setNotificationLargeIcon(R.drawable.ic_launcher)
        .build()

MoEngage.initialise(moEngage)
Display notifications
To display the notifications, you must ensure the following:
- Registration for Push, that is, generating a push token.
- Receiving the push payload from Firebase Cloud Messaging (FCM) and displaying the alert on the device.
These actions are handled by the application or the MoEngage SDK, depending on your preference. Refer to the following sections to configure them.
Push Registration and Receiving handled by the app
By default, the MoEngage SDK attempts to register a push token. If your application is handling the push notifications, you need to opt-out of the SDK’s token registration.
Opt out of MoEngage Registration
To opt-out of MoEngage’s token registration mechanism call the optOutTokenRegistration() method in MoEngage.Builder, as shown:
val moEngage =
    MoEngage.Builder(this, "XXXXXXXX")
        .setNotificationSmallIcon(R.drawable.icon)
        .setNotificationLargeIcon(R.drawable.ic_launcher)
        .configureFcm(FcmConfig(false))
        .build()

MoEngage.initialise(moEngage)
Pass the push token to MoEngage SDK
The application would need to pass the push token received from FCM to the MoEngage SDK for MoEngage to send push notifications to the device. Use the following API to pass the push token to the MoEngage SDK:
MoEFireBaseHelper.getInstance().passPushToken(applicationContext, token)Make sure the token is passed to the MoEngage SDK whenever the push token is refreshed or your app is updated. Passing the token on application update is required to migrate to MoEngage.
Passing the push payload to the MoEngage SDK
To pass the push payload to the MoEngage SDK, call the MoEngage API from onMessageReceived() from the Firebase receiver.
Before passing the payload to the MoEngage SDK, you should check if the payload is from MoEngage using the helper API provided by the SDK.
if (MoEPushHelper.getInstance().isFromMoEngagePlatform(remoteMessage.data)) {
  MoEFireBaseHelper.getInstance().passPushPayload(
    applicationContext,
    remoteMessage.data
  )
} else {
  // your app's business logic to show notification
}
Push registration and receiving handled by SDK
Add the following code in your manifest file within the application tag:
<service android:name="com.moengage.firebase.MoEFireBaseMessagingService">
<intent-filter>
<action android:name="com.google.firebase.MESSAGING_EVENT"></action>
</intent-filter>
</service>
When the MoEngage SDK handles push registration it optionally provides a callback to the application whenever a new token is registered or token is refreshed.
An application can get this callback by implementing FirebaseEventListener and registering for a callback in the application class’ onCreate() using MoEFireBaseHelper.getInstance().setEventListener().
In-App messaging
In-app messaging is a type of mobile messaging where the notification is displayed within the app. Some examples include popups, yes/no prompts, and more. To implement this follow the MoEngage InApp NATIV guide.
- In your MoEngage dashboard, go to the Web Push Settings.
- Under Web, fill in the required details.
- For HTTPS Web Push to work, you need to host two files in the root directory of your web server.
- After clicking SAVE, download the
serviceworker.jsfile under the Web Push Settings. - If you already have your own
serviceworker.js, add it as shown:
importScripts(
  "https://cdn.moengage.com/webpush/releases/serviceworker_cdn.min.latest.js"
)- Select a sub-domain. For more details, follow the MoEngage guidelines.
- Open the
androidfolder of your React Native app and follow all steps listed in theAndroidtab in this section. - Open the
iosfolder of your React Native app and follow all steps listed in theiOStab in this section.
Timezone offset for cloud mode
This section explains how RudderStack determines the timezone offset for cloud mode connections.
Track
MoEngage allows sending the time at which the event occurred and calculates the user local time by taking two parameters - current_time and user_timezone_offset. current_time is the UTC time at which the event occurred and user_timezone_offset is the time difference (in seconds) between the user local time and UTC.
Note the following:
- RudderStack maps the
current_timetotimestampororiginalTimestampfrom the event payload. Hence, you must pass these values in UTC.- RudderStack maps
user_timezone_offsettotimezonepresent in thecontextobject of the event’s payload. You must pass this value as a stringtz.- The RudderStack mobile SDKs automatically populate the
timezonefield. However, for the other sources like server-side SDKs or HTTP API, you must explicitly set thetimezonefield in every request.
A sample track payload is shown below:
{
  "type": "track",
  "event": "Email Replied",
  "sentAt": "2020-12-02T11:30:33.262Z",
  "context": {
    "library": {
      "name": "analytics-node",
      "version": "0.0.3"
    },
    "timezone": "Asia/Kolkata"
  },
  "rudderId": "87a40cf3-f6d8-4675-bc01-7854ab4486ec",
  "_metadata": {
    "nodeVersion": "10.22.0"
  },
  "messageId": "node-7519b5f2fcacca521c7a9e8ddb9fc09c-c273004b-6968-422d-a511-440b6db24403",
  "properties": {
    "details": "list of details"
  },
  "anonymousId": "anony11111111111",
  "originalTimestamp": "2020-12-02T11:30:33.259Z"
}
Identify
MoEngage accepts the user creation time for its User endpoint. This is reflected as first_seen in the MoEngage dashboard.
RudderStack sets thecreated_timefield in MoEngage from thecreatedAtfield present in the event payload. This value should be in the ISO 8601 format. If the value is absent or present in an improper format, MoEngage assigns the value automatically.
A sample identify payload is shown below:
{
  "type": "identify",
  "sentAt": "2020-12-02T13:04:05.953Z",
  "traits": {
    "city": "Bangalore",
    "name": "lolo",
    "email": "lolo@website.com",
    "country": "India",
    "createdAt": "2020-12-02T12:29:53.872Z"
  },
  "userId": "111its111",
  "context": {
    "traits": {
      "city": "Bangalore",
      "name": "lolo",
      "email": "lolo@website.com",
      "country": "India",
      "createdAt": "2020-12-02T12:29:53.872Z"
    },
    "library": {
      "name": "analytics-node",
      "version": "0.0.3"
    }
  },
  "rudderId": "754fe90e-89fb-4d71-9d11-3ec2b91b5777",
  "_metadata": {
    "nodeVersion": "10.22.0"
  },
  "messageId": "node-1a585828272cf1116407aaf6be3921f2-65c1670e-f4e1-4283-a7a5-0a60825c4f83",
  "originalTimestamp": "2020-12-02T13:04:05.951Z"
}
FAQ
Where can I find my MoEngage API ID and API key?
You can find your MoEngage API ID and API key in your MoEngage dashboard under Settings > APIs > DATA API Settings.
For more information, refer to the MoEngage documentation.
Where can I see the events that are sent to MoEngage?
To view the events sent to MoEngage, go to For developers > Recent Events in your MoEngage dashboard. If your app is in debug mode, then you can view the events under the Test tab, otherwise you can view them under the Live tab.
