Apache Kafka

Send your event data from RudderStack to Apache Kafka.

Apache Kafka is a popular distributed streaming platform used for building realtime data pipelines and streaming apps.

info
Find the open source transformer code for this destination in the GitHub repository.

Getting started

RudderStack supports sending events to Apache Kafka via the following connection modes:

Connection ModeWebMobileServer
Device mode---
Cloud modeSupportedSupportedSupported

Once you have confirmed that the source platform supports sending events to Apache Kafka, follow these steps:

  1. From your RudderStack dashboard, add the source. Then, from the list of destinations, select Apache Kafka.
  2. Assign a name to your destination and click Continue.

Connection settings

To successfully set up Apache Kafka as a destination, you need to configure the following settings:

  • Host Name(s): Enter your Kafka server broker’s host name. You can specify multiple host names in a comma-separated format.
  • Port: Enter the port number to connect to the Kafka broker.
  • Topic Name: Specify the default Kafka topic where you want to send the event data.
  • SSL Enabled: Enable this option if you have enabled SSL to connect to your broker.
    • CA Certificate: If SSL is enabled, enter the CA certificate.
  • Enable SASL with SSL: Enable this setting to use SASL for client authentication.
    • SASL Type: Choose the SASL authentication type from Plain, SCRAM SHA-512, and SCRAM SHA-256.
    • Username: Enter the username configured in Kafka for authenticating clients with SASL.
    • Password: Enter the password for the above username.
info
For more information on the SASL authentication, refer to the Apache Kafka documentation.
  • Convert Data to AVRO format: Enable this setting to serialize your data using Avro and send it to the specified Kafka topic.
    • Schema ID: Enter the schema ID for the schema list.
    • Schema: Enter the schema corresponding to the above-mentioned ID.
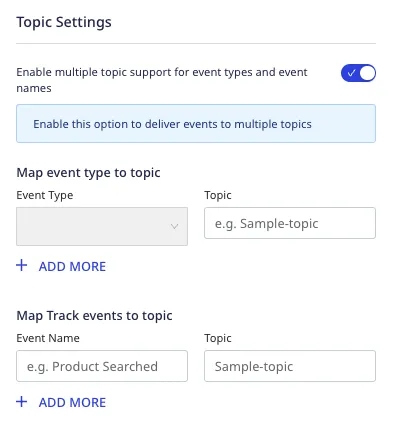
  • Enable multiple topic support for event types and event names: Enable this setting to deliver your events to multiple Kafka topics.
    • Map event type to topic: You can use this setting to send a particular event type (identify, group, page, screen, alias) to a specific Kafka topic.
    • Map Track events to topic: You can use this setting to map a particular track event to a specific Kafka topic.
warning
If this setting is disabled, RudderStack sends all events to the Kafka topic specified in the Topic Name setting. Also, if you configure only a few event types or specific track events with the above setting, RudderStack sends the rest of the events to the topic defined in the Topic Name setting.

Sending events to Kafka topics

You can send your events to a specific Kafka topic by configuring the Topic Name dashboard setting.

Alternatively, you can send your events to a Kafka topic by specifying the topic name in the integrations object:

rudderanalytics.track(
  "Feedback Submitted", {
    feedbackScore: 9,
    feedbackText: "Great Product!",
    ip: "127.0.0.0",
    url: "https://www.google.com/",
    createdAt: "2022-01-20T13:39:21.032Z"
  }, {
    integrations: {
      "All": true,
      "Kafka": {
        "topic": "myTopic",
      },
    },
  }
);
warning
The mappings specified in the integrations object take precedence over the dashboard settings.

RudderStack also supports sending events to multiple Kafka topics. To do so, enable the Enable multiple topic support for event types and event names dashboard setting and configure the mappings:

Kafka connection settings

Serializing data using Avro

RudderStack lets you serialize your data using Avro and send it to a specific Kafka topic by leveraging the goavro package.

To use this feature, you need to pass the schemaId in your event’s integrations object, as shown in the below event payload:

{
  "event": "Product Added",
  "messageId": "4bb69e26-b5a6-446a-a140-dbb6263369c9",
  "type": "track",
  "anonymousId": "",
  "context": {
    "traits": {
      "email": "alex@example.com"
    },
  },
  "integrations": {
    "KAFKA": {
      "schemaId": "schema001"
    }
  },
  "originalTimestamp": "2022-06-22T12:31:19.002+05:30",
  "receivedAt": "2022-06-22T12:31:15.656+05:30",
  "request_ip": "[::1]",
  "sentAt": "2022-06-22T12:31:19.002+05:30",
  "timestamp": "2022-06-22T12:31:15.655+05:30"
}

The corresponding schema is shown below:

{
  "name": "RudderStackEvent",
  "type": "record",
  "namespace": "com.acme.avro",
  "fields": [{
    "name": "anonymousId",
    "type": "string"
  }, {
    "name": "event",
    "type": "string"
  }, {
    "name": "messageId",
    "type": "string"
  }, {
    "name": "originalTimestamp",
    "type": "string"
  }, {
    "name": "receivedAt",
    "type": "string"
  }, {
    "name": "request_ip",
    "type": "string"
  }, {
    "name": "rudderId",
    "type": "string"
  }, {
    "name": "sentAt",
    "type": "string"
  }, {
    "name": "timestamp",
    "type": "string"
  }, {
    "name": "type",
    "type": "string"
  }, {
    "name": "context",
    "type": "record",
    "fields": [{
      "name": "traits",
      "type": "record",
      "fields": [{
        "name": "email",
        "type": "string"
      }]
    }, {
      "name": "ip",
      "type": "string"
    }]
  }, {
    "name": "integrations",
    "type": "record",
    "fields": [{
      "name": "KAFKA",
      "type": "record",
      "fields": [{
        "name": "schemaId",
        "type": "string"
      }]
    }]
  }]
}

Partition key

RudderStack uses the userId in the event as the partition key of the message.

info
If userId is not present in payload, then RudderStack uses anonymousId instead.

So, if you have a multi-partitioned topic, then the records of the same userId (or anonymousId in absence of userId) will always go to the same partition.

FAQ

Does my Kafka server require client authentication?

If you have enabled 2-way SSL, that is, your server requires client authentication, then you need to have the CA certificate and put that in the truststore of your server.

How can I enable the 2-way SSL in Kafka and connect to RudderStack?

Follow the below steps to make use of Java’s keytool utility to enable two-way SSL in Kafka and connect to RudderStack:

Step 1: Generate the key and certificate

Run the following command:

keytool -keystore kafka.server.keystore.jks -alias localhost -keyalg RSA -genkey

Step 2: Create your own CA

Follow these steps to create your own CA:

  1. Generate a CA that is a public-private key pair and a certificate by running the command below. Enter the contents of this certificate in the RudderStack dashboard under the CA certificate setting.
openssl req -new -x509 -keyout ca-key -out ca-cert -days {validity}
  1. Add the generated CA to the broker’s truststore so that the brokers can trust this CA.

    keytool -keystore kafka.server.truststore.jks -alias CARoot -importcert -file ca-cert
    

Step 3: Sign the certificate

Follow the steps below:

  1. Export the certificate from the keystore:
keytool -keystore kafka.server.keystore.jks -alias localhost -certreq -file cert-file
  1. Sign it with the CA:
openssl x509 -req -CA ca-cert -CAkey ca-key -in cert-file -out cert-signed -days {validity} -CAcreateserial -passin pass:{ca-password}
  1. Import both the certificate of the CA and the signed certificate into the broker keystore:
keytool -keystore kafka.server.keystore.jks -alias CARoot -import -file ca-cert 
keytool -keystore kafka.server.keystore.jks -alias localhost -import -file cert-signed

All the above commands to generate the key and certificate, create the CA, and sign the certificate are summarized below:

// Step 1: Generate the key and the certificate
keytool -keystore kafka.server.keystore.jks -alias localhost -keyalg RSA -validity {validity} -genkey
// Step 2: Create your own CA
openssl req -new -x509 -keyout ca-key -out ca-cert -days {validity}
keytool -keystore kafka.server.truststore.jks -alias CARoot -importcert -file ca-cert
// Step 3: Sign the certificate
keytool -keystore kafka.server.keystore.jks -alias localhost -certreq -file cert-file
openssl x509 -req -CA ca-cert -CAkey ca-key -in cert-file -out cert-signed -days {validity} -CAcreateserial -passin pass:{ca-password}
keytool -keystore kafka.server.keystore.jks -alias CARoot -import -file ca-cert
keytool -keystore kafka.server.keystore.jks -alias localhost -import -file cert-signed

Step 4: Update server.properties

Enter the below parameters in your server.properties:

ssl.keystore.location=<keystore location>
ssl.keystore.password=<keystore password>
ssl.key.password=<ca key password>
ssl.truststore.location=<truststore location>
ssl.truststore.password=<truststore password>
ssl.client.auth=required
ssl.enabled.protocols=TLSv1.2,TLSv1.1,TLSv1
ssl.truststore.type=JKS
ssl.keystore.type=JKS

Step 5: Save the RudderStack certificate

Save the below RudderStack certificate as ca-cert-rudder (or any other name of your choice) on your system:

-----BEGIN CERTIFICATE-----
MIIEDzCCAvegAwIBAgIUByH8aYuRqjCyz5yZZ91fcJOsW+0wDQYJKoZIhvcNAQEL
BQAwgZYxCzAJBgNVBAYTAklOMRQwEgYDVQQIDAtXZXN0IEJlbmdhbDEQMA4GA1UE
BwwHS29sa2F0YTEUMBIGA1UECgwLUnVkZGVyc3RhY2sxCzAJBgNVBAsMAklUMRQw
EgYDVQQDDAtSdWRkZXJzdGFjazEmMCQGCSqGSIb3DQEJARYXY29udGFjdEBydWRk
ZXJzdGFjay5jb20wHhcNMjAwNTE5MTA1OTEwWhcNMjEwNTE5MTA1OTEwWjCBljEL
MAkGA1UEBhMCSU4xFDASBgNVBAgMC1dlc3QgQmVuZ2FsMRAwDgYDVQQHDAdLb2xr
YXRhMRQwEgYDVQQKDAtSdWRkZXJzdGFjazELMAkGA1UECwwCSVQxFDASBgNVBAMM
C1J1ZGRlcnN0YWNrMSYwJAYJKoZIhvcNAQkBFhdjb250YWN0QHJ1ZGRlcnN0YWNr
LmNvbTCCASIwDQYJKoZIhvcNAQEBBQADggEPADCCAQoCggEBAMkLBYbfhvhm2wpJ
FZSr9AGyrJUEh2e6YaY83xLRDuOYC1cvqlmCNxltc4W+ACyyi9zqSvhrrNb2C/Yh
Ig4gvvplImAAmv5Ua4ZiB2XSrn9ZvR+baRyezPgKI1+iU5ovDciUkeZP3p7hEmLw
ktayyFrWV5IEuGnfGBN4O077tgUiCm8zq3cHC0e5JBTUtelnwj6u1Ye6zZfIx/rC
Ikf0l1LGZqV1DHZefCqPl3l9awVnA4rbllL9a+mLNe44BT2H4UG6OaZxnAEqVQ9x
lMvvDAYSzaSI334qGw/AAeBUE3mHyEbE9PtS0p+qOdRiq4b5m+usW5VbZBFSvT4A
FR2Xa2cCAwEAAaNTMFEwHQYDVR0OBBYEFF71gmg4bAdft9PF3Sj9QMrxwoFMMB8G
A1UdIwQYMBaAFF71gmg4bAdft9PF3Sj9QMrxwoFMMA8GA1UdEwEB/wQFMAMBAf8w
DQYJKoZIhvcNAQELBQADggEBAFvXp77ZQXwqB0vQZXAr4JfiNZueNP4OlpxltiLd
qt0UwLJzCZ/ik65jmGGcoxZeFQc3dF8InheH+zvanPWBq385TDSyF9/vomKbu7+R
b7ndgDtWGpJm6vCUgC6m15KRKzjlHmiWu227hed4ZNrl5EJwqqFhKzSQ62wv66uM
xHaTVaC1ThV5MmecsC7kS3mNCkhO1IVxy5KAJCftYzjni+O0U0wkcmUnZjJyN0l9
hAegB6VLwodW3FqFJ7hMlSZOxE9hYjl9/FlqDdS3KPtn8qh9uliq9V8NELK2jROh
vWJxTpadFmHwCTtKNrfnm2PgokxX3pVtkFu7xQhl26+87RQ=
-----END CERTIFICATE-----

Step 6: Add the RudderStack CA certificate to your truststore

Add the above RudderStack CA certificate to your truststore by using the certificate’s location in the following command:

keytool -keystore kafka.server.truststore.jks -alias CARootRudder -import -file ca-cert-rudder
// here ca-cert-rudder is the RudderStack CA certificate

How can I connect to RudderStack if my Kafka server is running in a Kubernetes cluster?

You will need to expose one public address to which RudderStack can connect. It is recommended to use SSL for that.

warning
You should allow only the authenticated clients to this exposed address.

If you use PLAINTEXT for your internal services within your cluster, you might already have the address. Open this address with SSL. You need to update advertised.listeners in your server.properties, as shown in the below example:

# Hostname and port the broker will advertise to producers and consumers.
# here the INTERNAL listener is your cluster kafka service host for kafka server
# and the EXTERNAL listener is the public loadbalancer for kafka server
advertised.listeners=INTERNAL://kafka-0.kafka-headless.kafka-test-1.svc.cluster.local:9092,EXTERNAL://ab7e36e84991c11ea8a930ebf847c1ef-555780507.us-east-1.elb.amazonaws.com:19092
listener.security.protocol.map=INTERNAL:PLAINTEXT,EXTERNAL:SSL

Does RudderStack support SASL_PLAINTEXT authentication?

RudderStack does not support SASL_PLAINTEXT authentication. You can use SASL_SSL instead. The official Kafka documentation recommends using SASL with SSL in production.

Why is the connection between Kafka and Zookeeper is failing for SASL?

You can try configuring your Zookeeper with SASL_SSL to resolve this issue.


Questions? Contact us by email or on Slack