Firebase
12 minute read
Firebase is a popular mobile platform powered by Google. It helps you to quickly develop high-quality, enterprise-grade applications and grow your business.
RudderStack supports Firebase as a mobile device mode to which you can seamlessly send your customer data for analytics.
Firebase device mode support is not available for the Cordova SDK.
Connection compatibility
| Destination Information | |||
|---|---|---|---|
| |||


Get started
Once you have confirmed that the source platform supports sending events to Firebase, follow these steps:
- From your RudderStack dashboard, add a source. Then, from the list of destinations, select Firebase.
- Assign a name to the destination and click Next.
Connection settings
Connect this destination to your Android (Java)/iOS (Obj-C)/Unity/React Native source. You should then see the following screen:
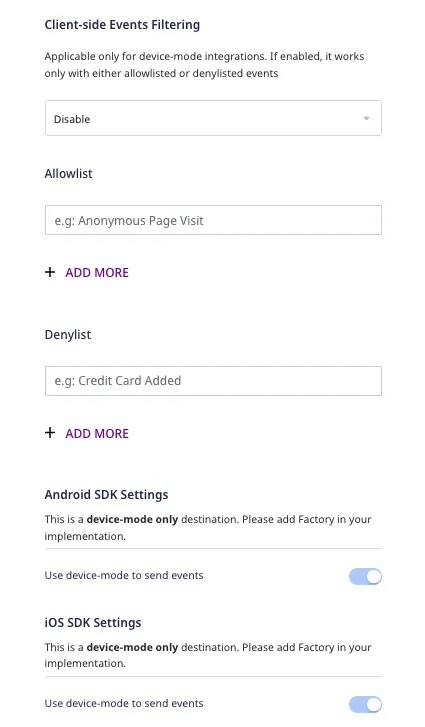
- Client-side Events Filtering: Refer to the Client-side Event Filtering guide for more information on this setting.
As this is a device mode-only integration, click Next to complete the destination setup.
Add device mode integration
Depending on your platform of integration, follow the steps below to add Firebase to your project:
Follow the steps in this section to add Firebase to your Kotlin project.
1. Project setup
See the Firebase documentation for more information on setting up your project.
- Register your mobile app in the Firebase console.
- Once you have successfully created the app in the Firebase console, you will be prompted to download the
google-services.jsonfile. - Copy this file in the
appfolder of your project. It contains all necessary information about the project and the integration. - To make the values in your
google-services.jsonconfig file accessible to the Firebase SDK, you will need the Google services Gradle plugin (google-services).
- In your root-level (project-level) Gradle file (
<project>/build.gradle.ktsor<project>/build.gradle), add the Google services plugin as a dependency:
Kotlin DSL (build.gradle.kts)
plugins {
  // Add the dependency for the Google services Gradle plugin
  id("com.google.gms.google-services") version "4.4.2" apply false
}
Groovy DSL (build.gradle)
plugins {
  // Add the dependency for the Google services Gradle plugin
  id 'com.google.gms.google-services' version '4.4.2' apply false
}- In your module (app-level) Gradle file (usually
<project>/<app-module>/build.gradle.ktsor<project>/<app-module>/build.gradle), add the Google services plugin:
Kotlin DSL (build.gradle.kts)
plugins {
  // Add the Google services Gradle plugin
  id("com.google.gms.google-services")
}
Groovy DSL (build.gradle)
plugins {
  // Add the Google services Gradle plugin
  id 'com.google.gms.google-services'
}
2. Add dependencies
In your module (app-level) Gradle file (usually <project>/<app-module>/build.gradle.kts or <project>/<app-module>/build.gradle), add the dependencies for the RudderStack Firebase integration:
dependencies {
  // ...

  // Add Rudder Kotlin and Firebase integration:
  implementation("com.rudderstack.sdk.kotlin:android:<latest-version>")
  implementation("com.rudderstack.integration.kotlin:firebase:<latest-version>")

  // Add Firebase dependencies:
  // Import the Firebase BoM
  implementation(platform("com.google.firebase:firebase-bom:33.7.0"))

  // When using the BoM, you don't specify versions in Firebase library dependencies

  // Add the dependency for the Firebase SDK for Google Analytics
  implementation("com.google.firebase:firebase-analytics")
}
3. Initialize the SDK and integration
Add the SDK initialization and the Rudder-Firebase integration in your Application class:
import android.app.Application
import com.rudderstack.sdk.kotlin.android.Analytics
import com.rudderstack.sdk.kotlin.android.Configuration
import com.rudderstack.integration.kotlin.firebase.FirebaseIntegration

class MyApplication : Application() {
    lateinit var analytics: Analytics

    override fun onCreate() {
        super.onCreate()
        analytics = Analytics(
            configuration = Configuration(
                writeKey = "WRITE_KEY",
                application = this,
                dataPlaneUrl = "DATA_PLANE_URL",
            )
        )

        analytics.add(FirebaseIntegration())
    }
}Add Firebase to your iOS project
Register your app in the Firebase console. It will then prompt you to download the
GoogleServices-Info.plistfile.Add the
GoogleServices-Info.plistfile to the root of your XCode project.
Integrate the Firebase SDK with your project
- In Xcode, select File > Add Package Dependencies….
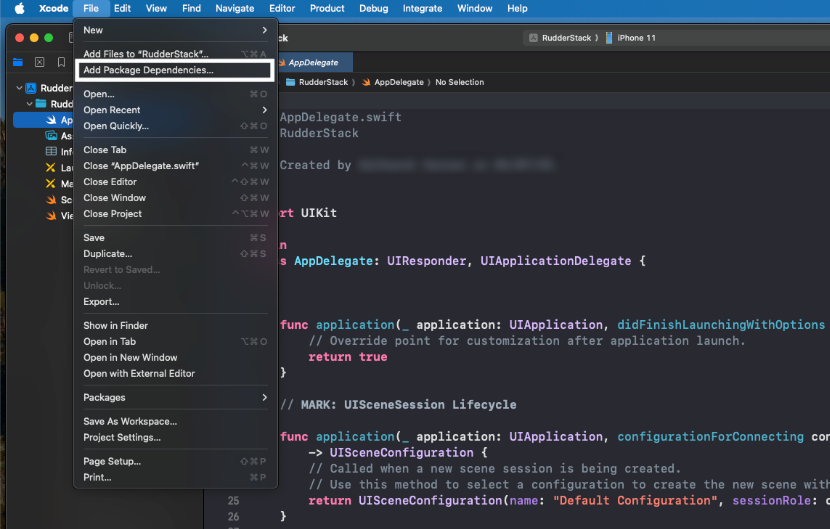
- Enter the below package repository URL in the search bar:
https://github.com/rudderlabs/integration-swift-firebase/- Select the latest version and the target to which you want to add the package.
- Click Add Package.
Alternatively, you can add the dependency to your Package.swift file, as shown:
dependencies: [
    .package(url: "<https://github.com/rudderlabs/integration-swift-firebase.git>", from: "<latest_integration_version>")
]
Usage
- Import the SDK and integration:
import RudderStackAnalytics
import RudderIntegrationFirebase- Add
FirebaseIntegrationto youranalyticsinstance:
// Initialize RudderStack Analytics
let analytics = Analytics(
    configuration: Configuration(
        writeKey: "<WRITE_KEY>",
        dataPlaneUrl: "<DATA_PLANE_URL>"
    )
)

// Add Firebase Integration
analytics.add(plugin: FirebaseIntegration())
Follow these steps to add Firebase to your Unity project:
- Register your project in the Firebase Console. Currently, RudderStack supports only Android and iOS platforms for Unity.
- After adding the project, Firebase will prompt you to download the
google-services.jsonfor Android andGoogleServices-Info.plistfor iOS. - Add those two files to your project’s
Assetsfolder. - Integrate the RudderStack core SDK with your project. For more information, refer to the Unity SDK documentation.
- Download and import the Firebase Unity SDK and follow the instructions to add the Firebase SDK (specifically,
FirebaseAnalytics.unitypackage) to your project. - Download the RudderStack Firebase Extension from the GitHub page and import it in your project.
- Attach the
RudderPreferbs.prefabfile fromRudderto your mainGameObject - Finally, change the SDK initialization using the following code snippet:
// Build your config
RudderConfigBuilder configBuilder = new RudderConfigBuilder()
    .WithEndPointUrl(<data_plane_url>)
    .WithFactory(RudderFirebaseIntegrationFactory.GetFactory());

// get instance for RudderClient
RudderClient rudderClient = RudderClient.GetInstance(
    <source_write_key>,
    configBuilder.Build()
);
Note the following:
- Starting with v3.0.0, the React Native SDK supports the new React Native architecture.
- RudderStack recommends using the latest version of the Firebase React Native device mode to get the latest updates and performance enhancements.
- Register your Android and iOS applications in the Firebase console.
- Once you have successfully created the applications in the Firebase console, you will be prompted to download the
google-services.jsonandGoogleServices-Info.plistfiles. - Add the RudderStack React Native SDK to your app by referring to the React Native SDK documentation.
- Add the RudderStack-Firebase React Native module to your app using the following command:
npm install @rudderstack/rudder-integration-firebase-react-native
// OR //
yarn add @rudderstack/rudder-integration-firebase-react-native- Next, import the module you added above and add it to your SDK initialization code as shown:
import rudderClient from '@rudderstack/rudder-sdk-react-native';
import firebase from "@rudderstack/rudder-integration-firebase-react-native";

const config = {
    dataPlaneUrl: <data_plane_url>,
    trackAppLifecycleEvents: true,
    withFactories: [firebase]
};

rudderClient.setup(<source_write_key>, config);- Navigate to your app’s
androidfolder and follow the steps below:
- Copy the
google-services.jsonfile in theappfolder of your Android project. This file contains all necessary information about the project and the integration. - Add the
classpathunderdependenciesto your project levelbuild.gradlefile:
buildscript {
  repositories {
    google()
  }
  dependencies {
    // add this line
    classpath 'com.google.gms:google-services:4.3.3'
  }
}- Once you have completed the steps above, you can add the plugins and dependencies to your
app/build.gradlefile:
apply plugin: 'com.android.application'
apply plugin: 'com.google.gms.google-services'- Then, add the necessary permissions under
AndroidManifest.xml:
<uses-permission android:name="android.permission.INTERNET"></uses-permission>
<uses-permission android:name="android.permission.ACCESS_NETWORK_STATE"></uses-permission>- For React-Native Firebase version 1.0.16 and above, if you encounter any static libraries issue while installing the Rudder-Firebase pods, add the below lines in your iOS app’s
Podfile:
pod 'FirebaseCore', :modular_headers => true
pod 'GoogleUtilities', :modular_headers => true- Finally, navigate to your app’s
iOSfolder and follow these steps:
- Install all required pods using the
pod installcommand. - Add the
GoogleServices-Info.plistfile to the root of your XCode project.
Follow the below steps to add Firebase to your Flutter Project:
- Add the following dependency to the
dependenciessection of yourpubspec.yamlfile.
rudder_integration_firebase_flutter: ^1.0.1- Run the below command to install the dependency added in the above step:
flutter pub get- Import the
RudderIntegrationFirebaseFlutterin your application where you are initializing the SDK.
import 'package:rudder_integration_firebase_flutter/rudder_integration_firebase_flutter.dart';- Change the initialization of your
RudderClientas shown:
final RudderController rudderClient = RudderController.instance;
RudderConfigBuilder builder = RudderConfigBuilder();
builder.withFactory(RudderIntegrationFirebaseFlutter());
rudderClient.initialize(<write_key>, config: builder.build(), options: null);- Navigate to your app’s
androidfolder and follow the below steps:
- Copy the
google-services.jsonfile in theappfolder of your Android project. This file contains all necessary information about the project and the integration. - Add the
classpathunderdependenciesto your project levelbuild.gradlefile:
buildscript {
  repositories {
    google()
  }
  dependencies {
    // add this line
    classpath 'com.google.gms:google-services:4.3.3'
  }
}- Add
mavenCentral()as a repository underbuildscript.repositoriesandallprojects.repositoriesto your project levelbuild.gradlefile:
buildscript {
  repositories {
    google()
    // should be added
    mavenCentral()
  }
  dependencies {
    classpath 'com.google.gms:google-services:4.3.3'
  }
}
allprojects {
  repositories {
      google()
      // should be added
      mavenCentral()
  }
}- Next, add the plugins and dependencies to your
app/build.gradlefile:
apply plugin: 'com.android.application'
apply plugin: 'com.google.gms.google-services'- Add the necessary permissions under
AndroidManifest.xml:
<uses-permission android:name="android.permission.INTERNET"></uses-permission>
<uses-permission android:name="android.permission.ACCESS_NETWORK_STATE"></uses-permission>- Finally, navigate to your app’s
iOSfolder and add theGoogleServices-Info.plistfile to the root of your XCode project.
Follow these steps to add Firebase to your Android project:Use the latest version of the Firebase Android device mode to get the latest updates, bug fixes, and performance enhancements.
- Register your mobile app in the Firebase console.
- Once you have successfully created the app in the Firebase console, you will be prompted to download the
google-services.jsonfile. - Copy this file in the
appfolder of your project. It contains all necessary information about the project and the integration. - Add the
classpathunderdependenciesto your project levelbuild.gradle:
buildscript {
  repositories {
    google()
  }
  dependencies {
    // add this line
    classpath 'com.google.gms:google-services:4.3.3'
  }
}- Now, you can add the
pluginsanddependenciesto yourapp/build.gradlefile:
apply plugin: 'com.android.application'
apply plugin: 'com.google.gms.google-services'- Then, add the
mavenCentralrepository:
repositories {
  mavenCentral()
}- Add the RudderStack-Firebase SDK extension along with the
coreSDK underdependencies:
implementation 'com.rudderstack.android.sdk:core:1.+'
implementation 'com.rudderstack.android.integration:firebase:2.+'

//Firebase
implementation platform('com.google.firebase:firebase-bom:28.4.2')
implementation 'com.google.firebase:firebase-analytics'- Next, add the necessary
permissionsunderAndroidManifest.xml:
<uses-permission android:name="android.permission.INTERNET"></uses-permission>
<uses-permission android:name="android.permission.ACCESS_NETWORK_STATE"></uses-permission>- Finally, change the SDK initialization in your
Applicationclass:
// initialize Rudder SDK
val rudderClient =
    RudderClient.getInstance(
        this,
        WRITE_KEY,
        RudderConfig.Builder()
            .withDataPlaneUrl(DATA_PLANE_URL)
            .withFactory(FirebaseIntegrationFactory.FACTORY)
            .build()
)Follow these steps to add Firebase to your iOS project:If you’re using the Firebase iOS device mode v1.0.2, update to the latest version to get the latest updates, bug fixes, and performance enhancements.
- Register your app in the Firebase console. It will then prompt you to download the
GoogleServices-Info.plistfile. - Add the file to the root of your XCode project.
- Go to your
Podfileand add theRudder-Firebaseextension along with the core SDK using the following code:
pod 'Rudder-Firebase', '~> 2.0.5'4. After adding the dependency followed by the `pod install` command, you can add the imports to your `AppDelegate.m` file:Rudder-Firebaseversion2.0.5is tested and fully compatible withFirebase/Analyticsversion8.15.0.
#import "RudderFirebaseFactory.h"- Finally, change the SDK initialization, as shown in the following snippet:
RSConfigBuilder *builder = [[RSConfigBuilder alloc] init];
[builder withDataPlaneUrl:<data_plane_url>];
[builder withFactory:[RudderFirebaseFactory instance]];
[builder withLoglevel:RSLogLevelDebug];
[RSClient getInstance:<write_key> config:[builder build]];Follow these steps to add Firebase to your iOS project:This device mode integration is supported for Firebase v8.15.0 and above.
- Add Firebase as a destination in the RudderStack dashboard.
- Register your app in the Firebase console. It will then prompt you to download the
GoogleServices-Info.plistfile. - Download and place this file in your project.
- Install
RudderFirebase(available through CocoaPods) by adding the following line to yourPodfile:
pod 'RudderFirebase', '~> 1.0.0'- Run the
pod installcommand. - Then, import the SDK depending on your preferred platform:
import RudderFirebase@import RudderFirebase;- Next, add the imports to your
AppDelegatefile under thedidFinishLaunchingWithOptionsmethod:
RSConfig *config = [[RSConfig alloc] initWithWriteKey:WRITE_KEY];
[config dataPlaneURL:DATA_PLANE_URL];
[[RSClient sharedInstance] configureWith:config];
[[RSClient sharedInstance] addDestination:[[RudderFirebaseDestination alloc] init]];let config: RSConfig = RSConfig(writeKey: WRITE_KEY)
.dataPlaneURL(DATA_PLANE_URL)
RSClient.sharedInstance().configure(with: config)
RSClient.sharedInstance().addDestination(RudderFirebaseDestination())Identify
The identify call sets the userId through the setUserId method from FirebaseAnalytics. RudderStack sets the other user properties from RudderTraits to Firebase using the setUserProperty method.
RudderStack ignoresage,gender, andinterest, as these properties are reserved by Google.
[[RSClient sharedInstance] identify:@"test_user_id"
                             traits:@{@"foo": @"bar",
                                      @"foo1": @"bar1",
                                      @"email": @"test@gmail.com",
                                      @"key_1" : @"value_1",
                                      @"key_2" : @"value_2"
                             }
];
Track
RudderStack’s track events are mapped to the standard Firebase events wherever possible.
Event mapping
RudderStack maps the following events to the standard Firebase events:
| RudderStack Event | Firebase Event |
|---|---|
Payment Info Entered | add_payment_info |
Product Added | add_to_cart |
Product Added to Wishlist | add_to_wishlist |
Application Opened | app_open |
Checkout Started | begin_checkout |
Order Completed | purchase |
Order Refunded | refund |
Products Searched | search |
Cart Shared | share |
Product Shared | share |
Product Viewed | view_item |
Product List Viewed | view_item_list |
Product Removed | remove_from_cart |
Product Clicked | select_content |
Promotion Viewed | view_promotion |
Promotion Clicked | select_promotion |
Cart Viewed | view_cart |
The following Firebase events are not mapped to any RudderStack event:
number_of_nightsnumber_of_roomsnumber_of_passengersorigindestinationstart_dateend_datetravel_classitem_list_namecreative_slotlocation_idtransaction_idscreen_class
RudderStack passes all event-related properties to Firebase. The nested values in the properties are converted to JSON using GSON.
Property mapping
RudderStack maps the following event properties to the standard Firebase properties:
| RudderStack property | Firebase property |
|---|---|
category | item_category |
cart_id,product_id | item_id |
share_via | method |
query | search_term |
revenue, value, total | value |
currency | currency |
tax | tax |
shipping | shipping |
coupon | coupon |
name | name, promotion_name |
quantity | quantity |
price | price |
payment_method | payment_type |
list_id | item_list_id |
promotion_id | promotion_id |
creative | creative_name |
affiliation | affiliation |
Along with mapping the above list of the standard property names, RudderStack exhibits the following behavior:
- Converts the event names to the lower case.
- Trims the whitespaces at the start and the end.
- Replaces a space with an underscore.
Firebase enforces a strict event name length limit of 40 characters. RudderStack takes a substring of 40 characters (from the beginning) if the event names exceed this permitted value.
A sample track call sent from the iOS (Obj-C) SDK is shown below:
[[RSClient sharedInstance] track:@"simple_track_with_props" properties:@{
    @"key_1" : @"value_1",
    @"key_2" : @"value_2"
}];
Screen
The screen method lets you record whenever a user sees their mobile screen along with any optional properties about the viewed screen.
A sample screen call is as shown:
[[RSClient sharedInstance] screen:@"Home Screen"
                              properties:@{
                                  @"Width" : @"13"
                              }];
Reset
The reset method resets the user identification.
A sample reset call is shown below:
[[RSClient getInstance] reset];RudderClient.getInstance()?.reset()Debugging
You can check the events and their properties in the Firebase DebugView. To enable it for Android, run the following command from your terminal:
$ adb shell setprop debug.firebase.analytics.app <your_package_name>For iOS, specify the following in your command line argument in XCode:
-FIRAnalyticsDebugEnabledFAQ
How do I disable automatic screen tracking while using the RudderStack SDKs?
- For Android, nest the following setting within the
<application>tag of yourAndroidManifest.xmlfile:
<meta-data android:name="google_analytics_automatic_screen_reporting_enabled" android:value="false" />- For iOS, set
FirebaseAutomaticScreenReportingEnabledtoNO(Boolean) in yourInfo.plist.
For more information, refer to the Firebase documentation.
