Facebook App Events
13 minute read
Facebook App Events is Facebook’s event tracking functionality which lets you track events via your app or web page, including user activities such as app installation, purchases, etc.
Find the open source transformer code for this destination in the GitHub repository.
Connection compatibility
| Destination Information | |||
|---|---|---|---|
| |||


Get started
Once you have confirmed that the source platform supports sending events to Facebook App Events, follow these steps:
- From your RudderStack dashboard, add a source. Then, from the list of destinations, select Facebook App Events.
- Assign a name to the destination and click Continue.
Connection settings
To successfully configure Facebook App Events as a destination, you will need to configure the following settings:
APP ID: Enter your Facebook App ID. See FAQ for more information on getting your Facebook App ID.
The following settings are applicable only if you are sending events to Facebook using device mode:
Limited Data Use: Enable this setting to send the end user’s country and state information. Facebook processes the user data according to the data regulations set for that region. See Limited Data Use for more information on this setting.
You can allow Facebook to detect your country and state automatically by choosing the Use Facebook to detect Automatically option.
- Client-side Events Filtering: This setting lets you specify which events should be blocked or allowed to flow through to Facebook App Events. See Client-side Events Filtering for more information.
- Consent management settings: Configure the consent management settings for the specified source by choosing the Consent management provider from the dropdown and entering the relevant consent category IDs. See Consent Management in RudderStack for more information on this feature.
Add device mode integration
Depending on your platform of integration, follow the below steps to integrate App Events with your app.
Follow the steps in this section to add Facebook App Events to your Kotlin project.
1. Add dependencies
In your module (app-level) Gradle file (usually <project>/<app-module>/build.gradle.kts or <project>/<app-module>/build.gradle), add the following dependencies for the RudderStack-Facebook integration:
dependencies {
  // ...

  // Add Rudder Kotlin and Facebook integration SDKs:
  implementation("com.rudderstack.sdk.kotlin:android:<latest-version>")
  implementation("com.rudderstack.integration.kotlin:facebook:<latest-version>")
}
2. Update manifest
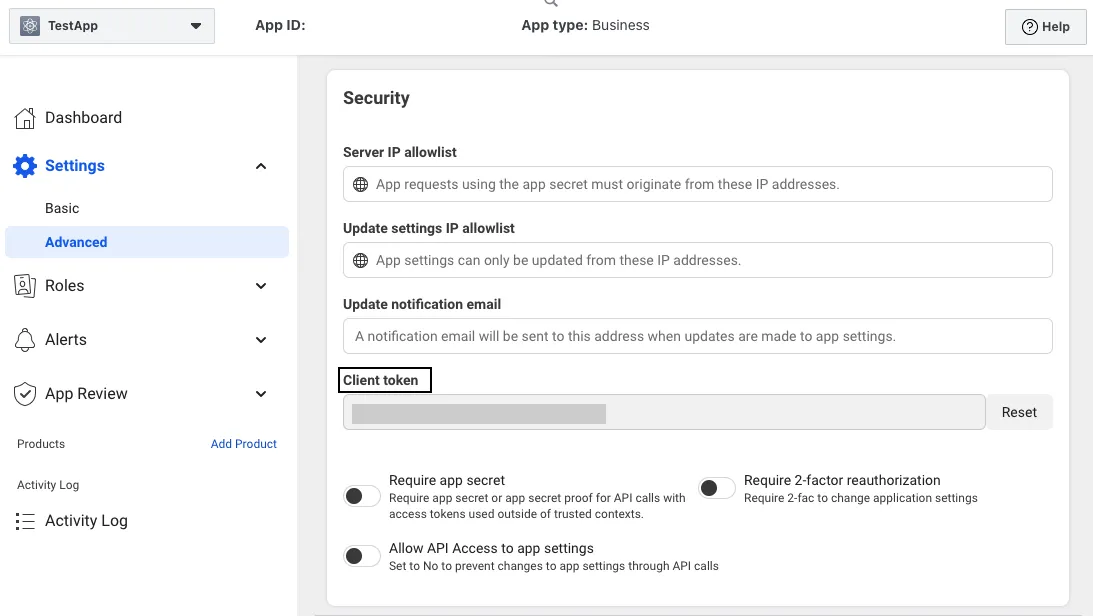
Add your App ID and client token to the project’s string file and update the manifest file:
- Open
/app/res/values/strings.xmlin your app project. - Add
stringelements with the namesfacebook_app_idandfacebook_client_token, and set their values to your App ID and client token. For example, if your app ID is1234and your client token is56789, then your code should look as follows:
<string name="facebook_app_id">1234</string>
<string name="facebook_client_token">56789</string>- Open
/app/src/main/AndroidManifest.xmlin your app project. - Add
meta-dataelements to theapplicationelement for your App ID and client token:
<application android:label="@string/app_name" ...>
    ...
    <meta-data android:name="com.facebook.sdk.ApplicationId" android:value="@string/facebook_app_id"/>
    <meta-data android:name="com.facebook.sdk.ClientToken" android:value="@string/facebook_client_token"/>
    ...
</application>
3. Initialize the SDK and integration
Add the SDK initialization and the Rudder-Facebook integration in your Application class:
import android.app.Application
import com.rudderstack.sdk.kotlin.android.Analytics
import com.rudderstack.sdk.kotlin.android.Configuration
import com.rudderstack.integration.kotlin.facebook.FacebookIntegration

class MyApplication : Application() {
    lateinit var analytics: Analytics

    override fun onCreate() {
        super.onCreate()
        analytics = Analytics(
            configuration = Configuration(
                writeKey = "WRITE_KEY",
                application = this,
                dataPlaneUrl = "DATA_PLANE_URL",
            )
        )

        analytics.add(FacebookIntegration())
    }
}Follow these steps to add the Facebook App Events integration to your Swift project using Swift Package Manager:
- In Xcode, select File > Add Package Dependencies….
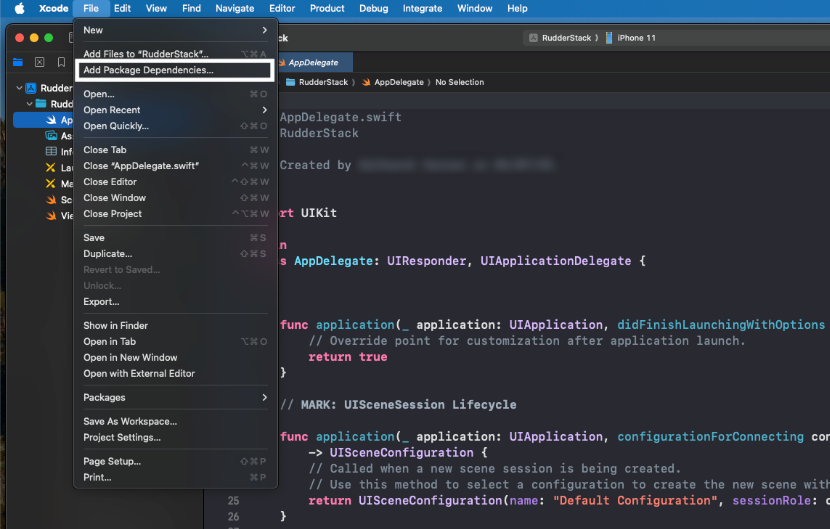
- Enter the below package repository URL in the search bar:
https://github.com/rudderlabs/integration-swift-facebook/- Select the latest version and the target to which you want to add the package.
- Click Add Package.
Alternatively, you can add the dependency to your Package.swift file, as shown:
dependencies: [
    .package(url: "<https://github.com/rudderlabs/integration-swift-facebook.git>", from: "<latest_integration_version>")
]
Usage
- Import the Facebook SDK:
import FacebookCore- Initialize the Facebook App Events iOS SDK just before initializing the RudderStack iOS (Swift) SDK:
ApplicationDelegate.shared.application(
    UIApplication.shared,
    didFinishLaunchingWithOptions: [:]
)- Send the user’s consent to Facebook App Events, as shown:
// Set AdvertiserTrackingEnabled to true if a user provides consent
Settings.setAdvertiserTrackingEnabled(true)

// Set AdvertiserTrackingEnabled to false if a user does not provide consent
Settings.setAdvertiserTrackingEnabled(false)- Configure your project by adding the following lines to
<dict>...</dict>in yourInfo.plistfile.
<key>CFBundleURLTypes</key>
<array>
<dict>
<key>CFBundleURLSchemes</key>
<array>
<string>fbAPP-ID</string>
</array>
</dict>
</array>
<key>FacebookAppID</key>
<string>APP-ID</string>
<key>FacebookClientToken</key>
<string>CLIENT-TOKEN</string>
<key>FacebookDisplayName</key>
<string>APP-NAME</string>
Make sure to replacefbAPP-ID,APP-ID,CLIENT-TOKEN,APP-NAMEwith the app-specific details from the Facebook for Developers platform.
- Import the SDK and integration:
import RudderStackAnalytics
import RudderIntegrationFacebook- Add
FacebookIntegrationto youranalyticsinstance:
// Initialize RudderStack Analytics
let analytics = Analytics(
    configuration: Configuration(
        writeKey: "<WRITE_KEY>",
        dataPlaneUrl: "<DATA_PLANE_URL>"
    )
)

// Add Facebook Integration
analytics.add(plugin: FacebookIntegration())
Configure React Native Android app
- Open the
/app/res/values/strings.xmlfile and add the following lines. Make sure to replaceAPP_IDandCLIENT_TOKENwith the appropriate values:
<!-- Refer to the Facebook doc: https://developers.facebook.com/docs/android/getting-started-->
<string name="facebook_app_id">APP_ID</string>
<string name="facebook_client_token">CLIENT_TOKEN</string>- In the
app/AndroidManifest.xmlfile, add ameta-dataelement to theapplicationelement. See the Facebook developer documentation for more details.
<!-- Refer to the Facebook doc: https://developers.facebook.com/docs/android/getting-started-->
<meta-data android:name="com.facebook.sdk.ApplicationId" android:value="@string/facebook_app_id"/>
<meta-data android:name="com.facebook.sdk.ClientToken" android:value="@string/facebook_client_token"/>
Configure React Native iOS app
- Import the Facebook app into the
AppDeletegate.swiftfile:
import FBSDKCoreKit- Initialize the Facebook App Events iOS SDK by adding the below snippet to the
applicationmethod inAppDelegate.swift:
ApplicationDelegate.shared.application(application, didFinishLaunchingWithOptions: launchOptions)- Configure the
Info.plistfile with the below XML snippet containing the data about your app. See the Facebook developer documentation for more details.
<key>CFBundleURLTypes</key>
<array>
  <dict>
  <key>CFBundleURLSchemes</key>
  <array>
    <string>fbAPP-ID</string>
  </array>
  </dict>
</array>
<key>FacebookAppID</key>
<string>APP-ID</string>
<key>FacebookClientToken</key>
<string>CLIENT-TOKEN</string>
<key>FacebookDisplayName</key>
<string>APP-NAME</string>
Add RudderStack-Facebook module
Add the React Native integration to your app using either of the below ways:
npm install @rudderstack/rudder-integration-facebook-react-nativeOR
yarn add @rudderstack/rudder-integration-facebook-react-nativeImport module and initialize SDK
Import the module you added to the app and include it in your React Native SDK initialization, as shown:
import rudderClient from "@rudderstack/rudder-sdk-react-native"
import facebook from '@rudderstack/rudder-integration-facebook-react-native';

const config = {
  dataPlaneUrl: DATA_PLANE_URL,
  withFactories: [facebook],
}
rudderClient.setup(WRITE_KEY, config)- Add the repository:
repositories {
    mavenCentral()
}- Add the following lines to your
app/build.gradlefile under thedependenciessection:
implementation 'com.rudderstack.android.sdk:core:1.+'
implementation 'com.rudderstack.android.integration:facebook:1.0.0'
implementation 'com.facebook.android:facebook-android-sdk:11.1.0'- Open your
/app/res/values/strings.xmlfile and add the following lines. Replace[APP_IDwith your actual app ID.
<string name="facebook_app_id">[APP_ID]</string>
<string name="fb_login_protocol_scheme">fb[APP_ID]</string>- In the
app/manifests/AndroidManifest.xmlfile, add ameta-dataelement to theapplicationelement:
<application ...="" android:label="@string/app_name">
  ...
  <meta-data android:name="com.facebook.sdk.ApplicationId" android:value="@string/facebook_app_id"></meta-data>
  ...
</application>- Change the initialization of your
RudderClientin yourApplicationclass:
val rudderClient = RudderClient.getInstance(
    this,
    WRITE_KEY,
    RudderConfig.Builder()
        .withDataPlaneUrl(DATA_PLANE_URL)
        .withFactory(FacebookIntegrationFactory.FACTORY)
        .build()
)- Add the following line to your CocoaPods
Podfile:
pod 'Rudder-Facebook'- Initialize the Facebook App Events iOS SDK just before intializing the RudderStack iOS (Obj-C) SDK:
[[FBSDKApplicationDelegate sharedInstance] application:application
didFinishLaunchingWithOptions:launchOptions];- Send the user’s consent to App Events as shown below:
For Objective-C:
// Set AdvertiserTrackingEnabled to YES if a user provides consent
[FBSDKSettings setAdvertiserTrackingEnabled:YES];
// Set AdvertiserTrackingEnabled to NO if a user does not provide consent
[FBSDKSettings setAdvertiserTrackingEnabled:NO];
For Swift:
// Set AdvertiserTrackingEnabled to true if a user provides consent
Settings.setAdvertiserTrackingEnabled(true)
// Set AdvertiserTrackingEnabled to false if a user does not provide consent
Settings.setAdvertiserTrackingEnabled(false)- Configure your project by adding the following lines to
(<dict>...</dict>)in yourInfo.plist:
<key>CFBundleURLTypes</key>
<array>
<dict>
<key>CFBundleURLSchemes</key>
<array>
<string>fbAPP-ID</string>
</array>
</dict>
</array>
<key>FacebookAppID</key>
<string>APP-ID</string>
<key>FacebookClientToken</key>
<string>CLIENT-TOKEN</string>
<key>FacebookDisplayName</key>
<string>APP-NAME</string>
Make sure you replacefbAPP-ID,APP-ID,CLIENT-TOKEN,APP-NAMEwith the app-specific details from the Facebook for Developers platform.
- After adding the dependency, register the
RudderFacebookFactorywith yourRudderClientinitialization as afactoryofRudderConfig. To do this, run the following command to import theRudderFacebookFactory.hfile in yourAppDelegate.mfile:
#import <rudder-facebook>- Add the RudderStack iOS (Obj-C) SDK initialization:
RSConfigBuilder *builder = [[RSConfigBuilder alloc] init];
[builder withDataPlaneUrl:DATA_PLANE_URL];
[builder withFactory:[RudderFacebookFactory instance]];
[RSClient getInstance:WRITE_KEY config:[builder build]];
This device mode integration is supported for Facebook App Events 13.0.0 and above.
- Install
RudderFacebookAppEvents(available through CocoaPods) by adding the following line to yourPodfile:
pod 'RudderFacebookAppEvents', '~>; 1.0.0'- Run the
pod installcommand. - Import the SDK depending on your preferred platform:
import RudderFacebookAppEvents@import RudderFacebookAppEvents;- Add the imports to your
AppDelegatefile under thedidFinishLaunchingWithOptionsmethod:
let config: RSConfig = RSConfig(writeKey: WRITE_KEY)
            .dataPlaneURL(DATA_PLANE_URL)

RSClient.sharedInstance().configure(with: config)
RSClient.sharedInstance().addDestination(RudderFacebookAppEventsDestination())RSConfig *config = [[RSConfig alloc] initWithWriteKey:WRITE_KEY];
[config dataPlaneURL:DATA_PLANE_URL];
[[RSClient sharedInstance] configureWith:config];
[[RSClient sharedInstance] addDestination:[[RudderFacebookAppEventsDestination alloc] init]];Identify
For Facebook App Events, RudderStack supports theidentifycalls only in mobile device mode.
You can use the identify call to set the userId through the setUserID method from AppEventsLogger.
RudderStack sets the following properties (if available) using the setUserData method.
| RudderStack property | Data type | App Events property |
|---|---|---|
traits.emailcontext.traits.email | String | em |
traits.firstNamecontext.traits.firstName | String | fn |
traits.lastNamecontext.traits.lastName | String | ln |
traits.phonecontext.traits.phone | String | ph |
traits.gendercontext.traits.gender | String | ge |
traits.birthdaycontext.traits.birthday | String | db |
traits.citycontext.traits.city | String | ct |
traits.statecontext.traits.state | String | st |
traits.zipcontext.traits.zip | String | zp |
traits.countrycontext.traits.country | String | cn |
Make sure you pass the above properties in their specific format. Otherwise, RudderStack will ignore them and not map to any Facebook properties.
A sample identify call for an iOS application is shown below:
[[RSClient sharedInstance] identify:@"developer_user_id"
                                 traits:@{@"email": @"bar@foo.com"}];
Track
This destination does not strictly adhere to the RudderStack Ecommerce Event Spec.
RudderStack logs the track call to Facebook using the logEvent method of the AppEventsLogger class. It uses the same eventName as you have passed in the track call along with all properties, after converting them into the accepted format.
A sample track call for an iOS application is as shown:.
[[RSClient sharedInstance] track:@"Accepted Terms of Service"
                      properties:@{
                          @"foo": @"bar",
                          @"foo_int": @134
                      }];
When
revenueandcurrencyare present in the event properties of anytrackcall, RudderStack makes aPurchasecall to Facebook using itslogPurchaseAPI along with the normaltrackcall using thelogEventAPI.If
currencyis absent in the event properties, RudderStack sets the default value toUSD.
Supported mappings for iOS v2
This section lists some track event and property mappings which are applicable only when sending events via the iOS SDK v2 device mode.
The following table lists the track event properties mappings between RudderStack and Facebook App Events:
| RudderStack property | Facebook App Events property |
|---|---|
product_id | ContentID |
rating | MaxRatingValue |
name | AdType |
order_id | OrderID |
currency | Currency |
query | Query |
description | Description |
The following table lists the ecommerce events mappings between RudderStack and Facebook App Events:
| RudderStack event | Facebook App Events event |
|---|---|
| Products Searched | Search |
| Products Viewed | View Content |
| Product Added | Add to Cart |
| Product Added To Wishlist | Add to Wishlist |
| Payment Info Entered | Add Payment Info |
| Checkout Started | Initiate Checkout |
| Order Completed | Purchase |
| Promotion Clicked | In-App Ad Click |
| Promotion Viewed | In-App Ad Impression |
| Product Reviewed | Rate |
| Spend Credits | Spent Credits |
RudderStack also supports the following Lifecycle events and maps them as it is before sending them to Facebook App Events:
- Complete Registration
- Achieve Level
- Complete Tutorial
- Unlock Achievement
- Subscribe
- Start Trial
Page
The page method lets you record your website’s page views with any additional relevant information about the viewed page. You need not pass the event name as RudderStack automatically sets it to Viewed Page.
A sample page call made using the JavaScript SDK is show below:
rudderanalytics.page();Thepagecall is directly passed on to Facebook as atrackevent via itslogEventAPI, with the event name asViewed Pagealong with the the associated properties.
Screen
The screen call lets you record whenever your user views their mobile screen, with any additional relevant information about the screen.
A sample screen call using the iOS (Obj-C) SDKiOS (Obj-C) refers to the legacy RudderStack iOS SDK. Note that it will be deprecated soon.
For new implementations, use the iOS (Swift) SDK instead.
is as shown:
[[RSClient sharedInstance] screen:@"Home" properties:@{
    @"category" : @"launcher"
}];
In the above snippet, RudderStack captures the name and category of the viewed screen and sends this information to Facebook as a track event Viewed Home screen by leveraging Facebook’s logEvent API.
Limited Data Use
In July 2020, Facebook released a Limited Data Use feature to give businesses better control over how their data is used in their California Consumer Privacy Act (CCPA) compliance efforts.
Using this, you can send the Limited Data Use data processing parameters to Facebook for each event via RudderStack, so that Facebook can appropriately apply the user’s data choice.
To use this feature, enable the Limited Data Use setting in the RudderStack dashboard and control its behavior via the following data processing parameters:
| Parameter | Default Value | Description |
|---|---|---|
| Data Processing Options State | 0 | Use Facebook’s geolocation to determine the end-user’s state. |
| Data Processing Options Country | 0 | Use Facebook’s geolocation to determine the end-user’s country. |
Learn more about the different data processing options accepted by Facebook.
Configure App Events SDK based on user consent
This section highlights the different consent-based options for configuring the App Events SDK.
Disable automatically logged events
To disable automatic event logging, open the application’s.plist as code in Xcode and add the following XML to the property dictionary:
<key>FacebookAutoLogAppEventsEnabled</key>
<false></false>
In some cases, you can delay the collection of automatically logged events to obtain user consent or fulfill legal obligations instead of disabling it entirely. To do so, call thesetAutoLogAppEventsEnabled method of theFBSDKSettings class to re-enable auto-logging after the end-user provides the required consent.
In Objective-C:
[FBSDKSettings setAutoLogAppEventsEnabled:YES];In Swift:
FBSDKSettings.setAutoLogAppEventsEnabled(true)To suspend event collection for any reason, set thesetAutoLogAppEventsEnabled method toNO for iOS orfalse for Swift:
In Objective-C:
[FBSDKSettings setAutoLogAppEventsEnabled:NO];In Swift:
FBSDKSettings.setAutoLogAppEventsEnabled(false)To disable automatically logged events, add the following to yourAndroidManifest.xml file:
<application>
  ...
  <meta-data android:name="com.facebook.sdk.AutoLogAppEventsEnabled" android:value="false"></meta-data>
  ...
</application>
In some cases, you can delay the collection of automatically logged events to obtain user consent or fulfill legal obligations instead of disabling it entirely. To do so, call thesetAutoLogAppEventsEnabled() method of theFacebookSDK class and set it totrue . This re-enables event logging after the end-user has provided the required consent.
setAutoLogAppEventsEnabled(true);To suspend event logging again for any reason, set thesetAutoLogAppEventsEnabled() method tofalse:
setAutoLogAppEventsEnabled(false);Disable collection of advertiser IDs
To disable the collection of advertiser ID, open the application’s.plist as code in Xcode and add the following XML to the property dictionary:
<key>FacebookAdvertiserIDCollectionEnabled</key>
<false></false>
In some cases, you can delay the collection ofadvertiser_id to obtain the user consent or fulfill any legal obligations instead of disabling it entirely. To do so, call thesetAdvertiserIDCollectionEnabled method of theFBSDKSettings class and set it toYES for iOS, ortrue for Swift after the end-user provides consent:
In Objective-C:
[FBSDKSettings setAdvertiserIDCollectionEnabled:@YES];In Swift:
FBSDKSettings.setAdvertiserIDCollectionEnabled(true);To suspend collection for any reason, set thesetAdvertiserIDCollectionEnabled method toNO for iOS orfalse for Swift.
In Objective-C:
[FBSDKSettings setAdvertiserIDCollectionEnabled:@NO];In Swift:
FBSDKSettings.setAdvertiserIDCollectionEnabled(false)To disable collection ofadvertiser-id, add the following code to yourAndroidManifest.xml file:
<application>
  ...
  <meta-data android:name="com.facebook.sdk.AdvertiserIDCollectionEnabled" android:value="false"></meta-data>
  ...
</application>
In some cases, you can delay the collection ofadvertiser_id to obtain user consent or fulfill any legal obligations instead of disabling it entirely. To do so, call thesetAdvertiserIDCollectionEnabled() method of theFacebookSDK class and set it totrue . This re-enables the collection ofadvertiser_id after the end-user provides the required consent:
setAdvertiserIDCollectionEnabled(true);To suspend collection for any reason, set thesetAdvertiserIDCollectionEnabled() method tofalse:
setAdvertiserIDCollectionEnabled(false)Disable automatic SDK initialization
To disable automatic SDK initialization in case of Android, add the following to yourAndroidManifest.xml file:
<application>
  ...
  <meta-data androidname="com.facebook.sdk.AutoInitEnabled" androidvalue="false"></meta-data>
  ...
</application>
In some cases, you can delay the SDK initialization to obtain user consent or fulfill any legal obligations instead of disabling it entirely. To do so, call the class methodsetAutoInitEnabled and set it totrue to manually initialize the SDK after the end-user provides the required consent.
FacebookSdk.setAutoInitEnabled(true)
FacebookSdk.fullyInitialize()
Starting from iOS version 14.5, you need to get the device consent to share data with Facebook by setting the isAdvertiserTrackingEnabled property. Refer to Facebook’s Get device consent documentation for more information.
FAQ
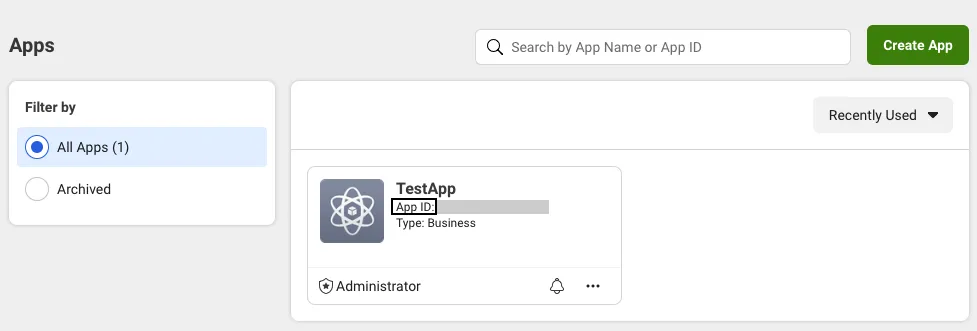
Where do I get the Facebook App ID?
You can find the Facebook App ID by logging into your Facebook Developer account, and navigating to the Home page of your application’s dashboard:
Where do I get the Facebook Client Token?
You can find the Facebook Client Token by logging into your Facebook Developer account and navigating to Settings > Advanced > Security section in the application’s dashboard: