Braze Device Mode Integration
14 minute read
After you have successfully instrumented Braze as a destination in RudderStack, follow this guide to correctly send your events to Braze in device mode.
Add Braze integration
Make sure to add the Braze integration to your project before sending events to Braze in device mode.
Depending on your integration platform, follow these steps:
The Braze integration v1.0.0 and above requires minimum SDK version (minSdk) of 25.
Follow the steps in this section to add Braze to your Kotlin project.
- In your module (app-level) Gradle file (usually
<project>/<app-module>/build.gradle.ktsor<project>/<app-module>/build.gradle), add the following dependencies for the RudderStack-Braze integration:
dependencies {
  // ...

  // Add Rudder Kotlin and Braze integration SDKs:
  implementation("com.rudderstack.sdk.kotlin:android:<latest-version>")
  implementation("com.rudderstack.integration.kotlin:braze:<latest-version>")
}- For further steps on permissions and other optional configurations, see the Braze documentation.
- Add the SDK initialization and the
Rudder-Brazeintegration in yourApplicationclass:
import android.app.Application
import com.rudderstack.sdk.kotlin.android.Analytics
import com.rudderstack.sdk.kotlin.android.Configuration
import com.rudderstack.integration.kotlin.braze.BrazeIntegration

class MyApplication : Application() {
    lateinit var analytics: Analytics

    override fun onCreate() {
        super.onCreate()
        analytics = Analytics(
            configuration = Configuration(
                writeKey = "WRITE_KEY",
                application = this,
                dataPlaneUrl = "DATA_PLANE_URL",
            )
        )

        analytics.add(BrazeIntegration())
    }
}Follow these steps to add the Braze integration to your Swift project using Swift Package Manager:
- In Xcode, select File > Add Package Dependencies….
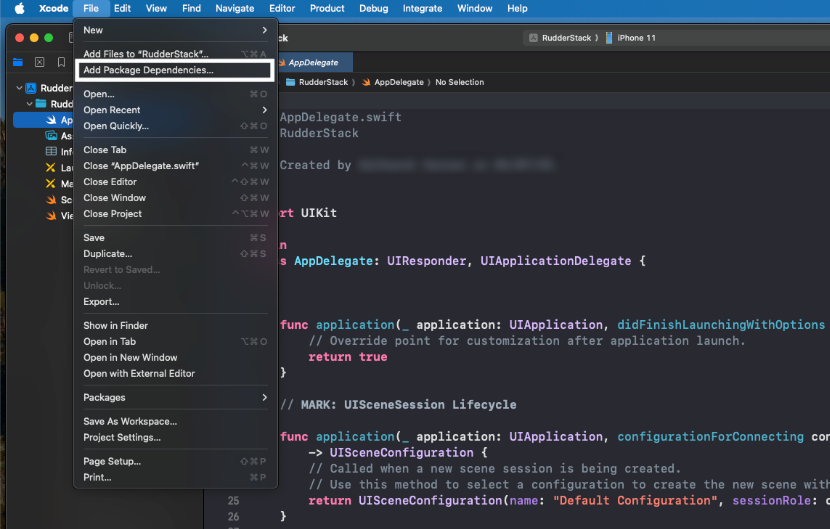
- Enter the below package repository URL in the search bar:
https://github.com/rudderlabs/integration-swift-braze/- Select the latest version and the target to which you want to add the package.
- Click Add Package.
Alternatively, you can add the dependency to your Package.swift file, as shown:
dependencies: [
    .package(url: "<https://github.com/rudderlabs/integration-swift-braze.git>", from: "<latest_integration_version>")
]
Usage
- Import the SDK and the integration:
import RudderStackAnalytics
import RudderIntegrationBraze- Add
BrazeIntegrationto youranalyticsinstance:
// Initialize RudderStack Analytics
let analytics = Analytics(
    configuration: Configuration(
        writeKey: "<WRITE_KEY>",
        dataPlaneUrl: "<DATA_PLANE_URL>"
    )
)

// Add Braze Integration
analytics.add(plugin: BrazeIntegration())- Add the RudderStack-Braze module to your app by running the following command:
npm install @rudderstack/rudder-integration-braze-react-nativeyarn add @rudderstack/rudder-integration-braze-react-native- Import the module you added above and add it to your SDK initialization code:
import rudderClient from "@rudderstack/rudder-sdk-react-native";
import braze from "@rudderstack/rudder-integration-braze-react-native";
const config = {
  dataPlaneUrl: DATA_PLANE_URL,
  trackAppLifecycleEvents: true,
  withFactories: [braze]
};
rudderClient.setup(WRITE_KEY, config);- Add the following dependency to the
dependenciessection of yourpubspec.yamlfile:
rudder_integration_braze_flutter: ^1.0.1- Run the below command to install the dependency added in the above step:
flutter pub get- Import the
RudderIntegrationBrazeFlutterin your application where you are initializing the SDK:
import 'package:rudder_integration_braze_flutter/rudder_integration_braze_flutter.dart';- Change the initialization of your
RudderClientas shown:
final RudderController rudderClient = RudderController.instance;
RudderConfigBuilder builder = RudderConfigBuilder();
builder.withFactory(RudderIntegrationBrazeFlutter());
rudderClient.initialize(<write_key>, config: builder.build(), options: null);- Add the following under
dependenciessection:
implementation 'com.rudderstack.android.sdk:core:[1.0,2.0)'
implementation 'com.rudderstack.android.integration:braze:[1.3.0,)'
The Braze-RudderStack Android SDK integration v2.0.0 and above requires a minimum SDK version (minSdkVersion) of 25.
- Add the following permissions to the
AndroidManifest.xmlfile:
<uses-permission android:name="android.permission.INTERNET"></uses-permission>
<uses-permission android:name="android.permission.ACCESS_NETWORK_STATE"></uses-permission>- Change the SDK initialization to the following:
// initialize Rudder SDK
val rudderClient: RudderClient =
    RudderClient.getInstance(
        this,
        WRITE_KEY,
        RudderConfig.Builder()
            .withDataPlaneUrl(DATA_PLANE_URL)
            .withLogLevel(RudderLogger.RudderLogLevel.DEBUG)
            .withFactory(BrazeIntegrationFactory.FACTORY)
            .build()
)- Open the
Podfileof your project and add the following:
pod 'Rudder-Braze'- Run the
pod installcommand. - Change the SDK initialization to the following snippet:
RudderConfigBuilder *builder = [[RudderConfigBuilder alloc] init];
[builder withDataPlaneUrl:<data_plane_url>];
[builder withFactory:[RudderBrazeFactory instance]];
[RudderClient getInstance:<write_key>; config:[builder build]];
RudderStack supports this device mode integration for Braze v4.4.4 and above.
- Install
RudderBraze(available through CocoaPods) by adding the following to yourPodfile:
pod 'RudderBraze', '~> 1.0.0'- Run the
pod installcommand. - Import the SDK depending on your preferred platform:
import RudderBraze@import RudderBraze;- Add the imports to your
AppDelegatefile under thedidFinishLaunchingWithOptionsmethod:
let config: RSConfig = RSConfig(writeKey: WRITE_KEY)
            .dataPlaneURL(DATA_PLANE_URL)
RSClient.sharedInstance().configure(with: config)
RSClient.sharedInstance().addDestination(RudderBrazeDestination())RSConfig *config = [[RSConfig alloc] initWithWriteKey:WRITE_KEY];
[config dataPlaneURL:DATA_PLANE_URL];
[[RSClient sharedInstance] configureWith:config];
[[RSClient sharedInstance] addDestination:[[RudderBrazeDestination alloc] init]];To send push notification events, see Send push notifications.
Use platform-specific Braze App Identifier keys
For device mode connections, you can configure platform-specific (Android, iOS, and web) Braze App Identifier keys while setting up your Braze destination. This is useful especially when connecting cross-platform SDK sources like React Native and Flutter, while also allowing Android and iOS sources to be configured to the same Braze destination.
To use this feature:
- Enable the Enable Platform-specific App Identifier Keys setting in the Connection settings.
- Configure the relevant App Identifier keys based on your connected sources.
How App Identifier key selection works
The Braze device mode integration looks for platform-specific App Identifier keys first. If unavailable, it uses the Default App Identifier Key instead.
Note that:
- An older version of the device mode integration will continue to work with the default App Identifier key.
- If you remove the default App Identifier key and configure platform-specific App Identifier keys, you must upgrade to the latest version of the device mode integration highlighted below:
| SDK | Minimum supported integration version |
|---|---|
| Android (Kotlin) | 1.1.1 |
| iOS (Swift) | 1.0.1 |
| React Native | 2.1.0 |
| Flutter | 2.5.0 |
| Android (Java) — Legacy | 2.1.1 |
| iOS (Obj-C) — Legacy | 4.2.1 |
Migration example
Scenario
Suppose you have three sources connected to three separate Braze destinations in your current setup:
- Android source (A) → Braze destination (B1)
- iOS source (B) → Braze destination (B2)
- JavaScript source (C) → Braze destination (B3)
Each destination is configured with platform-specific keys.
What you want to achieve
You want to consolidate these connections to a single Braze destination (B3, for example) that supports all the platform-specific App Identifier keys, simplifying your overall setup.
Steps
Upgrade your SDK integrations: Upgrade your Android and iOS SDK integrations to the minimum versions that support platform-specific App Identifier keys. See the supported versions table above for details.
Enable platform-specific keys: In your existing Braze destination B3 (previously connected only to the JavaScript source), enable the Enable Platform-specific App Identifier Keys toggle in the Connection settings and specify the platform-specific key for the JavaScript source.
Connect additional sources: Connect your Android (A) and iOS (B) sources to the Braze destination.
Add platform-specific keys: Configure the Android and iOS App Identifier keys in the destination settings.
Remove old destinations: Delete the older separate Braze destinations (B1 and B2) that are no longer needed.
After completing these steps, all three sources (Android, iOS, and JavaScript) send events to a single Braze destination configured with platform-specific App Identifier keys.
Identify
You can use the identify call to identify a user in Braze in any of the below cases:
- When the user registers to the app for the first time.
- When they log into their app.
- When they update their information.
A sample identify call is shown below:
rudderanalytics.identify("1hKOmRA4GRlm", {
  email: "alex@example.com",
  name: "Alex Keener"
});
Set custom user ID (externalId)
In mobile device mode, that is, when using Android (Java), iOS (Obj-C), React Native, or Flutter as source, you need to pass externalId in your identify events. Otherwise, Braze uses userId to identify the user.
Braze gives first preference to theexternalIdfield in theidentifyevent to identify the user. IfexternalIdis absent, it falls back to theuserIdfield.
The following code snippet shows how to add an externalId to your identify event using the React Native SDK:
const options = {
  externalIds: [
    {
      id: "<your_external_id>",
      type: "brazeExternalId",
    },
  ],
}
rudderClient.identify(
  "1hKOmRA4GRlm",
  {
    email: "alex@example.com",
    gender: "male",
  },
  options
)
Make sure to send theidentifyevent containing theexternalIdbefore sending any subsequenttrackevents. That way, RudderStack is able to successfully persist theexternalIdinformation in all the future events.
Track
The track event lets you record the customer events along with any associated properties.
A sample track call is shown below:
rudderanalytics.track("Product Added", {
  numberOfRatings: "12",
  name: "item 1"
});
Order Completed
When you use the track call for an Order Completed event, RudderStack sends the product information present in the event to Braze as purchases.
A sample Order Completed event is shown:
rudderanalytics.track("Order Completed", {
  userId: "1hKOmRA4GRlm",
  currency: "USD",
  products: [
    {
      product_id: "123454387",
      name: "Game",
      price: 15.99
    }
  ]
});
Page
The page event lets you record your website’s page views, with the additional relevant information about the viewed page.
A sample page call is as shown:
rudderanalytics.page("Cart", "Cart Viewed", {
  path: "/cart",
  referrer: "test.com",
  search: "term",
  title: "test_item",
  url: "http://test.in"
});
Delta management for identify and track calls
If you are sending events to Braze in device mode, you can save costs by deduplicating your identify calls. To do so, enable the Deduplicate Traits dashboard setting. RudderStack then sends only the changed or modified attributes (traits) to Braze.
RudderStack recommends reviewing Braze’s data points policy to fully understand how this functionality can help you avoid data overages.
Advanced features
This section covers some advanced Braze operations that you can perform using RudderStack.
Send push notification events
Depending on your iOS (Obj-C) SDK version, follow these steps to send push notification events to Braze:
The iOS (Swift) SDK does not auto-forward push notifications. You must explicitly integrate the push notification handling code in your app.
The underlying Braze instance is exposed and can be accessed via the
getDestinationInstance()oronDestinationReady()callbacks for customizing the push notification handling code.
Prerequisites
You must enable the Push Notifications capability in Xcode under your target’s Signing & Capabilities section.
Step 1: Initialize integration and register for push notifications
Store the BrazeIntegration instance as a property so it can be referenced throughout the app’s lifecycle. Set up UNUserNotificationCenter synchronously before the app finishes launching.
For SwiftUI apps, use @UIApplicationDelegateAdaptor to wire in a UIApplicationDelegate implementation:
import SwiftUI
import UIKit
import UserNotifications
import RudderStackAnalytics
import RudderIntegrationBraze
import BrazeKit

@main
struct MyApp: App {
    @UIApplicationDelegateAdaptor(AppDelegate.self) var appDelegate

    var body: some Scene {
        WindowGroup { ContentView() }
    }
}

class AppDelegate: UIResponder, UIApplicationDelegate {

    // Store the plugin instance — required for getDestinationInstance() and onDestinationReady
    private let brazePlugin = BrazeIntegration()
    private var pendingDeviceToken: Data?

    private var braze: Braze? {
        brazePlugin.getDestinationInstance() as? Braze
    }

    func application(_ application: UIApplication,
                     didFinishLaunchingWithOptions launchOptions: [UIApplication.LaunchOptionsKey: Any]?) -> Bool {
        setupRudderStack()
        setupPushNotifications(application)
        return true
    }

    private func setupRudderStack() {
        let configuration = Configuration(
            writeKey: "<WRITE_KEY>",
            dataPlaneUrl: "<DATA_PLANE_URL>"
        )
        let analytics = Analytics(configuration: configuration)
        analytics.add(plugin: brazePlugin)
    }

    private func setupPushNotifications(_ application: UIApplication) {
        let center = UNUserNotificationCenter.current()
        center.setNotificationCategories(Braze.Notifications.categories)
        center.delegate = self
        center.requestAuthorization(options: [.alert, .badge, .sound]) { granted, error in
            guard granted else { return }
            DispatchQueue.main.async {
                application.registerForRemoteNotifications()
            }
        }
    }
}
Step 2: Forward device token
The didRegisterForRemoteNotificationsWithDeviceToken callback can be triggered very early during app launch. Depending on OS-level timing, the device token may be received before the Braze SDK has been initialized and is ready to accept the token.
To avoid losing the token in such cases, temporarily store it and register it once Braze becomes available using onDestinationReady:
extension AppDelegate {

    func application(_ application: UIApplication,
                     didRegisterForRemoteNotificationsWithDeviceToken deviceToken: Data) {
        if let braze {
            // Braze already initialized — register immediately
            braze.notifications.register(deviceToken: deviceToken)
        } else {
            // Hold token until onDestinationReady fires
            pendingDeviceToken = deviceToken
            brazePlugin.onDestinationReady { [weak self] instance, result in
                guard let self, case .success = result,
                      let token = self.pendingDeviceToken,
                      let braze = instance as? Braze else { return }
                braze.notifications.register(deviceToken: token)
                self.pendingDeviceToken = nil
            }
        }
    }

    func application(_ application: UIApplication,
                     didFailToRegisterForRemoteNotificationsWithError error: Error) {
        // Handle registration failure
    }
}
Step 3: Handle notification events
extension AppDelegate: UNUserNotificationCenterDelegate {

    // Foreground display options
    func userNotificationCenter(_ center: UNUserNotificationCenter,
                                willPresent notification: UNNotification,
                                withCompletionHandler completionHandler: @escaping (UNNotificationPresentationOptions) -> Void) {
        completionHandler([.list, .banner, .sound])
    }

    // Notification tap / action response
    func userNotificationCenter(_ center: UNUserNotificationCenter,
                                didReceive response: UNNotificationResponse,
                                withCompletionHandler completionHandler: @escaping () -> Void) {
        if let braze, braze.notifications.handleUserNotification(response: response, withCompletionHandler: completionHandler) {
            return
        }
        completionHandler()
    }

    // Silent / background push
    func application(_ application: UIApplication,
                     didReceiveRemoteNotification userInfo: [AnyHashable: Any],
                     fetchCompletionHandler completionHandler: @escaping (UIBackgroundFetchResult) -> Void) {
        if let braze, braze.notifications.handleBackgroundNotification(userInfo: userInfo, fetchCompletionHandler: completionHandler) {
            return
        }
        completionHandler(.noData)
    }
}
See the following references for more information:
- Follow the Braze documentation to generate a push notification certificate.
- Add the following code to your
AppDelegatefile under thedidFinishLaunchingWithOptionsmethod:
[[UIApplication sharedApplication] registerForRemoteNotifications];

UNUserNotificationCenter *center = UNUserNotificationCenter.currentNotificationCenter;
[center setNotificationCategories:BRZNotifications.categories];
center.delegate = self;
UNAuthorizationOptions options = UNAuthorizationOptionAlert | UNAuthorizationOptionSound | UNAuthorizationOptionBadge;
if (@available(iOS 12.0, *)) {
    options = options | UNAuthorizationOptionProvisional;
}
[center requestAuthorizationWithOptions:options
                      completionHandler:^(BOOL granted, NSError *_Nullable error) {
    NSLog(@"Notification authorization, granted: %d, "
          @"error: %@)",
          granted, error);
}];
You must assign the delegate object using
center.delegate = selfsynchronously before your app finishes launching - preferably inapplication:didFinishLaunchingWithOptions.Otherwise, your app may miss any incoming push notificaitons. See Apple’s
UNUserNotificationCenterDelegatedocumentation for more information.
- Register push tokens with Braze:
// - Register the device token with Braze
- (void)application:(UIApplication *)application didRegisterForRemoteNotificationsWithDeviceToken:(NSData *)deviceToken {
    if ([RudderBrazeFactory instance].integration) {
        [[RudderBrazeFactory instance].integration didRegisterForRemoteNotificationsWithDeviceToken:deviceToken];
    }
}
Make sure that
RudderBrazeFactoryis initialized before making calls to this push API.Since the Braze push API is designed as an instance method, it relies on the SDK that is correctly initialized beforehand. To do this, you can utilize the
dispatch_afterAPI.
- Enable push handling:
// - Add support for silent notification

- (void)application:(UIApplication *)application didReceiveRemoteNotification:(NSDictionary *)userInfo fetchCompletionHandler: (void (^)(UIBackgroundFetchResult))completionHandler {
    if ([RudderBrazeFactory instance].integration) {
        [[RudderBrazeFactory instance].integration didReceiveRemoteNotification:userInfo fetchCompletionHandler:completionHandler];
    }
}

// - Add support for push notifications

- (void)userNotificationCenter:(UNUserNotificationCenter *)center didReceiveNotificationResponse:(UNNotificationResponse *)response withCompletionHandler:(void (^)(void))completionHandler {
    if ([RudderBrazeFactory instance].integration) {
        [[RudderBrazeFactory instance].integration didReceiveNotificationResponse:response withCompletionHandler:completionHandler];
    }
}

// - Add support for displaying push notification when the app is currently running in the foreground

- (void)userNotificationCenter:(UNUserNotificationCenter *)center willPresentNotification:(UNNotification *)notification withCompletionHandler: (void (^)(UNNotificationPresentationOptions))completionHandler {
    if (@available(iOS 14, *)) {
        completionHandler(UNNotificationPresentationOptionList |
                          UNNotificationPresentationOptionBanner);
    } else {
        completionHandler(UNNotificationPresentationOptionAlert);
    }
}
Braze recommends invoking the push integration code within the application’s main thread.
Add the following code to your AppDelegate file under the didFinishLaunchingWithOptions method:
if #available(iOS 10, *) {
    let center = UNUserNotificationCenter.current()
    center.delegate = self
    var options: UNAuthorizationOptions = [.alert, .sound, .badge]
    if #available(iOS 12.0, *) {
        options = UNAuthorizationOptions(rawValue: options.rawValue | UNAuthorizationOptions.provisional.rawValue)
        }
        center.requestAuthorization(options: options) { (granted, error) in
            RSClient.sharedInstance().pushAuthorizationFromUserNotificationCenter(granted)
    }
    UIApplication.shared.registerForRemoteNotifications()
} else {
    let types: UIUserNotificationType = [.alert, .badge, .sound]
    let setting: UIUserNotificationSettings = UIUserNotificationSettings(types: types, categories: nil)
    UIApplication.shared.registerUserNotificationSettings(setting)
    UIApplication.shared.registerForRemoteNotifications()
}if (floor(NSFoundationVersionNumber) > NSFoundationVersionNumber_iOS_9_x_Max) {
UNUserNotificationCenter *center = [UNUserNotificationCenter currentNotificationCenter];
center.delegate = self;
UNAuthorizationOptions options = UNAuthorizationOptionAlert | UNAuthorizationOptionSound | UNAuthorizationOptionBadge;
if (@available(iOS 12.0, *)) {
options = options | UNAuthorizationOptionProvisional;
}
[center requestAuthorizationWithOptions:options
completionHandler:^(BOOL granted, NSError * _Nullable error) {
[[RSClient sharedInstance] pushAuthorizationFromUserNotificationCenter:granted];
}];
[[UIApplication sharedApplication] registerForRemoteNotifications];
} else {
UIUserNotificationSettings *settings = [UIUserNotificationSettings settingsForTypes:(UIUserNotificationTypeBadge | UIUserNotificationTypeAlert | UIUserNotificationTypeSound) categories:nil];
[[UIApplication sharedApplication] registerForRemoteNotifications];
[[UIApplication sharedApplication] registerUserNotificationSettings:settings];
}Send in-app message events
Braze in-app messages are not automatically supported in the iOS (Swift) SDK. After the Braze SDK is initialized, you must explicitly configure a presenter — use theonDestinationReadycallback to assignBrazeInAppMessageUIas the in-app message presenter.
1. Add dependency
- Using
Package.swift(requires addingBrazeUIto your target’s package dependencies in thePackage.swiftfile):
..
dependencies: [
  .package(url: "https://github.com/braze-inc/braze-swift-sdk-prebuilt-static", from: "<latest_version>"),
],
targets: [
  .target(
    name: "<your_target>",
    dependencies: [
      .product(name: "BrazeUI", package: "braze-swift-sdk-prebuilt-static"),
    ]
   )
]
..
Using SPM:
- Use the Braze repository to search for the package.
- Select the
BrazeUIpackage to add it as a dependency for your target.
2. Implementation
After add the dependency, import the package as shown:
import BrazeKit
import BrazeUI
import RudderIntegrationBraze

// Inside setupAnalytics(), after analytics.add(plugin: brazePlugin):
brazePlugin.onDestinationReady { instance, result in
    guard case .success = result, let braze = instance as? Braze else { return }
    braze.inAppMessagePresenter = BrazeInAppMessageUI()
}
In-app messages are triggered by custom events. When the app is foregrounded and a matching campaign is active in the Braze dashboard, the message displays automatically after the presenter is assigned.
See the Braze documentation for more information on this feature.
This feature is available in the iOS (Obj-C) SDK device mode integration starting from version 1.4.0.
- Add the following line to your
Podfilefor Braze IAM support:
pod 'BrazeUI'- Navigate to your Xcode app project directory and run
pod install. - Import the BrazeUI SDK in your
AppDelegate.mfile:
@import BrazeUI;- Add a static variable to your
AppDelegate.mfile to keep a reference to the Braze instance throughout your app’s lifetime:
static Braze *braze;- Add the following code in your
AppDelegate.mfile just after the RudderStack iOS (Obj-C) SDK initialization snippet:
id<RSIntegrationFactory> brazeFactoryInstance = [RudderBrazeFactory instance];
// RudderStack SDK initialization
[[RSClient getInstance] onIntegrationReady:brazeFactoryInstance withCallback:^(NSObject *brazeInstance) {
    if (brazeInstance && [brazeInstance isKindOfClass:[Braze class]]) {
        braze = (Braze *)brazeInstance;
        [self configureIAM];
    } else {
        NSLog(@"Error getting Braze instance.");
    }
}];
The corresponding Swift snippet is as follows:
let brazeFactoryInstance = RudderBrazeFactory()
// RudderStack SDK initialization
RSClient.getInstance().onIntegrationReady(brazeFactoryInstance) { brazeInstance in
    if let brazeInstance = brazeInstance as? Braze {
        AppDelegate.braze = brazeInstance
        self.configureIAM()
    } else {
        print("Error getting Braze instance.")
    }
}- Add the
configureIAMmethod in theAppDelegate.mfile:
-(void) configureIAM {
    // Refer here: https://www.braze.com/docs/developer_guide/platform_integration_guides/swift/in-app_messaging/customization/setting_delegates/#setting-the-in-app-message-delegate
    BrazeInAppMessageUI *inAppMessageUI = [[BrazeInAppMessageUI alloc] init];
    braze.inAppMessagePresenter = inAppMessageUI;
}
The corresponding Swift snippet is as follows:
func configureIAM() {
    // Refer here: https://www.braze.com/docs/developer_guide/platform_integration_guides/swift/in-app_messaging/customization/setting_delegates/#setting-the-in-app-message-delegate
    let inAppMessageUI: BrazeInAppMessageUI = BrazeInAppMessageUI()
    AppDelegate.braze?.inAppMessagePresenter = inAppMessageUI
}