Mailchimp Destination
6 minute read
The RudderStack Mailchimp integration is experiencing intermittent issues.
Not all customers are experiencing these issues. Our engineering team is actively working on a fix. For questions, contact RudderStack Support.
Mailchimp is a popular email marketing automation platform used worldwide by thousands of businesses. Built specially for eCommerce and retail, Mailchimp allows you to build your audience and send them personalized campaign and marketing messages through web or mobile.
RudderStack supports Mailchimp as a destination to which you can seamlessly send your event data. Also, you can add people to your Mailchimp list via a simple identify call.
Find the open-source transformer code for this destination in our GitHub repository.
Connection compatibility
| Destination Information | |||
|---|---|---|---|
| |||


Get started
Once you have confirmed that the source platform supports sending events to Mailchimp, follow these steps:
- From your RudderStack dashboard, add a source. Then, from the list of destinations, select Mailchimp.
- Assign a name to the destination and click Continue.
Connection settings
To successfully configure Mailchimp as a destination, you will need to configure the following settings:
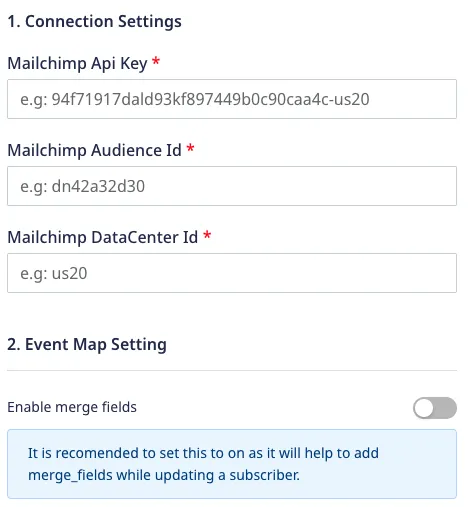
- Mailchimp API Key: Enter your Mailchimp API Key.
It is recommended to create a new API key for the RudderStack destination. Mailchimp restricts each API key to a maximum of 10 concurrent requests. Hence, creating a dedicated key for RudderStack ensures maximum throughput for the outgoing calls. Refer to the Mailchimp documentation for more detaails.
- Mailchimp Audience ID: Enter your Mailchimp Audience ID.
- Mailchimp DataCenter ID: Enter your Mailchimp DataCenter ID.
- Enable Merge fields: Enable this setting if you want to add merge fields while updating a subscriber.
Refer to the FAQ section for more information on how to get the above details.
Identify
The identify call captures the details about the visiting user along with the properties associated with that user.
Adding or updating a user
A sample identify call is shown below:
rudderanalytics.identify("1hKOmRA4el9Zt1WSfVJIVo4GRlm", {
    firstName: "Alex",
    lastName: "Keener",
    email: "alex@example.com"
});
Every time an identify call is made including an email address, RudderStack performs the following steps:
- RudderStack first checks with Mailchimp whether that specific email address exists for the
listIdprovided in the destination settings. - If the email address does not exist in the list, RudderStack subscribes the associated user to the list immediately. If the
doubleOptInsetting is enabled, Mailchimp sends a confirmation email to that user, and that email is tagged with apendingsubscriber status. The subscriber status automatically changes tosubscribedonce the user confirms the email. - If the user already has a subscriber status such as
pending,subscribed,unsubscribedorcleaned, RudderStack will not resubscribe them, but only update their associated user traits.
identifycall. The rest of the fields must match the Merge Field tag in Mailchimp.
Capture custom user traits
You can capture the custom user traits in the Mailchimp list dashboard by creating a custom merge field in Mailchimp.
Mailchimp supports merge tags only up to 10 characters. Hence, every user trait sent inside theidentifycall is trimmed to the first 10 characters and converted to uppercase before being sent to Mailchimp. Also, theMerge Tagsis created by taking the 10 characters (excluding whitespace/special characters) of itsField Label.
For example, if you set theField LabelasUpto 10-Char, theMerge Tagwill beUPTO10CHAR. Theuser.traitinside youridentifycall, which is,Upto 10-Char, will be converted toUPTO10CHARbefore being sent to Mailchimp.
Creating custom merge fields
Create custom merge fields only for the traits you want to see in your list view and not for alluser.traits.
To create and send custom merge fields or user traits to Mailchimp, please follow these steps:
- Create the merge field in Mailchimp for every trait you want sent to it.
- When you make the
identifycall, the keys that match the traits above will automatically appear in your Mailchimp list.
Theidentifycall will not change in this case.
Overriding listId
If you have multiple lists that your users can subscribe to, you can override the default listId as a parameter to Mailchimp.
The following sample snippet overrides the default listId with esf1rd234a as listId:
rudderanalytics.identify(
  "1hKOmRA4el9Zt1WSfVJIVo4GRlm",
  {
    email: "alex@example.com"
  },
  {
    integrations: {
      Mailchimp: {
        listId: "esf1rd234a"
      }
    }
  }
);
Updating the subscription status
RudderStack provides you with the option to manually update the subscription status of a user by passing the subscriptionStatus parameter to Mailchimp.
An example is shown below:
rudderanalytics.identify(
  "1hKOmRA4el9Zt1WSfVJIVo4GRlm",
  {
    email: "alex@example.com"
  },
  {
    integrations: {
      Mailchimp: {
        subscriptionStatus: "unsubscribed"
      }
    }
  }
);
This setting will NOT work for new users. For new users, the subscription status will always be set aspendingorsubscribed, depending on the setdoubleOptInsetting.
Track
You can use the track call to track user actions or trigger targeted automations in Mailchimp using their Events API.
A sample track call is shown below:
rudderanalytics.track("registered_referral", {
  "referee_id": "1233",
  "referral_acceptance": "accepted",
  "email": "alex@example.com"
})trackcall successfully. You can pass it in eithertraits.email,ucontext.traits.email, orproperties.email. RudderStack hashes thesubscriber_hashin the Mailchimp Events API endpoint.
Supported mappings
The following table lists the mappings between the RudderStack and Mailchimp properties:
| RudderStack property | Mailchimp property | Notes |
|---|---|---|
eventRequired | name | Event name must contain 2-30 characters. |
properties | properties | - |
properties.isSyncing | is_syncing | RudderStack triggers the targeted automations by default. However, you can set isSyncing to true if you don’t want to trigger them. |
originalTimestamp | occurred_at | - |
RudderStack stringifies all values received inproperties[key]as Mailchimp only accepts the string values inproperties[key].
FAQ
Where do I get the Mailchimp API Key?
To get the Mailchimp API Key, log in to Mailchimp, and go to Account > Extras > API Keys.
Where do I get the Mailchimp Audience ID?
You can find the Mailchimp Audience ID by logging in to Mailchimp and navigating to Audience > Manage Audience > Settings > Audience name and defaults.
Where do I get the Mailchimp DataCenter ID?
To get the DataCenter ID, please refer to your Mailchimp URL in the browser. For example, if the URL is https://us20.admin.mailchimp.com/lists, the DataCenter ID is us20 in this case.
