How to Create Custom Web Device Mode Integrations
4 minute read
This guide lists the steps to set up a custom web device mode destination in RudderStack and the necessary SDK configuration required to send events correctly.
Prerequisites
Before you start creating custom device mode integrations, make sure you have:
- A JavaScript source set up in your RudderStack workspace and integrated with your website
- Access to your third-party tool’s API, documentation, and SDK
Connection compatibility
| Destination Information | |||
|---|---|---|---|
| |||


1. Dashboard setup
Create a custom device mode destination in your RudderStack dashboard by following these steps:
- Navigate to the JavaScript source set up in your RudderStack dashboard.
- In the Overview tab, click Add Destination > Create new destination.
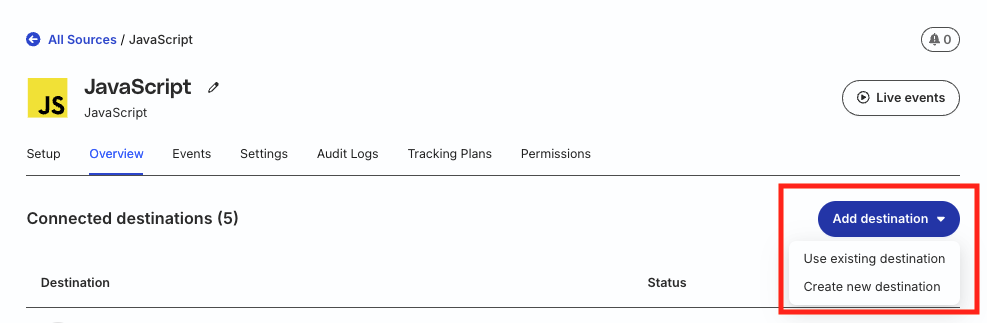
- Select Custom Device Mode from the list of destinations and click Continue.
- Configure the following settings:
| Setting | Description |
|---|---|
| Name | Assign a name to uniquely identify the destination in RudderStack. |
| Connection mode | Device mode is selected by default, as this is a web device mode-only integration. |
- Configure the other optional settings as per your requirements:
| Setting | Description |
|---|---|
| Consent management settings | Configure the consent management settings for the specified source by choosing the Consent management provider from the dropdown and entering the relevant consent category IDs. See Consent Management in RudderStack for more information on this feature. |
| Client-side Events Filtering | This setting lets you specify which track events should be blocked or allowed to flow through to the custom integration.See Client-side Events Filtering for more information. |
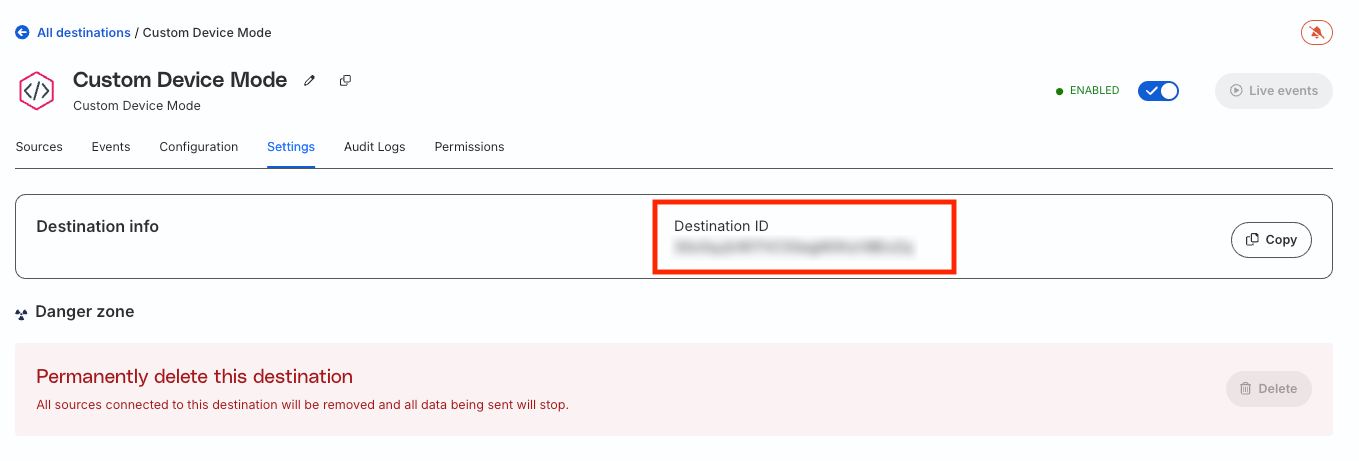
- Save your destination and note the Destination ID — you will need this for the JavaScript SDK integration.
2. Add your custom integration to the JavaScript SDK
Use the addCustomIntegration API to register your custom integration with the RudderStack JavaScript SDK.
TheaddCustomIntegrationAPI connects your custom code to the Custom Device Mode destination set up in the RudderStack dashboard.
Basic syntax
rudderanalytics.addCustomIntegration('<destination_id>', {
  // Your integration implementation
});
See the detailed addCustomIntegration API reference for more information on the following:
3. Implement the integration functions
This section covers the functions you need to implement to correctly create your custom web device mode integration.
Your implementation determines the supported event types and how the integration handles them.
Initialize the third-party SDK
Use the init function to load and configure your third-party SDK:
init: (destinationConfig, analytics, logger) => {
  logger.debug('Loading third-party SDK');

  // Dynamically load the SDK script
  const script = document.createElement('script');
  script.src = 'https://cdn.your-sdk.com/sdk.js';
  script.onload = () => {
    // Initialize the SDK once loaded
    window.YourSDK.init({
      apiKey: destinationConfig.apiKey,
      // Add other configuration options
    });
  };
  document.head.appendChild(script);
}
Check integration readiness
Note that isReady is the only required function — it tells RudderStack when your integration is ready to receive events:
isReady: (analytics, logger) => {
  // Check if your third-party SDK is loaded and initialized
  return window.YourSDK && window.YourSDK.initialized === true;
}IfisReadydoesn’t returntruewithin 11 seconds, RudderStack will time out and skip your integration.
Handle events
Make sure to implement only the event types your integration supports:
track: (analytics, logger, rsEvent) => {
  try {
    // Extract event data
    const eventName = rsEvent.message.event;
    const properties = rsEvent.message.properties;

    // Send to your third-party tool
    window.YourSDK.track(eventName, properties);

    logger.debug('Track event sent successfully');
  } catch (error) {
    logger.error('Failed to send track event:', error);
  }
}
4. Test the integration
After implementing your custom integration, verify it works correctly by following these steps:
- Open your browser’s developer console.
- Look for any debug messages (after configuring the required log levels in the JavaScript SDK) from your integration.
- Check that events are being sent to your tool.
- Test different event types (
track,page,identify) to ensure they’re handled properly.
Troubleshooting
| Issue | Solution |
|---|---|
| Integration not initializing | Make sure to call addCustomIntegration() before rudderanalytics.load(). |
| Events not being sent | Check that isReady returns true. |
| Third-party SDK not loading | Verify the script URL and check for console errors. |
| Configuration not available | Ensure your destination is properly configured in the RudderStack dashboard. |
