RudderStack IAM role for Redshift
Create a RudderStack IAM role for authenticating to Redshift.
4 minute read
This guide contains the steps to create an IAM role for authenticating RudderStack while setting up the following resources:
Prerequisites
Before creating the IAM role, make sure you have:
- Access to your AWS Management Console with permissions to:
- Create IAM policies
- Create IAM roles
- Manage trust relationships
- Your RudderStack workspace ID
- For Redshift Serverless:
- Workgroup ID
- AWS region
- AWS account ID
- For Redshift Provisioned:
- Cluster identifier
- AWS region
- AWS account ID
- Database name
- Database user name
Create RudderStack IAM role
This section contains the steps to set up a new RudderStack IAM role with the required permissions to access your Redshift database.
Create policy
- Sign in to your AWS Management Console and open the IAM console.
- Go to Policies > Create policy. See Creating IAM policies guide for more information.
- Choose the JSON option. Then, paste the JSON (shown below) depending on whether the Use Redshift Serverless connection setting is toggled on or off:
json
{
  "Version": "2012-10-17",
  "Statement": [{
      "Action": "redshift-serverless:GetCredentials",
      "Effect": "Allow",
      "Resource": [
        "arn:aws:redshift-serverless:${Region}:${Account}:workgroup/${WorkgroupId}"
      ],
      "Sid": "VisualEditor0"
    },
    {
      "Action": [
        "redshift-data:BatchExecuteStatement",
        "redshift-data:ExecuteStatement"
      ],
      "Effect": "Allow",
      "Resource": [
        "arn:aws:redshift-serverless:${Region}:${Account}:workgroup/${WorkgroupId}"
      ],
      "Sid": "VisualEditor1"
    },
    {
      "Action": [
        "redshift-data:GetStatementResult",
        "redshift-data:CancelStatement",
        "redshift-data:DescribeStatement"
      ],
      "Effect": "Allow",
      "Resource": "*",
      "Sid": "VisualEditor2"
    }
  ]
}
Make sure to replace{Region},{Account}, and{WorkgroupId}in the above policy with the exact values for your AWS region, account, and the workgroup ID, respectively.
json
{
  "Version": "2012-10-17",
  "Statement": [{
      "Action": "redshift:GetClusterCredentials",
      "Effect": "Allow",
      "Resource": [
        "arn:aws:redshift:${Region}:${Account}:dbuser:${ClusterIdentifier}/${DbUser}",
        "arn:aws:redshift:${Region}:${Account}:dbname:${ClusterIdentifier}/${DbName}"
      ],
      "Sid": "VisualEditor0"
    },
    {
      "Action": [
        "redshift-data:BatchExecuteStatement",
        "redshift-data:ExecuteStatement"
      ],
      "Effect": "Allow",
      "Resource": [
        "arn:aws:redshift:${Region}:${Account}:cluster:${ClusterIdentifier}"
      ],
      "Sid": "VisualEditor1"
    },
    {
      "Action": [
        "redshift-data:GetStatementResult",
        "redshift-data:CancelStatement",
        "redshift-data:DescribeStatement"
      ],
      "Effect": "Allow",
      "Resource": "*",
      "Sid": "VisualEditor2"
    }
  ]
}
Note the following:
- Make sure to replace
{Region},{Account}, and{ClusterIdentifier}in the above policy with the exact values for your AWS region, account, and cluster, respectively.- Replace
{DbUser}with the user name used to log in to the database. See Step 2 of Setting user permissions in Redshift for more information.- Replace
{DbName}with the name of the database for which the above user has access.
Set up new IAM role
- Sign in to your AWS Management Console and open the IAM console.
- In the left navigation pane, click Roles followed by Create role.
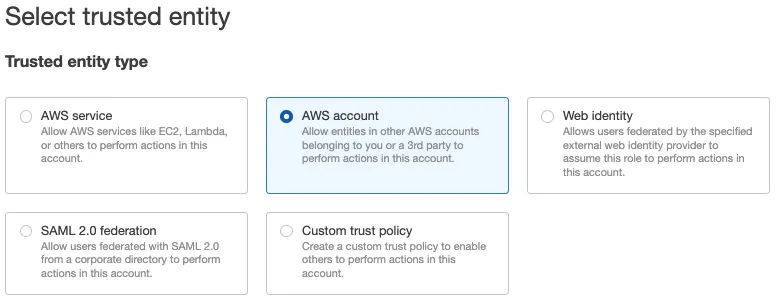
- Under Trusted entity type, select AWS account:
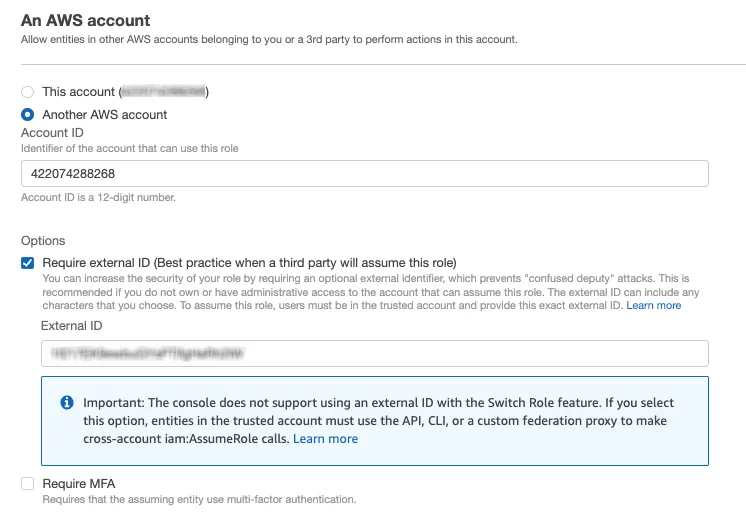
- Select Another AWS account and under Account ID, enter
422074288268, the account ID associated with RudderStack. - Under Options check Require external ID and enter your workspace ID as the External ID.
RudderStack currently does not support MFA setting that restricts the role only to the users who sign in using multi-factor authentication (MFA). Hence, do not check the Require MFA option.
- Review all settings carefully and click Next to proceed.
- In the policy selection screen, add the policy created in the Create policy section.
- Review all settings carefully and click Next to proceed.
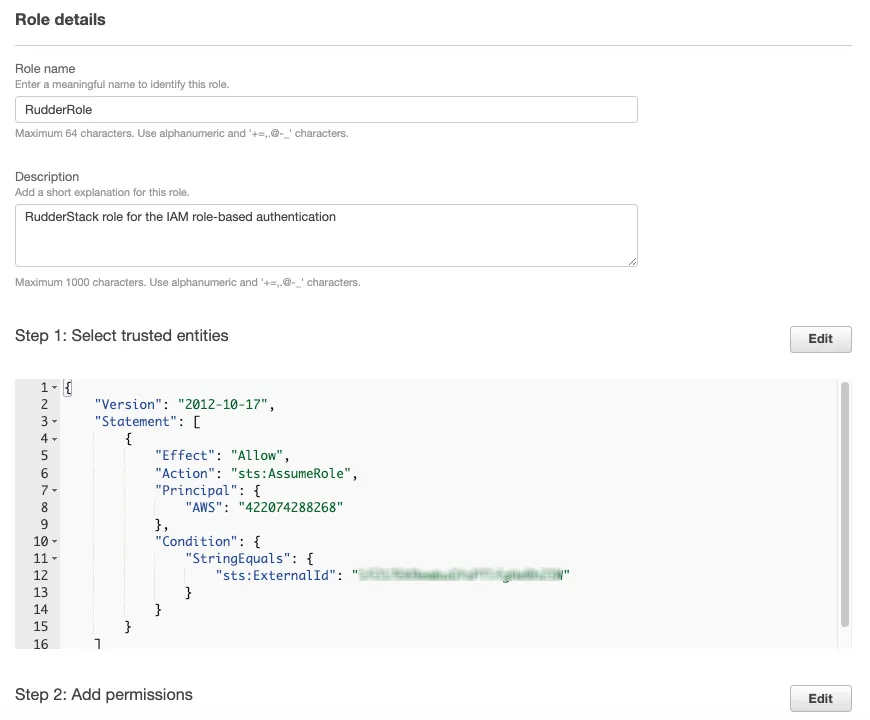
- Enter a unique name for your role. Note that this name cannot be distinguished by case. For example, you cannot create a role named
RUDDERSTACKifrudderstackalready exists.
You cannot edit the name of the role after it has been created.
- Enter the role description.
- To edit the use case or permissions for the role, click the Edit button next to the Step 1: Select trusted entities or Step 2: Add permissions, respectively.
- Optional: You can also add metadata to the role by attaching tags as key-value pairs. For more information, refer to the Tagging IAM resources guide.
- Click Create role to complete the setup.
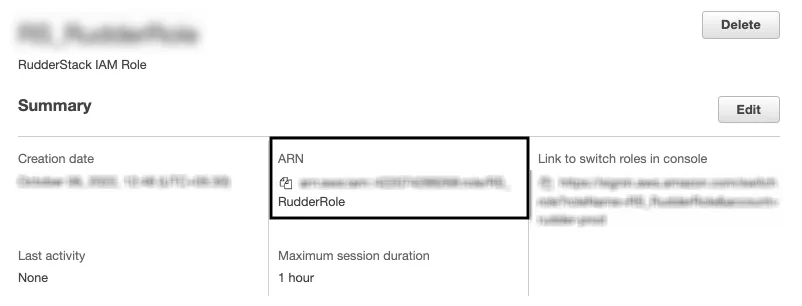
- Finally, note the ARN of this newly created role.
Use IAM role during Redshift setup
You can use the RudderStack IAM role to authenticate to Redshift for the following use cases:
Warehouse destination
- Toggle on the Use IAM for authentication setting.
- Specify the below settings depending on whether the Use Redshift Serverless connection setting is toggled on or off:
- Workgroup name: Enter the Redshift serverless workgroup name.
- Cluster region: Enter your AWS cluster region.
- IAM role ARN for Authentication: Enter the ARN of the RudderStack IAM role configured above.
- Cluster ID: Enter your AWS cluster identifier.
- Cluster region: Enter your AWS cluster region.
- IAM role ARN for Authentication: Enter the ARN of the RudderStack IAM role configured above.
See the Redshift destination setup guide for more details.
Reverse ETL source
- Select IAM as the Authentication Type.
- Enter the ARN of the RudderStack IAM role in the IAM Role ARN setting.
- Specify the below settings:
- Cluster identifier: Enter your AWS cluster ID.
- Cluster region: Enter your AWS cluster region.
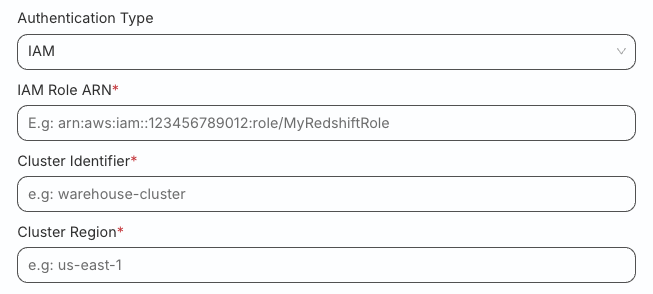
See the Redshift Reverse ETL source setup guide for more details.
