AppsFlyer Destination
15 minute read
AppsFlyer is a mobile attribution and marketing analytics platform. It offers intuitive dashboards, real-time data reports, and a unique deep linking technology to understand your customers better.
Find the open source code for this destination in the GitHub repository.
Connection compatibility
| Destination Information | |||
|---|---|---|---|
| |||


Get started
Once you have confirmed that the source platform supports sending events to AppsFlyer, follow these steps:
- From your RudderStack dashboard, add a source. Then, from the list of destinations, select AppsFlyer.
- Assign a name to the destination and click Continue.
Connection settings
To connect a source other than Android or Apple (iOS, watchOS, iPadOS, tvOS), you need to add a user transformation that adds the OS information required in the events.
See Connect AppsFlyer to non-Android/iOS sources for more information.
| Setting | Description |
|---|---|
| Authorization Type | Select the authorization type from the dropdown:
|
| App ID | Enter your Apple or Android app ID.
|
| Use Rich Event Names | Turn on this setting to include your app’s screen or page name in the screen or page event names. |
| Add properties at root in eventValue | Turn on this setting to include the custom properties at the root level of eventValue field. Otherwise, RudderStack sends them in the properties field inside eventValue.
|
| Sharing Filter | Use this setting to meet any regulatory requirements like GDPR and CCPA, complying with user opt-out mechanisms, and for any other business use-case. By default, the value for this setting is set to all.
|
| Client-side Event Filtering | This setting is applicable only if you are sending events to AppsFlyer in device mode. It lets you specify which events should be blocked or allowed to flow through to AppsFlyer. See the Client-side Event Filtering guide for more information. |
| Status Callback URLs | Specify the callback URLs to be used for user deletion requests. You can provide multiple callback URLs by separating them by a comma. |
| API Token | Enter your AppsFlyer API token. Note: For user deletion, you must specify both Status Callback URLs and API Token. |
| Use device-mode to send events | Turn on this setting to send events from the Android (Kotlin)/iOS (Swift) SDK to Appsflyer in device mode. |
Add device mode integration
Starting from v2.3.0 of AppsFlyer Android (Java) and iOS (Obj-C) device mode integrations, RudderStack supports sending all the custom properties oftrackevents, along with the standard properties.
Once you add AppsFlyer as a destination in the RudderStack dashboard, follow these steps to add it to your project depending on your integration platform:
To add AppsFlyer to your Kotlin project:
- In your module (app-level) Gradle file (usually
<project>/<app-module>/build.gradle.ktsor<project>/<app-module>/build.gradle), add the following dependencies for the RudderStack-AppsFlyer integration:
dependencies {
  // ...

  // Add Rudder Kotlin and AppsFlyer integration SDKs:
  implementation("com.rudderstack.sdk.kotlin:android:<latest-version>")
  implementation("com.rudderstack.integration.kotlin:appsflyer:<latest-version>")

  // AppsFlyer Android SDK
  implementation ("com.appsflyer:af-android-sdk:<latest_version>")
  implementation ("com.android.installreferrer:installreferrer:<latest_version>")
}- Initialize the AppsFlyer SDK in your
Applicationclass before initializing the RudderStack SDK as shown below. Then, add the AppsFlyer integration:
import com.appsflyer.AppsFlyerLib
import com.appsflyer.AFLogger
import com.rudderstack.sdk.kotlin.android.Analytics
import com.rudderstack.sdk.kotlin.android.Configuration
import com.rudderstack.integration.kotlin.appsflyer.AppsFlyerIntegration

class MyApplication : Application() {

    lateinit var analytics: Analytics

    override fun onCreate() {
        super.onCreate()

        // Initialize AppsFlyer SDK
        AppsFlyerLib.getInstance().init("<DEV_KEY>", null, this)
        AppsFlyerLib.getInstance().setLogLevel(AFLogger.LogLevel.DEBUG)
        AppsFlyerLib.getInstance().start(this)

        // Initialize RudderStack SDK
        analytics = Analytics(
            configuration = Configuration(
                writeKey = "<WRITE_KEY>",
                application = this,
                dataPlaneUrl = "<DATA_PLANE_URL>",
            )
        )

        // Add AppsFlyer integration
        analytics.add(AppsFlyerIntegration())
    }
}Follow these steps to add AppsFlyer to your Swift project using Swift Package Manager:
- In Xcode, select File > Add Package Dependencies….
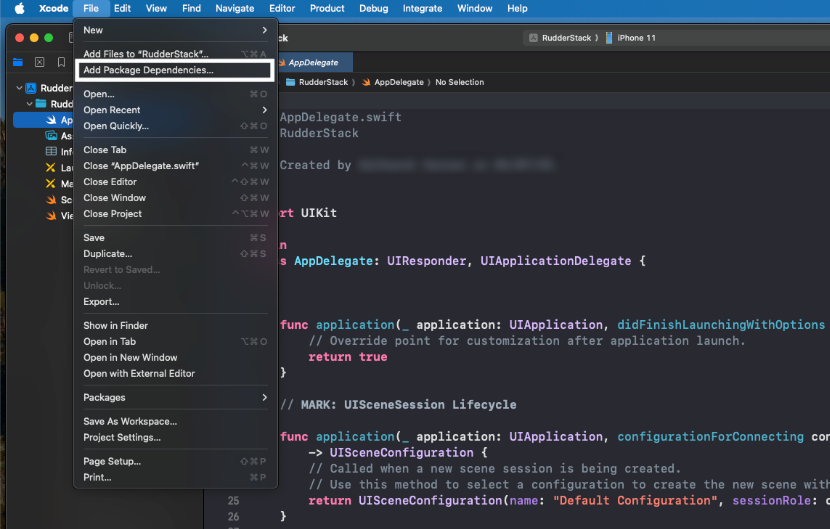
- Enter the below package repository URL in the search bar:
https://github.com/rudderlabs/integration-swift-appsflyer/- Select the latest version and the target to which you want to add the package.
- Click Add Package.
Alternatively, you can add the dependency to your Package.swift file, as shown:
dependencies: [
    .package(url: "<https://github.com/rudderlabs/integration-swift-appsflyer.git>", from: "<latest_integration_version>")
]
Initialize the AppsFlyer SDK
- Import the AppsFlyer SDK:
import AppsFlyerLib- Initialize the AppsFlyer SDK:
AppsFlyerLib.shared().appsFlyerDevKey = "<YOUR_APPSFLYER_DEV_KEY>"
AppsFlyerLib.shared().appleAppID = "<YOUR_APPLE_APP_ID>"
AppsFlyerLib.shared().isDebug = true
AppsFlyerLib.shared().start()
Usage
- Import the SDK and integration:
import RudderStackAnalytics
import RudderIntegrationAppsflyer- Add
AppsFlyerIntegrationto youranalyticsinstance:
// Initialize RudderStack Analytics
let analytics = Analytics(
    configuration: Configuration(
        writeKey: "<WRITE_KEY>",
        dataPlaneUrl: "<DATA_PLANE_URL>"
    )
)

// Add AppsFlyer Integration
analytics.add(plugin: AppsFlyerIntegration())
To add AppsFlyer to your React Native project:
- Add the RudderStack-AppsFlyer module to your app using the following command:
npm install @rudderstack/rudder-integration-appsflyer-react-nativeOR
yarn add @rudderstack/rudder-integration-appsflyer-react-nativeFor AppsFlyer React Native device mode version less than 1.1.0
- Import the module and add it to your SDK initialization code:
import rudderClient from "@rudderstack/rudder-sdk-react-native"
import appsflyer from "@rudderstack/rudder-integration-appsflyer-react-native"
const config = {
  dataPlaneUrl: DATA_PLANE_URL,
  trackAppLifecycleEvents: true,
  withFactories: [appsflyer],
}
rudderClient.setup(WRITE_KEY, config)
For AppsFlyer React Native device mode version 1.1.0 and above
- Initialize the AppsFlyer SDK:
import rudderClient from "@rudderstack/rudder-sdk-react-native";
import appsflyer from '@rudderstack/rudder-integration-appsflyer-react-native';
import {
    setOptions
} from '@rudderstack/rudder-integration-appsflyer-react-native';

// Set options for initializing the appsflyer sdk
setOptions({
    // dev key from the appsflyer dashboard
    "devKey": "<dev_key>",
    // whether we want to run the appsflyer SDK in the debug mode
    "isDebug": true,
})

// Configuration object to be passed while initializing the React Native SDK
const config = {
    dataPlaneUrl: DATA_PLANE_URL,
    // Passing appsflyer factory here, since we want to run appsflyer as a device mode destination.
    withFactories: [appsflyer]
};

// Initialize the React Native SDK
await rudderClient.setup( WRITE_KEY , config);
To add AppsFlyer to your Cordova project:
- Navigate to the root folder of your application and run the following command:
cordova plugin add rudder-integration-appsflyer-cordova- Add the platforms that you want to target for your app:
cordova platform add ios
cordova platform add android- Run the following command to build the project for all platforms:
cordova build- Add the following code in the
onDeviceReady()function of your home page to initialize the SDK:
RudderClient.initialize(WRITE_KEY , {
  dataPlaneUrl: DATA_PLANE_URL,
  factories: [RudderAppsflyerFactory]
})
Make sure to use theawaitkeyword with theinitializecall.
To add AppsFlyer to your Flutter project:
- Open
pubspec.yamland addrudder_integration_appsflyer_flutterunder thedependenciessection:
dependencies:
rudder_integration_appsflyer_flutter: ^1.1.0- Navigate to your application’s root folder and install all the required dependencies:
flutter pub get- Import the module installed above and add it to your SDK initialization code:
import 'package:rudder_sdk_flutter/RudderController.dart';
import 'package:rudder_sdk_flutter_platform_interface/platform.dart';
import 'package:rudder_integration_appsflyer_flutter/rudder_integration_appsflyer_flutter.dart';

RudderConfigBuilder builder = RudderConfigBuilder();
builder.withDataPlaneUrl(DATA_PLANE_URL);
builder.withFactory(RudderIntegrationAppsflyerFlutter());
final RudderController rudderClient = RudderController.instance;
rudderClient.initialize(WRITE_KEY,
config: builder.build(), options: null);- Add the following dependency to the
android/app/build.gradlefile of your app:
dependencies {
  implementation 'com.appsflyer:af-android-sdk:6.+'
}- Initialize the AppsFlyer Android SDK by overriding the
onCreatemethod inMainActivity.javafile (located in your app’sandroid/app/src/main/java/com/your_org/your_app_name/folder). This ensures that AppsFlyer’s Android SDK is initialized beforehand and is available for the Rudderstack Flutter SDK.
import com.appsflyer.AppsFlyerLib;
import com.appsflyer.AFLogger;

@Override
protected void onCreate(@Nullable Bundle savedInstanceState) {
  super.onCreate(savedInstanceState);
  AppsFlyerLib.getInstance().init("AF_DEV_KEY", null, this);
  AppsFlyerLib.getInstance().setLogLevel(AFLogger.LogLevel.DEBUG);
  AppsFlyerLib.getInstance().start(this);
}- Initialize the AppsFlyer iOS SDK by adding the following code at the top of the
didFinishLaunchingWithOptionsmethod in theAppDelegate.swiftfile (located in your app’sios/Runner/folder):
import AppsFlyerLib

AppsFlyerLib.shared().appsFlyerDevKey = "AF_DEV_KEY"
AppsFlyerLib.shared().appleAppID = "APPLE_APP_ID"
AppsFlyerLib.shared().isDebug = true
AppsFlyerLib.shared().start()
To add AppsFlyer to your Android project:
- Add the
mavenCentral()repository:
repositories {
    mavenCentral()
}- Add the following lines to your
app/build.gradlefile underdependencies:
implementation 'com.rudderstack.android.sdk:core:1.+'
implementation 'com.rudderstack.android.integration:appsflyer:1.+'

implementation 'com.appsflyer:af-android-sdk:6.+'
implementation 'com.android.installreferrer:installreferrer:2.+'- Starting from AppsFlyer Android device mode version
2.0.0and above, the RudderStack SDK does not automatically initialize the AppsFlyer SDK. Initialize the AppsFlyer SDK as shown:
import com.appsflyer.AppsFlyerLib;
import com.appsflyer.AFLogger;

AppsFlyerLib.getInstance().init(DEV_KEY, null, this);
AppsFlyerLib.getInstance().setLogLevel(AFLogger.LogLevel.DEBUG);
AppsFlyerLib.getInstance().start(this);- Change the SDK initialization in your
Applicationclass:
// initialize Rudder SDK
val rudderClient: RudderClient =
    RudderClient.getInstance(
        this,
        WRITE_KEY,
        RudderConfig.Builder()
            .withDataPlaneUrl(DATA_PLANE_URL)
            .withFactory(AppsFlyerIntegrationFactory.FACTORY)
            .build()
    )
To add AppsFlyer to your iOS project:
- Add the following line to your CocoaPods
Podfile:
pod 'Rudder-Appsflyer'- After adding the dependency, you need to register
RudderAppsflyerFactorywith yourRudderClientinitialization as afactoryofRudderConfig. To do so, import theRudderAppsflyerFactory.hfile in yourAppDelegate.mfile:
#import "RudderAppsflyerFactory.h"- Starting from AppsFlyer iOS device mode version
2.0.0and above, the RudderStack SDK does not automatically initialize the AppsFlyer SDK. You need to initialize the AppsFlyer SDK as shown:
#import <AppsFlyerLib/AppsFlyerLib.h>

[[AppsFlyerLib shared] setAppsFlyerDevKey:<devkey>];
[[AppsFlyerLib shared] setAppleAppID:<appleappid>];
[AppsFlyerLib shared].isDebug = YES;
[[AppsFlyerLib shared] start];- Change the iOS (Obj-C) SDK initialization to the following:
RSConfigBuilder *builder = [[RSConfigBuilder alloc] init];
[builder withDataPlaneUrl:DATA_PLANE_URL];
[builder withTrackLifecycleEvens:YES];
[builder withRecordScreenViews:YES];
[builder withFactory:[RudderAppsflyerFactory instance]];
[builder withLoglevel:RSLogLevelDebug];
[RSClient getInstance:WRITE_KEY config:[builder build]];
This device mode integration is supported for AppsFlyer v6.5.4 and above.
Follow these steps to add AppsFlyer to your iOS project:
- Install
RudderAppsFlyer(available through CocoaPods) by adding the following line to yourPodfile:
pod 'RudderAppsFlyer', '~> 1.0.0'Run the
pod installcommand.Import the SDK depending on your preferred platform:
import RudderAppsFlyer@import RudderAppsFlyer;- Add the imports to your
AppDelegatefile under thedidFinishLaunchingWithOptionsmethod.
let config: RSConfig = RSConfig(writeKey: WRITE_KEY)
            .dataPlaneURL(DATA_PLANE_URL)

RSClient.sharedInstance().configure(with: config)
client?.addDestination(RudderAppsFlyerDestination())RSConfig *config = [[RSConfig alloc] initWithWriteKey:WRITE_KEY];
[config dataPlaneURL:DATA_PLANE_URL];
[[RSClient sharedInstance] configureWith:config];
[[RSClient sharedInstance] addDestination:[[RudderAppsFlyerDestination alloc] init]];Connect AppsFlyer to non-Android/iOS sources
AppsFlyer supports all RudderStack sources in addition to Android and iOS. However, you need to add a transformation that adds the operating system information to the event payload.
- Add a transformation as shown below:
export function transformEvent(event, metadata) {
  event.context.os = {
    name: "android",
    version: "8.1.0"
  };
  return event;
}- Save the transformation and connect it to your AppsFlyer destination in the RudderStack dashboard.
Send events in cloud mode
To send events to AppsFlyer in cloud mode, you first need to obtain the AppsFlyer ID.
Get AppsFlyer ID
The AppsFlyer ID is generated by the Appsflyer SDK integrated with your app.
- If the AppsFlyer SDK is directly loaded on your app, see this AppsFlyer documentation to obtain the AppsFlyer ID.
- If your AppsFlyer SDK is loaded through RudderStack (device mode integration), then you can obtain the AppsFlyer ID by including the code snippet in your app, depending on your platform of integration:
import com.appsflyer.AppsFlyerLib

val appsFlyerId = AppsFlyerLib.getInstance().getAppsFlyerUID(context)import AppsFlyerLib
let appsFlyerId = AppsFlyerLib.shared().getAppsFlyerUID()import { getAppsFlyerId } from "@rudderstack/rudder-integration-appsflyer-react-native"
const appsFlyerId = await getAppsFlyerId();#import <appsflyerlib>
NSString *appsflyerId = [AppsFlyerLib shared].getAppsFlyerUID;import com.appsflyer.AppsFlyerLib;
String appsFlyerId = AppsFlyerLib.getInstance().getAppsFlyerUID(this);Send events to AppsFlyer
Once you obtain the AppsFlyer ID, you can send events to AppsFlyer in cloud mode by including the externalId key in your events. The format of externalId is shown below:
"externalId": [
  {
    "id": "<APPSFLYER_ID>",
    "type": "appsflyerExternalId"
  }
]
The following table lists the fields you can include in externalId:
| Field | Description |
|---|---|
id | Your AppsFlyer ID. |
type | The type of externalId. You must always set to appsflyerExternalId. |
The following sections explain how to send events to AppsFlyer in cloud mode via the mobile (Android and iOS) and JavaScript SDKs.
1. via mobile SDKs
For the new mobile SDKs (Android (Kotlin) and iOS (Swift)), you need to pass the
externalIdfield with each event, as RudderStack does not persist this value.For the legacy mobile SDKs (Android (Java) and iOS (Obj-C)), you need to pass the
externalIdkey just once within thecontextobject of youridentifyevent — RudderStack will persist this value and automatically pass it to all subsequent events.- Note: This value is cleared only once you call the
resetAPI.
- Note: This value is cleared only once you call the
2. via JavaScript SDK
You must attach theexternalIdkey containing the AppsFlyer ID to every single RudderStack event you send. This is not optional — all events require this field for correct AppsFlyer integration.
To send events containing the AppsFlyer ID via JavaScript SDK, you need to attach the externalId key to each event, as shown:
rudderanalytics.track("Product Purchased", {

    revenue: 49.99,
    currency: "USD",
    product_id: "SKU123",
    product_name: "Premium Subscription",
    quantity: 1
}, {
    externalId: [{
        id: "<APPSFLYER_ID>",
        type: "appsflyerExternalId"
    }]
});
Identify
The identify call sets userId through the setCustomerUserId method of AppsFlyerLib.
RudderStack supports theidentifycalls only in the device mode.
RudderStack sets email from the event traits to AppsFlyer using the native SDK’s setUserEmails method:
[[RSClient sharedInstance] identify:@"developer_user_id"
      traits:@{@"email": @"bar@foo.com"}];
Delete user
You can delete a user in AppsFlyer using the Suppression with Delete regulation of the RudderStack User Suppression API.
While RudderStack forwards the deletion request, it does not guarantee deletion within a 30-day window. You will need to check with AppsFlyer if the request is fulfilled.
To delete a user:
You must configure the Status Callback URLs and API Token settings in the RudderStack dashboard.
You must specify their
userIdin the event. Additionally, you can specify any of the following identifiers:- AppsFlyer ID
- iOS advertising ID/Android advertising ID (depending on your platform)
- Any custom identifier like
email,phone, etc.
A sample regulation request body for deleting a user in AppsFlyer is shown below:
Specify the App ID in your connection settings.
{
  "regulationType": "suppress_with_delete",
  "destinationIds": [
    "2FIKkByqn37FhzczP23eZmURciA"
  ],
  "users": [{
    "userId": "1hKOmRA4GRlm",
    "phone": "+1-202-555-0146",
    "email": "alex@example.com",
    "appsflyerId": "asdhw126"
  }]
}
Specify the App ID in your connection settings.
{
  "regulationType": "suppress_with_delete",
  "destinationIds": [
    "2FIKkByqn37FhzczP23eZmURciA"
  ],
  "users": [{
    "userId": "1hKOmRA4GRlm",
    "phone": "+1-202-555-0146",
    "email": "alex@example.com",
    "ios_advertising_id": "asdhw126"
  }]
}
Specify the App ID in your connection settings.
{
  "regulationType": "suppress_with_delete",
  "destinationIds": [
    "2FIKkByqn37FhzczP23eZmURciA"
  ],
  "users": [{
    "userId": "1hKOmRA4GRlm",
    "phone": "+1-202-555-0146",
    "email": "alex@example.com",
    "android_advertising_id": "asdhw126"
  }]
}
Track
This destination does not strictly adhere to the RudderStack Ecommerce Event Spec.
RudderStack’s track call is mapped to the standard AppsFlyer events wherever possible.
The following table lists the event mapping from RudderStack to AppsFlyer:
| RudderStack event | AppsFlyer event |
|---|---|
Products Searched | af_search |
Product Viewed | af_content_view |
Product List Viewed | af_list_view |
Product Added to Wishlist | af_add_to_wishlist |
Product Added | af_add_to_cart |
Checkout Started | af_initiated_checkout |
Order Completed | af_purchase |
Product Removed | remove_from_cart |
first_purchase | first_purchase |
Promotion Viewed | af_ad_view |
Promotion Clicked | af_ad_click |
Payment Info Entered | af_add_payment_info |
Product Shared | af_share |
Cart Shared | af_share |
Product Reviewed | af_rate |
For any event not present in the above table, RudderStack makes the following changes to the event name before sending it to AppsFlyer via the native SDK:
- Converting the entire event name to lower case
- Replacing any space with an underscore
Along with the above event mapping, RudderStack also maps the event properties to the corresponding AppsFlyer event properties, as shown below:
| RudderStack property | AppsFlyer property |
|---|---|
query | af_search_string |
price | af_price |
product_id | af_content_id |
category | af_content_type |
currency | eventCurrency |
products | RudderStack formulates this list as per the List View specification and passes it to the property af_content_list. |
quantity | af_quantity |
order_id | af_receipt_id |
revenue | af_revenue |
A sample track call for an iOS app is shown below:
[[RSClient sharedInstance] track:@"Accepted Terms of Service"
    properties:@{
        @"foo": @"bar",
        @"foo_int": @134
}];
Screen
For all screen calls sent from the SDK, RudderStack calls AppsFlyer’s trackEvent method with screen as the event name. All the event properties are passed to AppsFlyer without any modification.
For the automatically recorded screen calls, RudderStack obtains a Boolean property called automatic.
Advertising ID
RudderStack utilizes the advertising ID for the AppsFlyer destination if it is set as per the following specifications:
For iOS: Advertising ID documentation
For Android: Advertising ID documentation
You can find the advertising ID in your event’s context.device.advertisingId.
ATTrackingManager
If the ATTrackingManager.trackingAuthorizationStatus is passed according to ATTrackingManager authorization consent, RudderStack will utilize it for the AppsFlyer destination.
You can find trackingAuthorizationStatus in your event’s context.device.attTrackingStatus.
Debugging
RudderStack sets the logLevel in AppsFlyer based on the logLevel set for the RudderClient. If it is set to DEBUG or more, RudderStack sets the logLevel to VERBOSE for AppsFlyer.
For anything below that, RudderStack sets the logLevel to NONE for AppsFlyer.
Error messages
This section covers some of the possible error messages you may encounter while using this integration.
Invalid platform / required androidAppId / appleAppId missing
This error occurs when either the OS Name or your respective App ID is not set. You can set the App ID in your connection settings.
The SDK automatically sets the OS Name and it can be found in context.os.name.
Appsflyer ID is not set. Rejecting the event.
This error occurs when the appsflyerExternalId is not set. See the Sending events in the RudderStack cloud mode section for more information on setting the appsflyerExternalId.
FAQ
Where can I find the AppsFlyer dev key?
You can find the AppsFlyer Dev Key by logging into your AppsFlyer account and navigating to the Apps Settings page in your dashboard. For more information, see this AppsFlyer Help Center page.
I get an error saying “Build input file cannot be found” for iOS device mode. What should I do?
The latest AppsFlyer SDK requires XCode 12. Make sure you meet this requirement. You may have to downgrade your AppsFlyer SDK to build with a lower version of XCode.
You can declare the pod version in your Podfile as shown:
pod 'Rudder-Appsflyer',' 1.0.0'How do I get the AppsFlyer ID to send events from my mobile sources in cloud mode?
To send events to AppsFlyer in cloud mode, you first need to obtain the AppsFlyer ID generated by the Appsflyer SDK.
You can get this ID by either directly loading the native AppsFlyer SDK on your app, or loading it in RudderStack (device mode integration).
In case of a device mode integration, include the following code snippet (depending on your platform of integration) in your app to get the AppsFlyer ID:
import com.appsflyer.AppsFlyerLib

val appsFlyerId = AppsFlyerLib.getInstance().getAppsFlyerUID(context)import AppsFlyerLib
let appsFlyerId = AppsFlyerLib.shared().getAppsFlyerUID()import AppsFlyerIntegrationFactory from "@rudderstack/rudder-integration-appsflyer-react-native/src/bridge"
const appsFlyerId = await AppsFlyerIntegrationFactory.getAppsFlyerId()#import <appsflyerlib>
NSString *appsflyerId = [AppsFlyerLib shared].getAppsFlyerUID;import com.appsflyer.AppsFlyerLib;
String appsFlyerId = AppsFlyerLib.getInstance().getAppsFlyerUID(this);Once you obtain the AppsFlyer ID, you can send events in cloud mode by by including the externalId key within your events’ context. For more information, see the Send events in cloud mode section above.
