You are viewing documentation for an older version.

Activation API v1 Beta
9 minute read
This documentation is written for the Activation API v1 and it will be deprecated soon.
RudderStack recommends using the Activation API v2 to sync your Profiles customer 360 data to Redis.
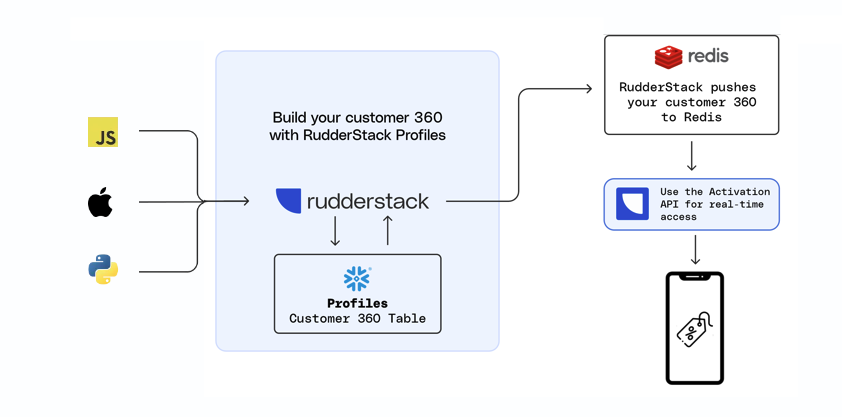
With RudderStack’s Activation API, you can fetch enriched user traits stored in your Redis instance and use them for near real-time personalization for your target audience.
You can sync all your customer 360 data from Profiles project to your Redis store. Then, use the Activation API endpoints to retrieve and use the enriched user data for personalization.
Prerequisites
To use the Activation API:
- You must have a working Redis instance in place to use the Activation API
- You must have at least one successful Profiles run
- Your
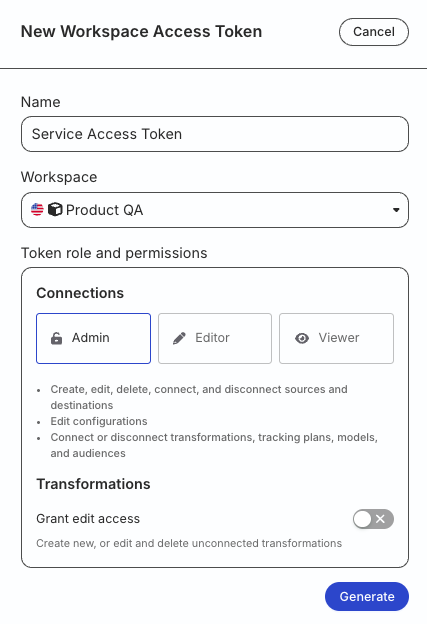
pb_project.yaml>entitiesmust have afeature_viewsproperty - Generate a workspace-level Service Access Token in your RudderStack dashboard with the following permission — this token is required to authenticate and use the API
| Resource | Permissions |
|---|---|
| PII Permission | Destination Data Access for the specific Redis destination |
Token permissions for legacy RBAC system
If you are on the legacy Permissions Management (RBAC) system, your workspace-level Service Access Token should have Admin permissions.
See this documentation for more information on generating the token.
Use Activation API
- Your Profiles project already uses a warehouse connection whose user/role must have the required permissions for a successful Profiles run. Follow the steps below to create the RudderStack state schema (used to store the sync state) and grant that same user/role full privileges on it.
You need privileges sufficient to create a schema in your database (for example, the ACCOUNTADMIN role).
Run the following queries:
CREATE SCHEMA "<YOUR_DATABASE>"."_RUDDERSTACK";
GRANT ALL PRIVILEGES ON SCHEMA "<YOUR_DATABASE>"."_RUDDERSTACK" TO ROLE "<YOUR_PROFILES_ROLE>";
Replace <YOUR_DATABASE> with your Profiles database and <YOUR_PROFILES_ROLE> with the Snowflake role configured for your Profiles warehouse connection.
The_RUDDERSTACKschema is used by RudderStack for storing the state of each data sync. Do not change this name.
Run the following queries:
CREATE SCHEMA "_rudderstack";
GRANT ALL ON SCHEMA "_rudderstack" TO <YOUR_PROFILES_USER>;
GRANT ALL PRIVILEGES ON ALL TABLES IN SCHEMA "_rudderstack" TO <YOUR_PROFILES_USER>;
Replace <YOUR_PROFILES_USER> with the Redshift user configured for your Profiles warehouse connection.
The_rudderstackschema is used by RudderStack for storing the state of each data sync. Do not change this name.
Run the following queries:
CREATE SCHEMA `_rudderstack`;
GRANT ALL PRIVILEGES ON SCHEMA `_rudderstack` TO `<YOUR_PROFILES_USER>`;
Replace <YOUR_PROFILES_USER> with the Databricks user configured for your Profiles warehouse connection.
The_rudderstackschema is used by RudderStack for storing the state of each data sync. Do not change this name.
Use the same service account as your Profiles BigQuery warehouse connection — this account should already have the project and dataset roles described in Grant warehouse permissions.
- Create the RudderStack schema from the BigQuery SQL workspace:
create schema rudderstack_;Therudderstack_schema is used by RudderStack for storing the state of each data sync. Do not change this name.
- Grant full access on that schema to your service account.
GRANT `roles/bigquery.dataOwner`
     ON SCHEMA rudderstack_
     TO "serviceAccount:<SERVICE_ACCOUNT_ID>";
Replace <SERVICE_ACCOUNT_ID> with the service account ID from your Profiles BigQuery warehouse connection (of the format your-service-account@your-project.iam.gserviceaccount.com)
- In your Profiles project settings, scroll down to Activation API and turn on the Enable sync to Redis toggle.

Permissions required to enable sync to Redis
New Access Management system:
- Admins can turn on the Enable sync to Redis toggle by default.
- Members need to have the Profiles Edit permission for the specific Profiles project.
Legacy RBAC system: In the legacy Permissions Management (RBAC) system, only Org Admins can turn on this toggle.
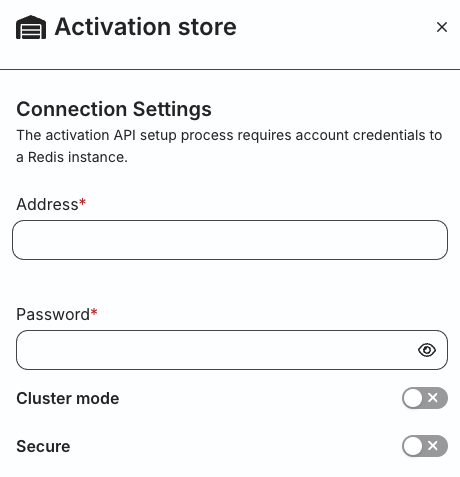
- Enter the account credentials for your Redis instance and click Create. This will also create a Redis destination in your dashboard.
- Note the destination ID from the Settings tab of your Redis destination.
- Use the Activation API endpoint to fetch user profiles from your Redis instance.
Authorization
This API uses Bearer Authentication for authenticating all requests. Set the Service Access Token as the bearer token for authentication.
Base URL
https://profiles.rudderstack.com/v1/The URL ishttps://profiles-eu.rudderstack.com/v2/if you are hosted in the EU region.
Get user profiles
Request body
type and value{
"entity": <entity_type>, // User, project, account, etc.
"destinationId": <redis_destination_id> , // Redis destination ID
"id": {
"type": <id_type>,
"value": <id_value>
}
}Example request
POST /v1/activation HTTP/1.1
Host: profiles.rudderstack.com
Content-Type: application/json
Authorization: Bearer <personal_access_token>
Content-Length: 90

{
 "entity": <entity_type>,
 "destinationId": <redis_destination_id>, // Redis destination ID
 "id": {
   "type": <id_type>,
   "value": <id_value>
 }
}curl --location 'https://profiles.rudderstack.com/v1/activation' \
--header 'Content-Type: application/json' \
--header 'Authorization: Bearer <personal_access_token>' \
--data '{
"entity": <entity_type>,
"destinationId": <redis_destination_id>, // Redis destination ID
"id": {
"type": <id_type>,
"value": <id_value>
}
}'const axios = require('axios');
let data = JSON.stringify({
"destinationId": <redis_destination_id>,
"entity": <entity_type>,
"id": {
"type": <id_type>,
"value": <id_value>
}
});
let config = {
method: 'post',
maxBodyLength: Infinity,
url: 'https://profiles.rudderstack.com/v1/activation',
headers: {
'Content-Type': 'application/json',
'authorization': 'Bearer <personal_access_token>'
},
data: data
};
axios.request(config)
.then((response) => {
console.log(JSON.stringify(response.data));
})
.catch((error) => {
console.log(error);
});Responses
- If the Service Access Token is absent or trying to access a destination to which it does not have access:
statusCode: 401
Response: {
  "error": "Unauthorized request. Please check your access token"
}- If the destination is not Redis or the destination ID is absent/blank:
statusCode: 404
Response: {
  "error": "Invalid Destination. Please verify you are passing the right destination ID"
}- If ID is present:
statusCode: 200
Response:
{
  "entity": <entity_type>,
  "id": {
    "type": <id_type>,
    "value": <id_value>
  },
  "data": {
    <traits_from_Redis>
  }
}- If ID is not present in Redis:
statusCode: 200
Response:
{
  "entity": <entity_type>,
  "id": {
    "type": <id_type>,
    "value": <id_value>
  },
  "data": {}
}
Delete user profiles
Request body
type and valueExample request
DELETE /v1/activation HTTP/1.1
Host: profiles.rudderstack.com
Content-Type: application/json
Authorization: Bearer <personal_access_token>
Content-Length: 90

{
 "entity": <entity_type>,
 "destinationId": <redis_destination_id>, // Redis destination ID
 "id": {
   "type": <id_type>,
   "value": <id_value>
 }
}curl --location --request DELETE 'https://profiles.rudderstack.com/v1/activation' \
--header 'Content-Type: application/json' \
--header 'Authorization: Bearer <personal_access_token>' \
--data '{
"entity": <entity_type>,
"destinationId": <redis_destination_id>, // Redis destination ID
"id": {
"type": <id_type>,
"value": <id_value>
}
}'const axios = require('axios');
let data = JSON.stringify({
"destinationId": <redis_destination_id>,
"entity": <entity_type>,
"id": {
"type": <id_type>,
"value": <id_value>
}
});
let config = {
method: 'delete',
maxBodyLength: Infinity,
url: 'https://profiles.rudderstack.com/v1/activation',
headers: {
'Content-Type': 'application/json',
'authorization': 'Bearer <personal_access_token>'
},
data: data
};
axios.request(config)
.then((response) => {
console.log(JSON.stringify(response.data));
})
.catch((error) => {
console.log(error);
});Responses
- Successful response
statusCode: 200
Response: {
  "deletedKeys": 20,
  "actualKeys": 30
}- Bad request
statusCode: 400
Response: {
  "message": "id should have at least one item"
}- Not found
statusCode: 404
Response: {
  "message": "None of the provided userIds were found"
}- Unhandled exceptions
statusCode: 500
Response: {
  "message": "Internal server error"
}
Use case
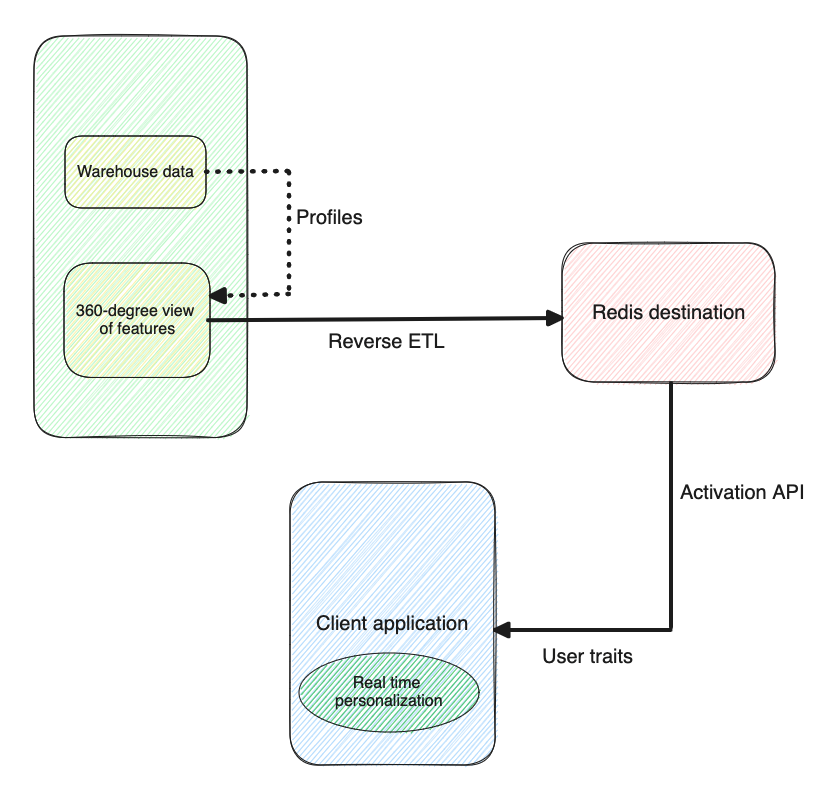
You can use the Activation API for real-time personalization. Once you fetch the user traits from your Redis instance via the API, you can pull them into your client application to alter the application behavior in real-time based on user interactions.
You can respond immediately with triggered, user-focused messaging based on actions like page views or app clicks and provide a better customer experience.
Redis configuration
You must have a working Redis instance in place before setting up the connection.
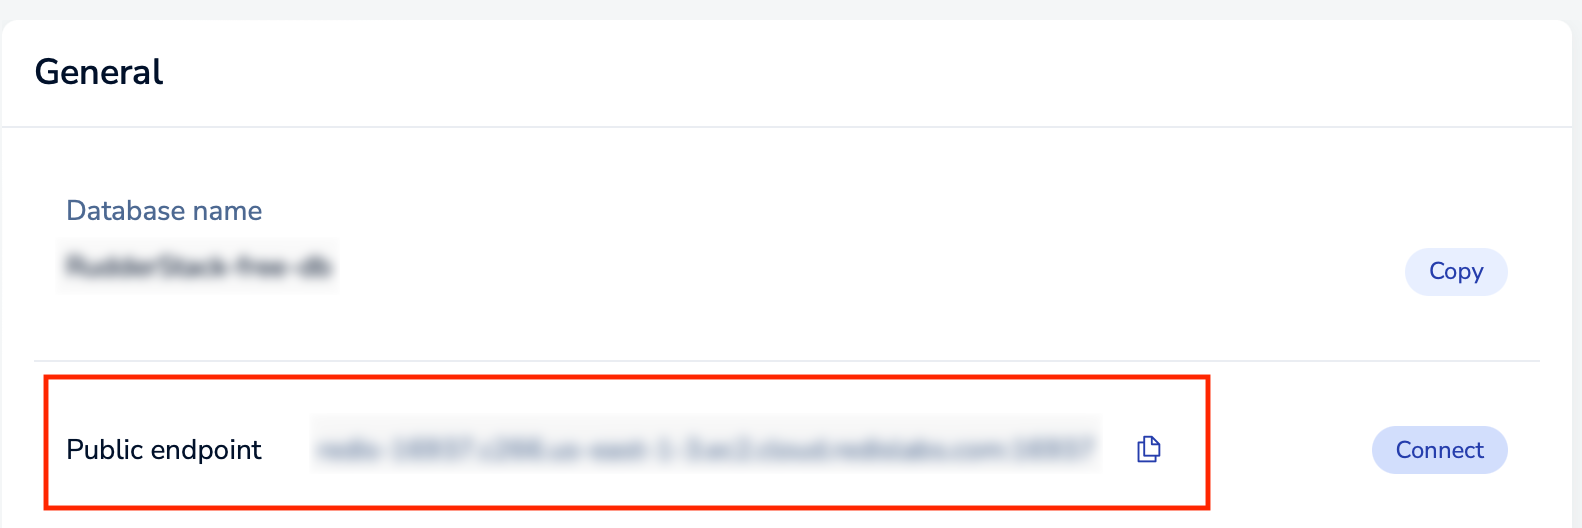
- Address: Enter the public endpoint of your Redis database. If you are using Redis Cloud, you can find this endpoint by going to your Redis database and navigating to Configuration tab > General.
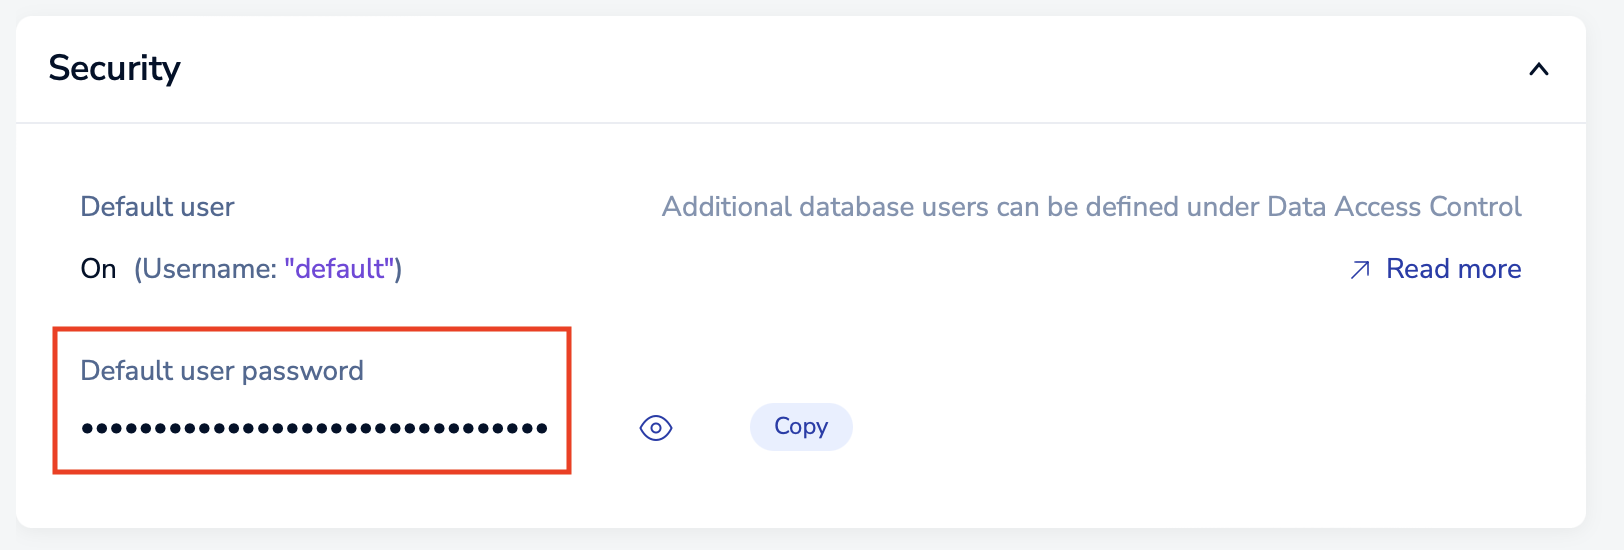
- Password: Enter the database password. You can find it in the Security section of the Configuration tab:
- Cluster Mode: Turn on this setting if you’re connecting to a Redis cluster.
- Secure: Enable this setting to secure the TLS communication between RudderStack Redis client and your Redis server.
Data mapping
RudderStack creates multiple Reverse ETL sources automatically based on your Profiles project. You will see separate sources connected to the same Redis destination.
The following pb_project.yaml snippet shows the sources to be created:
entities:
  - name: user
    id_types:
      - main_id
      - user_id
      - email
      - salesforce_id
    feature_views:
      using_ids:
        - id: email
          name: features_by_email # Optional. Takes default view name, if not specified.
        - id: salesforce_id
          name: salesforce_id_stitched_features
FAQ
How do I generate a workspace-level Service Access Token to use the Activation API?
Follow these steps to generate a workspace-level Service Access Token to use the Activation API:
Workspace-level Service Access Tokens are linked to a specific workspace — their usage is restricted to workspace-level resources (sources, destinations, transformations, etc.) and APIs.
- Log in to your RudderStack dashboard.
- Go to Settings > Access Management > Service Access Tokens.
- Click the Workspace tab.
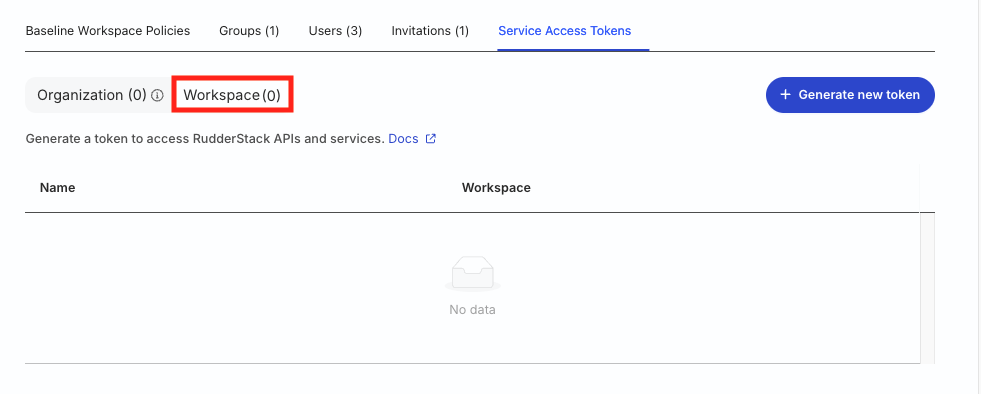
- Click Generate new token.
- Enter the name of the SAT.
- Choose the relevant workspace (applicable for a multi-workspace organization) where the token will be applicable. Then, click Next.

- Under Workspace SAT access policy, configure the access policy for the token with the following permission:
| Resource | Permissions |
|---|---|
| PII Permission | Destination Data Access for the specific Redis destination |
Important: Once generated, you cannot edit the access policy of the workspace-level Service Access Token.
- Click Generate to generate the token.
- Note the token and use it to authenticate the Activation API.
Secure the token value — you will not be able to see it again once you click Close.

Why am I getting an error trying to enable API in my instance for a custom project hosted on GitHub?
For GitHub projects, you need to explicitly add the IDs of the custom project that need to be served.
In your pb_project.yaml file, you can specify them as shown:
entities:
  - name: user
    id_types:
      - main_id
      - user_id
      - email
      - salesforce_id
    feature_views:
      name: user_feature_view
      using_ids:
        - id: email
          name: features_by_email
        - id: salesforce_id
          name: salesforce_id_stitched_features
Does RudderStack perform a full sync if I add a new feature to my project?
Yes, RudderStack updates the mappings and automatically sends all columns from the customer 360 view by triggering a full sync.
Suppose I’m running a full sync and the Profiles job is running in parallel and finishes eventually. What happens to the scheduled sync? Does it get queued?
RudderStack first creates a temporary snapshot copy of any sync when it starts. So its syncing the created copy. Even if a Profiles job is running in parallel, the sync - if started - is not impacted by it.
