You are viewing documentation for an older version.

Create New Profiles Project
15 minute read
This guide covers the detailed steps on creating a Profiles project from scratch. It also details how to:
- Build a virtual Python environment.
- Grant the necessary warehouse permissions for the project.
- Establish the warehouse connection.
- Generate the resulting project template.
Video walkthrough
Install Profiles
Install the Profiles Builder (PB) tool:
pip3 install profiles-rudderstackIf you have already installed PB, you can update its version:
pip3 install profiles-rudderstack -UValidate Profile Builder’s version after installing:
pb version- RudderStack recommends using a Python virtual environment to maintain an isolated and clean environment.
- If you are an existing user, migrate your project to the new schema.
- See the Profiles setup and installation FAQ for troubleshooting any issues.
Create virtual environment
Follow these steps to create a Python virtual environment:
- Install a python environment tool, for example,
pyenv.
brew update
brew install openssl readline sqlite3 xz zlib
brew install pyenv- Verify the installation.
pyenv version- Install a compatible Python version.
pyenv install 3.11.0- Create a virtual environment with that Python version.
pyenv virtualenv 3.11.0 <env name>- Navigate to your Profiles project locally and activate
pyenv.
pyenv activate <env_name>- Download the Profiles
mlcorelib.
pip install profiles-mlcorelib==0.4.2- Download the Profiles
pycorelib.
pip install profiles-pycorelib- Update Profiles to the latest version.
pip3 install profiles-rudderstack -U- Migrate the Profiles configuration schema version to latest.
pb migrate auto --inplaceGrant warehouse permissions
RudderStack supports Snowflake, Redshift, Databricks, and BigQuery for creating your Profiles project.
RudderStack requires specific warehouse permissions to read data from the schema having source tables (for example, tracks and identifies tables generated via Event Stream sources), and write data in a new schema created for Profiles.
RudderStack recommends keeping separate schemas for projects running via CLI and web. This way, the projects run from the CLI will never risk overwriting your production data.
Snowflake
Snowflake uses a combination of DAC and RBAC models for access control. However, RudderStack chooses an RBAC-based access control mechanism as multiple users can launch the Profile Builder CLI.
Also, it is not ideal to tie the result of an individual user run with
that user. Therefore, it is recommended to create a generic role (for example, PROFILES_ROLE) with the following privileges:
- Read access to all the inputs to the model (can be shared in case of multiple schemas/tables).
- Write access to the schemas and common tables as the PB project creates material (output) tables.
To access any material created from the project run, the above role (PROFILES_ROLE in this case) must also have read access to all of those schemas.
The following sample commands grant the required privileges to the role (PROFILES_ROLE) in a Snowflake warehouse:
-- Create role
CREATE ROLE PROFILES_ROLE;
SHOW ROLES; -- To validate-- Create user
CREATE USER PROFILES_TEST_USER PASSWORD='<strong_password>' DEFAULT_ROLE='PROFILES_ROLE';
SHOW USERS; -- To validate-- Grant role to user and database
GRANT ROLE PROFILES_ROLE TO USER PROFILES_TEST_USER;
GRANT USAGE ON DATABASE YOUR_RUDDERSTACK_DB TO ROLE PROFILES_ROLE;-- Create separate schema for Profiles and grant privileges to role
CREATE SCHEMA YOUR_RUDDERSTACK_DB.RS_PROFILES;
GRANT ALL PRIVILEGES ON SCHEMA YOUR_RUDDERSTACK_DB.RS_PROFILES TO ROLE PROFILES_ROLE;
GRANT USAGE ON WAREHOUSE RUDDER_WAREHOUSE TO ROLE PROFILES_ROLE;
GRANT USAGE ON SCHEMA YOUR_RUDDERSTACK_DB.EVENTSSCHEMA TO ROLE PROFILES_ROLE;For accessing input sources, you can individually grant select on tables/views, or give blanket grant to all in a schema.
-- Assuming we want read access to tables/views in schema EVENTSSCHEMA
GRANT SELECT ON ALL TABLES IN SCHEMA YOUR_RUDDERSTACK_DB.RS_PROFILES TO PROFILES_ROLE;
GRANT SELECT ON FUTURE TABLES IN SCHEMA YOUR_RUDDERSTACK_DB.RS_PROFILES TO PROFILES_ROLE;
GRANT SELECT ON ALL VIEWS IN SCHEMA YOUR_RUDDERSTACK_DB.RS_PROFILES TO PROFILES_ROLE;
GRANT SELECT ON FUTURE VIEWS IN SCHEMA YOUR_RUDDERSTACK_DB.RS_PROFILES TO PROFILES_ROLE;-- Assuming we want read access to tracks and identifies tables in schema EVENTSSCHEMA
GRANT SELECT ON TABLE YOUR_RUDDERSTACK_DB.RS_PROFILES.TRACKS TO PROFILES_ROLE;
GRANT SELECT ON TABLE YOUR_RUDDERSTACK_DB.RS_PROFILES.IDENTIFIES TO PROFILES_ROLE;Redshift
Suppose the inputs/edge sources are in a single schema website_eventstream and the name of the newly created Profiles user is rudderstack_admin. In this case, the requirements are as follows:
- A separate schema
rs_profiles(to store all the common and output tables). - The
rudderstack_adminuser should have all the privileges on the above schema and the associated tables. - The
rudderstack_adminuser should haveUSAGEprivilege on schemas that have the edge sources and input tables (website_eventstream) and read (SELECT) privileges on specific tables as well. This privilege can extend to the migration schema and other schemas from where data from warehouses comes in. - The
rudderstack_adminuser should have privileges to useplpythonuto create some UDFs.
The sample commands are as follows:
CREATE USER rudderstack_admin WITH PASSWORD '<strong_unique_password>';
CREATE SCHEMA rs_profiles;
GRANT ALL ON SCHEMA "rs_profiles" TO rudderstack_admin;
GRANT ALL PRIVILEGES ON ALL TABLES IN SCHEMA "rs_profiles" TO rudderstack_admin;
GRANT USAGE ON SCHEMA "website_eventstream" TO rudderstack_admin;
GRANT USAGE ON LANGUAGE plpythonu TO rudderstack_admin;GRANT SELECT ON ALL TABLES IN SCHEMA "website_eventstream" TO rudderstack_admin;To give access to only specific input tables/views referred in your Profiles project, use the below command:
GRANT SELECT ON TABLE "<YOUR_SCHEMA>"."<YOUR_TABLE>" TO rudderstack_admin;Supported inputs
RudderStack supports the following input types for Redshift warehouse/serverless:
- Redshift cluster with DC2 type nodes with following types as inputs:
- Redshift internal tables
- External schema and tables only for inputs (not supported as output)
- CSV files stored on S3 as inputs
- Redshift cluster with RA3 type nodes with following types as inputs:
- Redshift internal tables
- External schema and tables only for inputs (not supported as output)
- CSV files stored on S3 as inputs
- Cross DB input tables
- Redshift serverless with following types as inputs:
- Redshift internal tables
- External schema and tables (not supported as output)
- CSV files stored on S3 as inputs
- Cross DB input tables RudderStack also supports various authentication mechanisms to authenticate the user running the Profiles project. Refer Redshift warehouse connection for more information.
Databricks
- Open the Databricks UI.
- Create a new user.
- Reuse an existing catalog or create a new one by clicking Create Catalog.
- Grant
USE SCHEMAprivilege on the catalog. - Create a separate schema to write objects created by RudderStack Profiles.
- Grant all privileges on this schema.
- Grant privileges to access relevant schemas for the input tables. For example, if an input schema is in a schema named
website_eventstream, then you can run the following commands to assign a blanket grant to all schemas or only specific tables/views referred in your Profiles project:
CREATE USER rudderstack_admin WITH PASSWORD <strong_unique_password>;
GRANT USE SCHEMA ON CATALOG <catalog name> TO rudderstack_admin;
CREATE SCHEMA RS_PROFILES;
GRANT ALL PRIVILEGES ON SCHEMA RS_PROFILES TO rudderstack_admin;
GRANT SELECT ON SCHEMA website_eventstream TO rudderstack_admin;GRANT SELECT ON ALL TABLES IN SCHEMA "website_eventstream" TO rudderstack_admin;To give access to only specific input tables/views referred in your Profiles project, use the below command:
GRANT SELECT ON TABLE public.input_table TO rudderstack_admin; BigQuery
For BigQuery, RudderStack recommends you to use a view instead of table for streaming datasets.
You must first assign the BigQuery Job User role to your service account. Follow these steps:
- Open the BigQuery UI (Google Cloud Console).
- Select IAM & Admin > IAM from the left sidebar.
- Click GRANT ACCESS to grant permissions to your service account.
- Enter your service account email in the New principals field.
- In the Assign roles section, select
BigQuery Job Userrole from the role list. - Click Save.
Alternatively, you can add the following IAM Policy Binding:
{
  "bindings": [
    {
      "role": "roles/bigquery.jobUser",
      "members": [
        "serviceAccount:your-service-account@your-project.iam.gserviceaccount.com"
      ]
    }
  ]
}
Then, assign the dataset or project level roles to your service account:
- Open the BigQuery UI (Google Cloud Console).
- Select BigQuery from the sidebar.
- Select the dataset from your schema to which you want to grant access.
- In the Dataset info window, click SHARING > Permissions.
- Click Add Principal.
- Enter the service account email in the New principals field.
- In the Assign roles section, select the following roles from the role list:
- BigQuery Data Viewer: Allows read access to the dataset.
- BigQuery Data Editor: Allows read and write access to the dataset.
Alternatively, you can add the following IAM Policy Binding:
{
  "bindings": [
    {
      "role": "roles/bigquery.dataViewer",
      "members": [
        "serviceAccount:your-service-account@your-project.iam.gserviceaccount.com"
      ],
      "condition": {
        "title": "Access to dataset1",
        "description": "Allow data viewing access to dataset1",
        "expression": "resource.name.startsWith('projects/your-project-id/datasets/dataset1')"
      }
    },
    {
      "role": "roles/bigquery.dataEditor",
      "members": [
        "serviceAccount:your-service-account@your-project.iam.gserviceaccount.com"
      ],
      "condition": {
        "title": "Access to dataset2",
        "description": "Allow data editing access to dataset2",
        "expression": "resource.name.startsWith('projects/your-project-id/datasets/dataset2')"
      }
    }
  ]
}
If you have input relations in many datasets from a single project, you can assign the required privileges for the complete Google Cloud project. This allows your service account to access the relation from all the datasets of the project.
- Open the BigQuery UI (Google Cloud Console).
- Select IAM & Admin > IAM from the left sidebar.
- Click GRANT ACCESS to grant permissions to your service account.
- Enter the service account email in the New principals field.
- In the Assign roles section, select the following roles from the role list:
- BigQuery Data Viewer: Allows read access to the dataset.
- BigQuery Data Editor: Allows read and write access to the dataset.
Alternatively, you can add the following IAM Policy Binding:
{
  "bindings": [
    {
      "role": "roles/bigquery.dataViewer",
      "members": [
        "serviceAccount:your-service-account@your-project.iam.gserviceaccount.com"
      ]
    },
    {
      "role": "roles/bigquery.dataEditor",
      "members": [
        "serviceAccount:your-service-account@your-project.iam.gserviceaccount.com"
      ]
    }
  ]
}
Create warehouse connection
After granting the required permissions to your warehouse, you must create the warehouse connection to allow Profiles to access your data.
Initiate the warehouse connection:
pb init connectionThen, follow the prompts to enter further details about your warehouse.
A sample connection for a Snowflake account is as follows:
Enter Connection Name: test
Enter target:  (default:dev):  # Press enter, leaving it to default
Enter account: ina13147.us-east-1
Enter warehouse: rudder_warehouse
Enter dbname: your_rudderstack_db
Enter schema: rs_profiles # A segregated schema for storing tables/views created by Profiles
Enter user: profiles_test_user
Do you want to use key-pair authentication? [y/N] y
--- If you select yes ----
Enter file path containing value for privateKey: /<path>/key.pem
Enter passphrase (leave blank if private key not encrypted):
-- If you select no----
Enter password: <password>
--common for both--
Enter role: profiles_role
Append to /Users/<user_name>/.pb/siteconfig.yaml? [y/N] y- Connection Name: Name of the connection in the project file.
- Target: Environment name, such as
dev,prod,test, etc. You can specify any target name and create a separate connection for the same. - Account: Name of your Snowflake account. Based on your cloud platform and region, you might need to append
.aws,.gcp, or.azurein your account name. See Snowflake documentation for more information. - Warehouse: Name of the warehouse.
- Database name: Name of the database inside warehouse where model outputs will be written.
- Schema: Name of the schema inside database where you’ll store identity stitcher and entity features.
- User: Name of the user in data warehouse.
- Use Snowflake key-pair authentication: RudderStack supports Snowflake’s key-pair authentication mechanism to validate your Snowflake connection.
Security
For enhanced security, RudderStack recommends using the key pair authentication over the basic authentication mechanism (username and password).
See the following sections in the Snowflake documentation to generate and use the key pair:
If you opt for Snowflake key-pair authentication, then enter the following settings:
- Private key: Enter the file path containing the private key, for example,
/<path>/<private_key>.pem. - Passphrase: Specify the password you set while encrypting the private key. Leave this field blank if your private key is not encrypted.
The user authentication will fail if your private key is encrypted and you do not specify the passphrase.
Deprecated: If you opt for username and password authentication, then enter the following settings:
- Password: Password for the above user.
The username/password authentication mechanism is deprecated. RudderStack recommends using key-pair authentication instead.
Then, continue with the connection setup by specifying the below settings:
- Role: Name of the user role.
- Append to site configuration file: Determines whether to add the connection details to the
siteconfig.yamlfile.
RudderStack supports various user authentication mechanisms for Redshift:
Enter Connection Name: test
Enter target:  (default:dev):  # Press enter, leaving it to default
Enter dbname: your_rudderstack_db
Enter schema: rs_profiles # A segregated schema for storing tables/views created by Profiles
Enter user: profiles_test_user
Enter sslmode: options - [disable require]: disable # Enter "require" in case your Redshift connection mandates sslmode.
How would you like to authenticate with the warehouse service? Please select your method by entering the corresponding number:
y
[1] Warehouse Credentials: Log in using your username and password.
        Format: [Username, Password]
[2] AWS Programmatic Credentials: Authenticate using one of the following AWS credentials methods:
        a) Direct input of AWS Access Key ID, Secret Access Key, and an optional Session Token.
                Format: [AWS Access Key ID, Secret Access Key, Session Token (Optional)]
        b) AWS configuration profile stored on your system.
                Format: [AWS Configuration Profile Name]
        c) Use an AWS Secrets Manager ARN to securely retrieve credentials.
Format: [Secret ARN]- Connection Name: Name of the connection in the project file.
- Target: Environment name, such as
dev,prod,test, etc. You can specify any target name and create a separate connection for the same. - Host: Log in to AWS Console and go to Clusters to know about host.
- Port: Port number to connect to the warehouse.
- Database name: Name of the database inside warehouse where model outputs will be written.
- Schema: Name of the schema inside database where you’ll store identity stitcher and entity features.
- User: Name of the user in data warehouse.
- Password: Password for the above user.
Warehouse credentials
If you choose to use the warehouse credentials (option 1), enter the following details:
Enter host: warehouseabc.us-west-1.redshift.amazonaws.com
Enter port: 5439
Enter password: <password>
Enter tunnel_info: Do you want to use SSH Tunnel to connect with the warehouse? (y/n): y
Enter ssh user: user
Enter ssh host: 1234
Enter ssh port: 12345
Enter ssh private key file path: /Users/alex/.ssh/id_ed25519.pub
Append to /Users/alex/.pb/siteconfig.yaml? [y/N] y
AWS Programmatic Credentials
If you choose to use AWS Access Key ID, Secret Access Key, and an optional Session Token from AWS Programmatic Credentials (option 2a), enter the following details:
For Redshift Cluster
Which Redshift Service you want to connect with?
        [c]Redshift Cluster
        [s]Redshift Serverless
c
Enter Redshift Cluster Identifier: cluster-id
Enter access_key_id: aid
Enter secret_access_key: ***
Enter session_token: If you are using temporary security credentials, please specify the session token, otherwise leave it empty.
stoken
Append to /Users/alex/.pb/siteconfig.yaml? [y/N] y
For Redshift Serverless
Which Redshift Service you want to connect with?
        [c]Redshift Cluster
        [s]Redshift Serverless
s
Enter Redshift Serverless Workgroup Name: wg-name
Enter access_key_id: aid
Enter secret_access_key: ***
Enter session_token: If you are using temporary security credentials, please specify the session token, otherwise leave it empty.
Append to /Users/alex/.pb/siteconfig.yaml? [y/N] y
If you choose to use AWS configuration profile stored on your system from AWS Programmatic Credentials (option 2b), enter the following details:
For Redshift Cluster
Which Redshift Service you want to connect with?
        [c]Redshift Cluster
        [s]Redshift Serverless
c
Enter Redshift Cluster Identifier: ci
Enter shared_profile: default
Enter region: us-east-1
Append to /Users/alex/.pb/siteconfig.yaml? [y/N] y
For Redshift Serverless
Which Redshift Service you want to connect with?
        [c]Redshift Cluster
        [s]Redshift Serverless
s
Enter Redshift Serverless Workgroup Name: serverless-wg
Enter shared_profile: default
Append to /Users/alex/.pb/siteconfig.yaml? [y/N] y
If you choose to use an AWS Secrets Manager ARN to securely retrieve credentials from AWS Programmatic Credentials (option 2c), enter the following details:
For Redshift Cluster
Which Redshift Service you want to connect with?
        [c]Redshift Cluster
        [s]Redshift Serverless
c
Enter Redshift Cluster Identifier: cluster-identifier
Enter secrets_arn: ************************
Append to /Users/alex/.pb/siteconfig.yaml? [y/N] y
A sample connection for a Databricks account is as follows:
Enter Connection Name: test
Enter target:  (default:dev):  # Press enter, leaving it to default
Enter host: a1.8.azuredatabricks.net # The hostname or URL of your Databricks cluster
Enter port: 443 # The port number used for establishing the connection. Usually it is 443 for https connections.
Enter http_endpoint: /sql/1.0/warehouses/919uasdn92h # The path or specific endpoint you wish to connect to.
Enter access_token: <password> # The access token created for authenticating the instance.
Enter user: profiles_test_user # Username of your Databricks account.
Enter schema: rs_profiles # A segregated schema for storing tables/views created by Profiles
Enter catalog: your_rudderstack_db # The database or catalog having data that you’ll be accessing.
Append to /Users/<user_name>/.pb/siteconfig.yaml? [y/N]
y- Connection Name: Name of the connection in the project file.
- Target: Environment name, such as
dev,prod,test, etc. You can specify any target name and create a separate connection for the same. - Host: Host name or URL of your Databricks cluster.
- Port: Port number for establishing the connection, usually
443forhttpsconnections. - http_endpoint: Path or specific endpoint you wish to connect to.
- access_token: Access token for authenticating the instance.
- User: Username of your Databricks account.
- Schema: Name of the schema to store your output tables/views.
- Catalog: Name of the database or catalog from where you want to access the data.
RudderStack currently supports Databricks on Azure. To get the Databricks connection details:
- Log in to your Azure’s Databricks Web UI.
- Click on SQL Warehouses on the left.
- Select the warehouse to connect to.
- Select the Connection Details tab.
A sample connection for a BigQuery account is as follows:
Enter Connection Name: test
Enter target:  (default:dev):  # Press enter, leaving it to default
Enter credentials: json file path: # File path of your BQ JSON file, for example, /Users/alexm/Downloads/big.json. Entering an incorrect path will exit the program.
Enter project_id: profiles121
Enter schema: rs_profiles
Append to /Users/<user_name>/.pb/siteconfig.yaml? [y/N]
y
This creates a local site configuration file in your home directory: ~/.pb/siteconfig.yaml. Your Profiles project uses this file to access the warehouse, Git credentials, and other details. If you don’t see the file, enable the View hidden files option.
Project template
Finally, create your Profiles project:
pb init pb-project -o MyProfilesProjectThe above command creates a new project in the MyProfilesProject folder with the following structure:
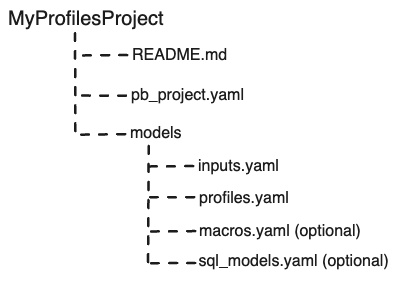
See Project structure for more information on the Profiles project files.
