You are viewing documentation for an older version.

Feature View
10 minute read
Once you have done identity stitching to unify the identity of your users across all the cross-platforms, you can evaluate and maintain the required features/traits for each identified user using a feature view model.
Prerequisites
- A basic Profile Builder project by following the Profile Builder CLI steps.
- Structure of a Profile Builder project and the parameters used in different files.
- Identity Stitching model as Feature View reuses its output to extract the required features/traits.
Feature View model
You can define and extract the required features/traits for an entity from your data warehouse using the feature view model. Once done, you can send them to the downstream destinations. A destination could either be the Activation API or any Reverse ETL destination that RudderStack supports. Each such destination requires data in the form of a table with an ID column and one or more feature columns.
You can use the Feature View model to access the entity features based on any ID type and create a view having all or a specified set of entity features across the project. It also lets you unify the traits/features (defined using entity_vars) and ML models to generate a comprehensive customer 360 table.
RudderStack assigns a default name to the model, if not provided, and adds all the available features on the entity into a view by default. The feature_view model creates the following views after each run:
- View of the current run, hash, and sequence number.
- Final view that always looks back at the most recent run.
The feature_view model is almost an exact replica of the entity var table in a view format. The only difference is that:
- The entity var table always has all the
entity_varsdefined for a particular entity. - In feature view, if you explicitly define an
entity_varsolely as a helper var, (thereby not needed for activation) you can ensure that the var is not used for any activation tables. Feature view will only haveentity_varsthat do not have theis_featurekey set tofalse.
It provides a quick actionable view with the main_id as the primary key. It also acts as the base (or data source) for the custom feature view model which is created using other entity aliases as primary keys.
The pb_project.yaml file for a default feature view model:
...
entities:
  - name: user
    id_types:
      - main_id
      - user_id
    feature_views:
      using_ids:
        - id: email # primary key for features_by_email view
          name: features_by_email
        - id: salesforce_id # primary key for salesforce_id_stitched_features view
          name: salesforce_id_stitched_features
      features:
        - from: models/feature_table_1 # include everything from `feature_table_1` (default behaviour if `include` is not specified)
          include: ["*"]
        - from: models/feature_table_2 # exclude 'middle_name' feature from `feature_table_2`
          exclude: ["middle_name"]
As seen in the above YAML, the feature_views key is defined within the entity block under a single entity. This configuration will output two views (features_by_email and salesforce_id_stitched_features) from the entity/all cohort - a default cohort which gets defined automatically when you run the project.
Sample project
This sample project uses the output of an identity stitching model as an input to create a feature view. The following sections describe how to define your PB project files:
Project detail
The pb_project.yaml file defines the project details such as name, schema version, connection name and the entities which represent different identifiers.
You can define all the identifiers from different input sources you want to stitch together as a user_main_id:
You need to addmain_idto the list only if you have definedmain_id_type: main_idin the ID stitcher spec.
# Project name
name: sample_id_stitching
# Project's yaml schema version
schema_version: 72
# Warehouse connection
connection: test
# Folder containing models
model_folders:
  - models
# Entities in this project and their ids.
entities:
  - name: user
    id_types:
      - main_id # You need to add `main_id` to the list only if you have defined `main_id_type: main_id` in the id stitcher spec.
      - user_id # one of the identifier from your data source.
      - email
# lib packages can be imported in project signifying that this project inherits its properties from there
packages:
  - name: corelib
    url: "https://github.com/rudderlabs/profiles-corelib/tag/schema_{{best_schema_version}}"
    # if required then you can extend the package definition such as for ID types.
Input
The input file file includes the input table references and corresponding SQL for the above-mentioned entities:
inputs:
- name: rsIdentifies
  contract: # constraints that a model adheres to
    is_optional: false
    is_event_stream: true
    with_entity_ids:
      - user
    with_columns:
      - name: timestamp
      - name: user_id
      - name: anonymous_id
      - name: email
  app_defaults:
    table: rudder_events_production.web.identifies # one of the WH table RudderStack generates when processing identify or track events.
    occurred_at_col: timestamp
    ids:
      - select: "user_id" # kind of identity sql to pick this column from above table.
        type: user_id
        entity: user # as defined in project file
        to_default_stitcher: true
      - select: "anonymous_id"
        type: anonymous_id
        entity: user
        to_default_stitcher: true
      - select: "lower(email)" # can use sql.
        type: email
        entity: user
        to_default_stitcher: true
- name: rsTracks
  contract:
    is_optional: false
    is_event_stream: true
    with_entity_ids:
      - user
    with_columns:
      - name: timestamp
      - name: user_id
      - name: anonymous_id
  app_defaults:
    table: rudder_events_production.web.tracks # another table in WH maintained by RudderStack processing track events.
    occurred_at_col: timestamp
    ids:
      - select: "user_id"
        type: user_id
        entity: user
        to_default_stitcher: true
      - select: "anonymous_id"
        type: anonymous_id
        entity: user
        to_default_stitcher: true
Model
The feature view model lets you define and extract the features/traits from your warehouse tables. Each feature is defined using an entity_var.
A sample profiles.yaml file specifying a feature view model:
var_groups:
  - name: first_group
    entity_key: user
    vars:
      - entity_var:
          name: first_seen
          select: min(timestamp::date)
          from: inputs/rsTracks
          where: properties_country is not null and properties_country != ''
      - entity_var:
          name: last_seen
          select: max(timestamp::date)
          from: inputs/rsTracks
          is_feature: false # Specifies the entity_var is not a feature
      - entity_var:
          name: user_lifespan
          select: '{{user.Var("last_seen")}} - {{user.Var("first_seen")}}'
          description: Life Time Value of a customer
      - entity_var:
          name: days_active
          select: count(distinct timestamp::date)
          from: inputs/rsTracks
          description: No. of days a customer was active
      - entity_var:
          name: campaign_source
          default: "'organic'"
      - entity_var:
          name: user_rank
          default: -1
      - entity_var:
          name: campaign_source_first_touch
          select: first_value(context_campaign_source)
          window:
              order_by:
                  - timestamp asc
              partition_by:
                  - main_id
          from: inputs/rsIdentifies
          where: context_campaign_source is not null and context_campaign_source != ''
      - input_var:
          name: num_c_rank_num_b_partition
          select: rank()
          from: inputs/tbl_c
          default: -1
          window:
            partition_by:
              - '{{tbl_c}}.num_b'
            order_by:
              - '{{tbl_c}}.num_c asc'
          where: '{{tbl_c}}.num_b >= 10'
      - entity_var:
          name: min_num_c_rank_num_b_partition
          select: min(num_c_rank_num_b_partition)
          from: inputs/tbl_c
var_groups
The var_groups field groups all the vars under it and provides the provision to define any configuration keys that need to be shared across vars.
| Field | Data type | Description |
|---|---|---|
name | String | Name to identify the var_groups uniquely. |
entity_key | String | Specifies the entity to be used. |
vars | List | Specifies the entity_var and input_var variables. |
entity_var
The entity_var field provides inputs for the feature view model. This variable stores the data temporarily, however, you can choose to store its data permanently by specifying the name in it as a feature in the features key.
| Field | Data type | Description |
|---|---|---|
name | String | Name of the entity_var to identify it uniquely. |
select | String | Column name/value you want to select from the table. This defines the actual value that will be stored in the variable. You can use simple SQL expressions or select an entity_var as {{entityName.Var(\"entity_var\")}}. It has to be an aggregate operation that ensures the output is a unique value for a given main_id. For example: min(timestamp), count(*), sum(amount) etc. This holds true even when a window function (optional) is used. For example:: first_value(), last_value() etc are valid while rank(), row_number(), etc. are not valid and give unpredictable results. |
from | List | Reference to the source table from where data is to be fetched. You can either refer to another model from the same YAML or some other table specified in input YAML. |
where | String | Any filters you want to apply on the input table before selecting a value. This must be SQL compatible and should consider the data type of the table. |
default | String | Default value in case no data matches the filter. When defining default values, make sure you enclose the string values in single quotes followed by double quotes to avoid SQL failure. However, you can use the non-string values without any quotes. |
description | String | Textual description of the entity_var. |
is_feature | Boolean | Determines whether the entity_var is a feature. The default value is true. |
window | Object | Specifies the window function. Window functions in SQL usually have both partition_by and order_by properties. But for entity_var, partition_by is added with main_id as default; so, adding partition_by manually is not supported. If you need partitioning on other columns too, check out input_var where partition_by on arbitrary and multiple columns is supported. |
input_var
The syntax of input_var is similar to entity_var, with the only difference that instead of each value being associated to a row of the feature view, it’s associated with a row of the specified input. While you can think of an entity_var as adding a helper column to the feature view, you can consider an input_var as adding a helper column to the input.
If more than oneinput_varare required to derive anentity_var, then all theinput_varmust be defined on the same table.
| Field | Data type | Description |
|---|---|---|
name | String | Name to store the retrieved data. |
select | String | Data to be stored in the name. |
from | List | Reference to the source table from where data is to be fetched. |
where | String | (Optional) Applies conditions for fetching data. |
default | String | (Optional) Default value for any entity for which the calculated value would otherwise be NULL. |
description | String | (Optional) Textual description. |
window | Object | (Optional) Specifies a window over which the value should be calculated. |
window
| Field | Data type | Description |
|---|---|---|
partition_by | String | (Optional) List of SQL expressions to use in partitioning the data. |
order_by | String | (Optional) List of SQL expressions to use in ordering the data. |
In window option, main_id is not added by default, it can be any arbitrary list of columns from the input table. So if a feature should be partitioned by main_id, you must add it in the partition_by key.
Output
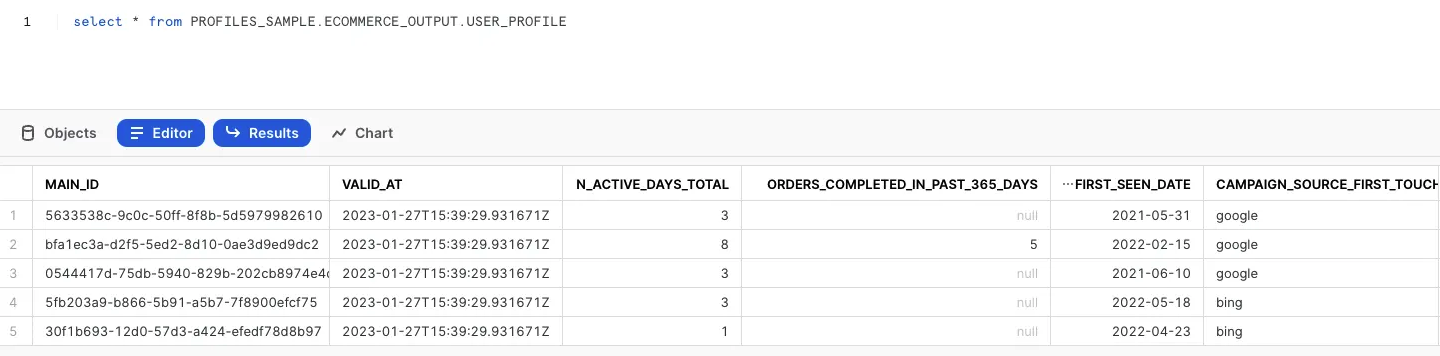
After running the project, you can view the generated material tables.
- Log in to your Snowflake console.
- Click Worksheets from the top navigation bar.
- In the left sidebar, click Database and the corresponding Schema to view the list of all tables. You can hover over a table to see the full table name along with its creation date and time.
- Write a SQL query like
select * from <table_name>and execute it to see the results:
- Open Postico2. If required, create a new connection by entering the relevant details. Click Test Connection followed by Connect.
- Click the + icon next to Queries in the left sidebar.
- You can click Database and the corresponding schema to view the list of all tables/views.
- Double click on the appropriate view name to paste the name on an empty worksheet.
- You can prefix
SELECT *from the view name pasted previously and suffixLIMIT 10;at the end. - Press Cmd+Enter keys, or click the Run button to execute the query.
- Enter your Databricks workspace URL in the web browser and log in with your username and password.
- Click the Catalog icon in left sidebar.
- Choose the appropriate catalog from the list and click on it to view contents.
- You will see list of tables/views. Click the appropriate table/view name to paste the name on worksheet.
- You can prefix
SELECT * FROMbefore the pasted view name and suffixLIMIT 10;at the end. - Select the query text. Press Cmd+Enter, or click the Run button to execute the query.
- Log in to your Google Cloud Console
- Search for Bigquery in the search bar.
- Select Bigquery from Product and Pages to open the Bigquery Explorer.
- Select the correct project from top left drop down menu.
- In the left sidebar, click the project ID, then the corresponding dataset view list of all the tables and views.
- Write a SQL query like
select * from <table_name> limit 10;and execute it to see the results.
A sample output containing the results in Snowflake: