You are viewing documentation for an older version.

Predictions (Early Access)
6 minute read
Predictions extends Profiles’ standard feature development functionality. It lets you easily create predictive features in your warehouse and answer questions like:
- Is a customer likely to churn in the next 30 days?
- Will a user make a purchase in the next 7 days?
- Is a lead going to convert?
- How much is a user likely to spend in the next 90 days?
Further, you can add the predicted feature to user profiles in your warehouse automatically and deliver ML-based segments and audiences to your marketing, product, and customer success teams.
The following self-guided tour shows you how to build the predictive traits. You can also follow the Predictions sample project guide and build the project yourself, including sample data.
Use cases
Churn prediction: Predicting churn is one of the crucial initiatives across businesses. Without a predicted churn score, your actions are reactive, whereas you can act proactively with a user trait like
is_likely_to_churn. Once you have such features, you can activate them with the appropriate outreach programs to prevent user churn.Customer LTV prediction: Predictions helps you understand your customers’ purchasing behavior over time. You can predict how much amount a particular customer is likely to spend within the predicted time range.
Python model
You can generate predictive features using a python_model which involves two key steps - train and predict.
The following profiles.yaml file shows how to use a python_model:
models:
  - name: shopify_churn
    model_type: python_model
    model_spec:
      occurred_at_col: insert_ts
      entity_key: user
      validity_time: 24h # 1 day
      py_repo_url: https://github.com/rudderlabs/rudderstack-profiles-classifier.git # Do not modify
      # this value as the actual logic resides in this repo.
      train:
        file_extension: .json
        file_validity: 60m
        inputs: &inputs
          - packages/feature_table/models/shopify_user_features
        config:
          data:
            label_column: is_churned_7_days
            label_value: 1
            prediction_horizon_days: 7
            output_profiles_ml_model: *model_name
            eligible_users: lower(country) = 'us' and amount_spent_overall > 0
            inputs: *inputs
            entity_column: user_main_id
            recall_to_precision_importance: 1.0
          preprocessing:
            ignore_features: [name, gender, device_type]
      predict:
        inputs:
          - packages/feature_table/models/shopify_user_features
        config:
          outputs:
            column_names:
              percentile: &percentile_name percentile_churn_score_7_days
              score: churn_score_7_days
            feature_meta_data: &feature_meta_data
              features:
                - name: *percentile_name
                  description: 'Percentile of churn score. Higher the percentile, higher the probability of churn'
Model parameters
The detailed list of parameters used in the python_model along with their description are listed below:
| Parameter | Description |
|---|---|
py_repo_urlRequired | The actual logic for Predictions resides in this remote repository. DO NOT modify this value. |
file_extensionRequired | Indicates the file type. This is a static value and does not need to be modified. |
file_validityRequired | If the last trained model is older than this duration, then the model is trained again. |
inputsRequired | Path to the base feature table project. You must add &inputs to it. |
label_columnRequired | Name of the feature (entity_var) you want to predict. It is defined in the feature table model. |
label_value | Expected label value for users who performed the event |
prediction_horizon_daysRequired | Number of days in future for which you want to make the prediction. See Prediction horizon days for more information. |
output_profiles_ml_modelRequired | Name of the output model. |
eligible_users | Eligibilty criteria for the users for which you want to define predictive features. You can set this criteria by defining a SQL statement referring to the different entity_vars. To build a model for all the available users, you can leave this parameter as blank.For example, if you want to train the model and make predictions only for the paying users from US, then define country='US' and is_payer=true. |
config.data.inputs | Path to the referenced project. |
entity_column | If you change the value ofid_column_name in the ID stitcher model, you should specify it here. This field is optional otherwise. |
recall_to_precision_importance | Also referred to as beta in f-beta score, this field is used in classification models to fine-tune the model threshold and give more weight to recall against precision. Note: This is an optional parameter. If not specified, it defaults to 1.0, giving equal weight to precision and recall. |
ignore_features | List of columns from the feature table which the model should ignore while training. |
percentileRequired | Name of column in output table having percentile score. |
scoreRequired | Name of column in output table having probabilistic score. |
descriptionRequired | Custom description for the predictive feature. |
If you want to run your python model locally using a CLI setup, you must set up a python environment with the required packages and add the python path to your siteconfig.yaml file.
Project setup
This section highlights the project setup steps for a sample churn prediction and LTV model.
Prerequisites
- You must be using a Snowflake, BigQuery, or Redshift warehouse.
- You must set up a standard Profiles project with a feature table model.
- Optional: If you are using Snowflake, you might need to create a Snowpark-optimized warehouse if your dataset is significantly large.
Churn prediction/LTV model
1. Create a Profiles project with Feature Table model
Follow the Feature table guide to create a Profiles project. Your project must include the definition of the feature you want to predict.
For example, to predict 30-day inactive churn, you should define it as a feature (entity_var) in the feature table so that the model knows how to compute this for historic users.
entity_var:
  name: churn_30_days
  select: case when days_since_last_seen >= 30 then 1 else 0 end
2. Create a python model and train it
Create a python_model and pass the Feature table model as an input.
Add the following set of parameters in the train block:
train:
    file_extension: .json
    file_validity: 168h
    inputs: &inputs
      - packages/feature_table/models/shopify_user_features
    config:
      data: &model_data_input_configs
        label_column: churn_30_days
        label_value: 1
        prediction_horizon_days: 30
        output_profiles_ml_model: *model_name
        eligible_users: ''
        inputs: *inputs
        entity_column: user_main_id
        recall_to_precision_importance: 1.0
      preprocessing:
ignore_features: [name, gender, device_type]train:
file_extension: .json
file_validity: 168h
inputs: &inputs
- packages/feature_table/models/shopify_user_features
config:
data: &model_data_input_configs
label_column: amount_spent_past_7_days
task: regression
prediction_horizon_days: 7
output_profiles_ml_model: *model_name
eligible_users: ''
inputs: *inputs
entity_column: user_main_id
preprocessing:
ignore_features: [name, gender, device_type]Note that:
- Unlike churn prediction, you should not specify the
label_valueandrecall_to_precision_importancefields.- The LTV model introduces a new parameter called
taskwhich you must set toregression. Profiles assumes a classification model by default, unless explicitly specified otherwise.
3. Define predictive features
Add the following set of parameters in the predict block:
predict:
    inputs:
      - packages/feature_table/models/shopify_user_features
    config:
      data: *model_data_input_configs
      outputs:
        column_names:
          percentile: &percentile_name percentile_churn_score_7_days
          score: churn_score_7_days
        feature_meta_data: &feature_meta_data
          features:
            - name: *percentile_name
description: 'Percentile of churn score. Higher the percentile, higher the probability of churn'predict:
inputs:
- packages/feature_table/models/shopify_user_features
config:
data: *model_data_configs
preprocessing: *model_prep_configs
outputs:
column_names:
percentile: &percentile_name percentile_predicted_amount_spent
score: predicted_amount_spent
feature_meta_data: &feature_meta_data
features:
- name: *percentile_name
description: 'Percentile of predicted future LTV. Higher the percentile, higher the expected LTV.'4. Run your project
Once you have created the project, you can choose to run it using either of the following ways:
Using Profile CLI
If you have created your Predictions Profiles project locally, run it using the pb run CLI command to generate output tables.
Using Profiles UI
Contact us to enable this feature for your account.
Run your Predictions Profiles project by first uploading it to a Git repository and then importing it in the RudderStack dashboard.
Output
Once your project run is completed, you can:
- View the output materials in your warehouse for the predictive features.
- Check the predicted value for any given user in the RudderStack dashboard’s Profile Lookup section.
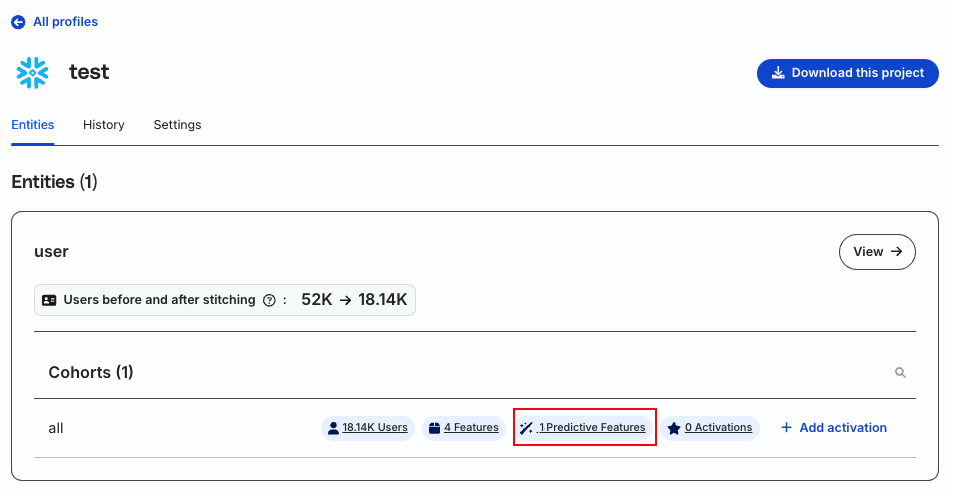
- View all predictive features in the Entities tab of your Profiles project:
Click Predictive features to see the following view:
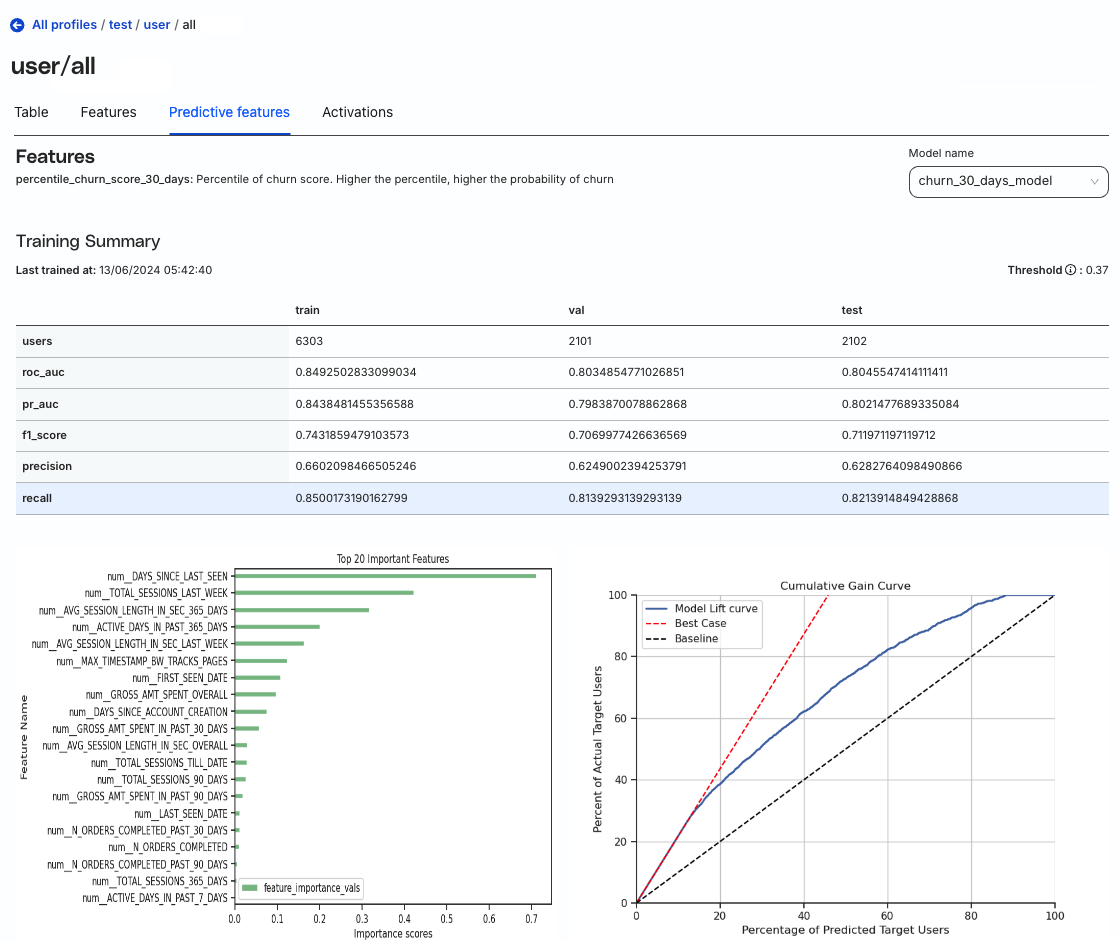
The value of a predictive feature is a probability. You can consider it as true or false based on your threshold.
See Also
- Predictive features: Builds predictive features such as churn prediction, conversion prediction, etc.
- Shopify churn model: Builds a churn prediction score on top of the Shopify library project.
