You are viewing documentation for an older version.

Profile Builder CLI
11 minute read
While creating a Profiles project, you can choose either of the below:
- Profile Builder (PB) CLI which gives you the flexibility to create, develop, and debug your Profiles project using various commands in fine detail. You can explore and implement the exhaustive list of features and functionalities offered by Profiles.
- Profiles UI which provides a step-by-step intuitive workflow in the RudderStack dashboard. You can configure your project, schedule its run, explore the outputs and the user profiles.
Profile Builder (PB) is a command-line interface (CLI) tool that simplifies data transformation within your warehouse. It generates customer profiles by stitching data together from multiple sources.
This guide lists the detailed steps to install and use the Profile Builder (PB) tool to create, configure, and run a new project.
Prerequisites
You must have:
- Python 3 installed on your machine.
- Admin privileges on your machine.
Steps
To set up a project using the PB tool, follow these steps:
1: Install PB
Install the Profile Builder tool by running the following command:
pip3 install profiles-rudderstackIf you have already installed PB, use the following command to update its version:
pip3 install profiles-rudderstack -URudderStack recommends using a Python virtual environment to maintain an isolated and clean environment.
bashpipx install profiles-rudderstack
Validate Profile Builder’s version after install using:
pb versionSee also: Setup and installation FAQ
If you are an existing user, migrate your project to the new schema. See Migrate your existing project for more information.
2: Create warehouse connection
RudderStack supports Snowflake, Redshift, BigQuery, and Databricks warehouses for Profiles. You must grant certain warehouse permissions to let RudderStack read from schema having the source tables (for example,tracksandidentifiestables generated via Event Stream sources), and write data in a new schema created for Profiles.
Create a warehouse connection to allow PB to access your data:
pb init connectionThen, follow the prompts to enter details about your warehouse connection.
A sample connection for a Snowflake account is as follows:
Enter Connection Name: test
Enter target:  (default:dev):  # Press enter, leaving it to default
Enter account: ina13147.us-east-1
Enter warehouse: rudder_warehouse
Enter dbname: your_rudderstack_db
Enter schema: rs_profiles # A segregated schema for storing tables/views created by Profiles
Enter user: profiles_test_user
Do you want to use key-pair authentication? [y/N] y
--- If you select yes ----
Enter file path containing value for privateKey: /<path>/key.pem
Enter passphrase (leave blank if private key not encrypted):
-- If you select no----
Enter password: <password>
--common for both--
Enter role: profiles_role
Append to /Users/<user_name>/.pb/siteconfig.yaml? [y/N] y- Connection Name: Name of the connection in the project file.
- Target: Environment name, such as
dev,prod,test, etc. You can specify any target name and create a separate connection for the same. - Account: Name of your Snowflake account. Based on your cloud platform and region, you might need to append
.aws,.gcp, or.azurein your account name. See Snowflake documentation for more information. - Warehouse: Name of the warehouse.
- Database name: Name of the database inside warehouse where model outputs will be written.
- Schema: Name of the schema inside database where you’ll store identity stitcher and entity features.
- User: Name of the user in data warehouse.
- Use Snowflake key-pair authentication: RudderStack supports Snowflake’s key-pair authentication mechanism to validate your Snowflake connection.
For enhanced security, RudderStack recommends using the key pair authentication over the basic authentication mechanism (username and password).
See the following sections in the Snowflake documentation to generate and use the key pair:
If you opt for Snowflake key-pair authentication, then enter the following settings:
- Private key: Enter the file path containing the private key, for example,
/<path>/<private_key>.pem. - Passphrase: Specify the password you set while encrypting the private key. Leave this field blank if your private key is not encrypted.
The user authentication will fail if your private key is encrypted and you do not specify the passphrase.
If you opt for username and password authentication, then enter the following settings:
- Password: Password for the above user.
Then, continue with the connection setup by specifying the below settings:
- Role: Name of the user role.
- Append to site configuration file: Determines whether to add the connection details to the
siteconfig.yamlfile.
RudderStack supports various user authentication mechanisms for Redshift:
Enter Connection Name: test
Enter target:  (default:dev):  # Press enter, leaving it to default
Enter dbname: your_rudderstack_db
Enter schema: rs_profiles # A segregated schema for storing tables/views created by Profiles
Enter user: profiles_test_user
Enter sslmode: options - [disable require]: disable # Enter "require" in case your Redshift connection mandates sslmode.
How would you like to authenticate with the warehouse service? Please select your method by entering the corresponding number:
y
[1] Warehouse Credentials: Log in using your username and password.
        Format: [Username, Password]
[2] AWS Programmatic Credentials: Authenticate using one of the following AWS credentials methods:
        a) Direct input of AWS Access Key ID, Secret Access Key, and an optional Session Token.
                Format: [AWS Access Key ID, Secret Access Key, Session Token (Optional)]
        b) AWS configuration profile stored on your system.
                Format: [AWS Configuration Profile Name]
        c) Use an AWS Secrets Manager ARN to securely retrieve credentials.
Format: [Secret ARN]- Connection Name: Name of the connection in the project file.
- Target: Environment name, such as
dev,prod,test, etc. You can specify any target name and create a separate connection for the same. - Host: Log in to AWS Console and go to Clusters to know about host.
- Port: Port number to connect to the warehouse.
- Database name: Name of the database inside warehouse where model outputs will be written.
- Schema: Name of the schema inside database where you’ll store identity stitcher and entity features.
- User: Name of the user in data warehouse.
- Password: Password for the above user.
Warehouse credentials
If you choose to use the warehouse credentials (option 1), enter the following details:
Enter host: warehouseabc.us-west-1.redshift.amazonaws.com
Enter port: 5439
Enter password: <password>
Enter tunnel_info: Do you want to use SSH Tunnel to connect with the warehouse? (y/n): y
Enter ssh user: user
Enter ssh host: 1234
Enter ssh port: 12345
Enter ssh private key file path: /Users/alex/.ssh/id_ed25519.pub
Append to /Users/alex/.pb/siteconfig.yaml? [y/N] y
AWS Programmatic Credentials
If you choose to use AWS Access Key ID, Secret Access Key, and an optional Session Token from AWS Programmatic Credentials (option 2a), enter the following details:
For Redshift Cluster
Which Redshift Service you want to connect with?
        [c]Redshift Cluster
        [s]Redshift Serverless
c
Enter Redshift Cluster Identifier: cluster-id
Enter access_key_id: aid
Enter secret_access_key: ***
Enter session_token: If you are using temporary security credentials, please specify the session token, otherwise leave it empty.
stoken
Append to /Users/alex/.pb/siteconfig.yaml? [y/N] y
For Redshift Serverless
Which Redshift Service you want to connect with?
        [c]Redshift Cluster
        [s]Redshift Serverless
s
Enter Redshift Serverless Workgroup Name: wg-name
Enter access_key_id: aid
Enter secret_access_key: ***
Enter session_token: If you are using temporary security credentials, please specify the session token, otherwise leave it empty.
Append to /Users/alex/.pb/siteconfig.yaml? [y/N] y
If you choose to use AWS configuration profile stored on your system from AWS Programmatic Credentials (option 2b), enter the following details:
For Redshift Cluster
Which Redshift Service you want to connect with?
        [c]Redshift Cluster
        [s]Redshift Serverless
c
Enter Redshift Cluster Identifier: ci
Enter shared_profile: default
Enter region: us-east-1
Append to /Users/alex/.pb/siteconfig.yaml? [y/N] y
For Redshift Serverless
Which Redshift Service you want to connect with?
        [c]Redshift Cluster
        [s]Redshift Serverless
s
Enter Redshift Serverless Workgroup Name: serverless-wg
Enter shared_profile: default
Append to /Users/alex/.pb/siteconfig.yaml? [y/N] y
If you choose to use an AWS Secrets Manager ARN to securely retrieve credentials from AWS Programmatic Credentials (option 2c), enter the following details:
For Redshift Cluster
Which Redshift Service you want to connect with?
        [c]Redshift Cluster
        [s]Redshift Serverless
c
Enter Redshift Cluster Identifier: cluster-identifier
Enter secrets_arn: ************************
Append to /Users/alex/.pb/siteconfig.yaml? [y/N] y
A sample connection for a Databricks account is as follows:
Enter Connection Name: test
Enter target:  (default:dev):  # Press enter, leaving it to default
Enter host: a1.8.azuredatabricks.net # The hostname or URL of your Databricks cluster
Enter port: 443 # The port number used for establishing the connection. Usually it is 443 for https connections.
Enter http_endpoint: /sql/1.0/warehouses/919uasdn92h # The path or specific endpoint you wish to connect to.
Enter access_token: <password> # The access token created for authenticating the instance.
Enter user: profiles_test_user # Username of your Databricks account.
Enter schema: rs_profiles # A segregated schema for storing tables/views created by Profiles
Enter catalog: your_rudderstack_db # The database or catalog having data that you’ll be accessing.
Append to /Users/<user_name>/.pb/siteconfig.yaml? [y/N]
y- Connection Name: Name of the connection in the project file.
- Target: Environment name, such as
dev,prod,test, etc. You can specify any target name and create a separate connection for the same. - Host: Host name or URL of your Databricks cluster.
- Port: Port number for establishing the connection, usually
443forhttpsconnections. - http_endpoint: Path or specific endpoint you wish to connect to.
- access_token: Access token for authenticating the instance.
- User: Username of your Databricks account.
- Schema: Name of the schema to store your output tables/views.
- Catalog: Name of the database or catalog from where you want to access the data.
RudderStack currently supports Databricks on Azure. To get the Databricks connection details:
- Log in to your Azure’s Databricks Web UI.
- Click on SQL Warehouses on the left.
- Select the warehouse to connect to.
- Select the Connection Details tab.
A sample connection for a BigQuery account is as follows:
Enter Connection Name: test
Enter target:  (default:dev):  # Press enter, leaving it to default
Enter credentials: json file path: # File path of your BQ JSON file, for example, /Users/alexm/Downloads/big.json. Entering an incorrect path will exit the program.
Enter project_id: profiles121
Enter schema: rs_profiles
Append to /Users/<user_name>/.pb/siteconfig.yaml? [y/N]
y
This creates a local site configuration file inside your home directory: ~/.pb/siteconfig.yaml. Your Profiles project uses this file to access the warehouse, git credentials, and other details. If you don’t see the file, enable the View hidden files option.
3: Create project
Run the following command to create a sample project:
pb init pb-project -o MyProfilesProjectThe above command creates a new project in the MyProfilesProject folder with the following structure:
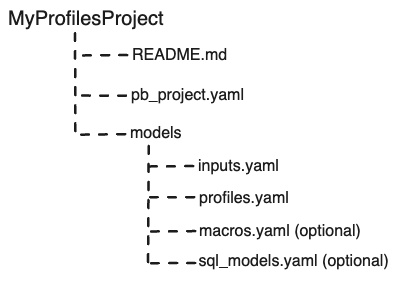
See Project structure for more information on the PB project files.
Navigate to the pb_project.yaml file and set the value of connection: to the connection name as defined in the previous step.
4: Change input sources
- Navigate to your project and open the
models/inputs.yamlfile. Here, you will see a list of tables/views along with their respective ID types. - Replace the placeholder table names with the actual table names in the
tablefield.
See Project structure for more information on setting these values.
5: Validate project
Navigate to your project and validate your warehouse connection and inputInputs refers to the input data sources used to create the material (output) tables in the warehouse. sources:
pb validate accessIf there are no errors, proceed to the next step. In case of errors, check if your warehouse schemas and tables have the required permissions.
Currently, this command is not supported for BigQuery warehouse.
6: Generate SQL files
Compile the project:
pb compileThis generates SQL files in the output/ folder that you can run directly on the warehouse. In case of any compilation errors, you will see them on your screen and also in the logs/logfile.log file.
7: Generate output tables
Run the project and generate material tables:
pb runThis command generates and runs the SQL files in the warehouse, creating the material tables.
8: View generated tables
The viewuser_default_id_stitcherwill always point to the latest generated ID stitcher anduser_profileto the latest feature table.
You can run the pb show models command to get the exact name and path of the generated ID stitcher/feature table. See show command for more information.
Then, execute the below query to view the generated tables in the warehouse:
select * from <table_name> limit 10;Here’s what the columns imply:
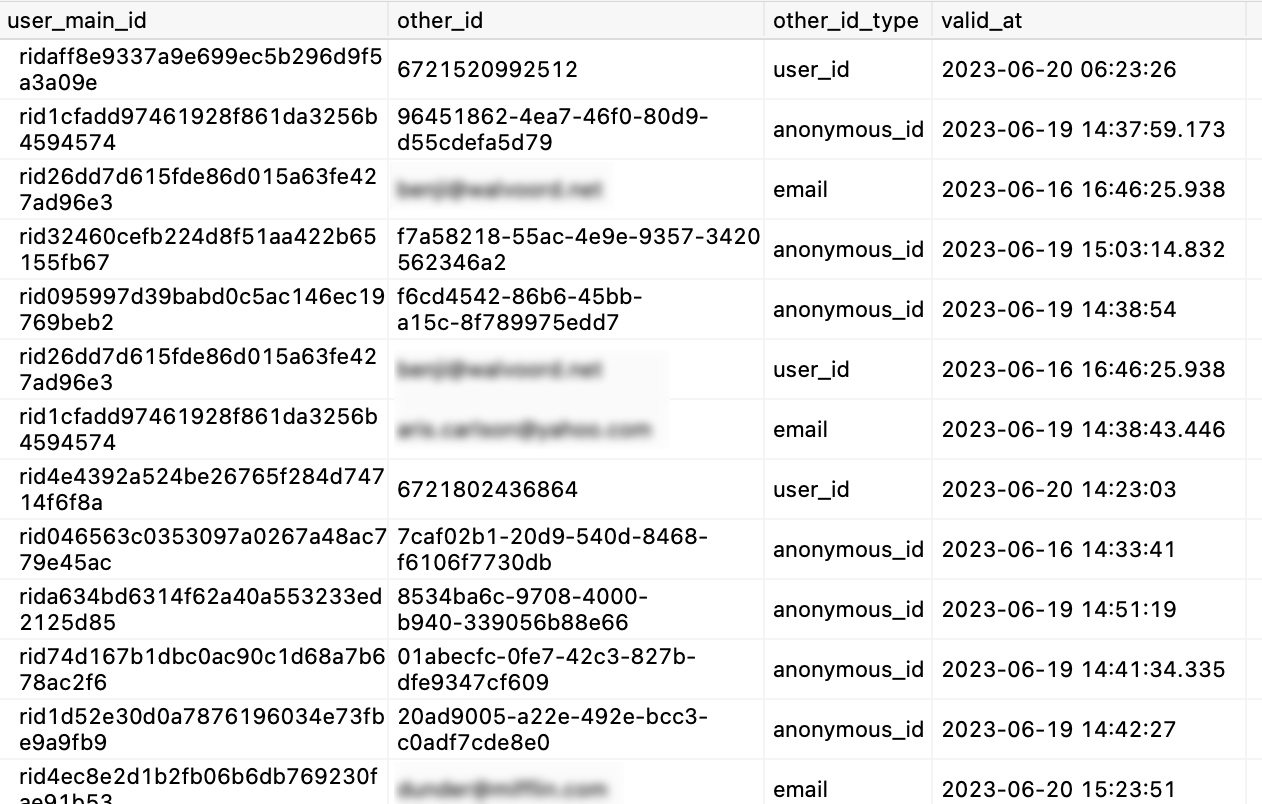
- user_main_id: Rudder ID generated by Profile Builder. Think of a one-to-many relationship, with one Rudder ID connected to different IDs belonging to same user such as User ID, Anonymous ID, Email, Phone number, etc.
- other_id: ID in input source tables that is stitched to a Rudder ID.
- other_id_type: Type of the other ID to be stitched (User ID, Anonymous ID, Email, etc).
- valid_at: Date at which the corresponding ID value occurred in the source tables. For example, the date at which a customer was first browsing anonymously, or when they logged into the CRM with their email ID, etc.
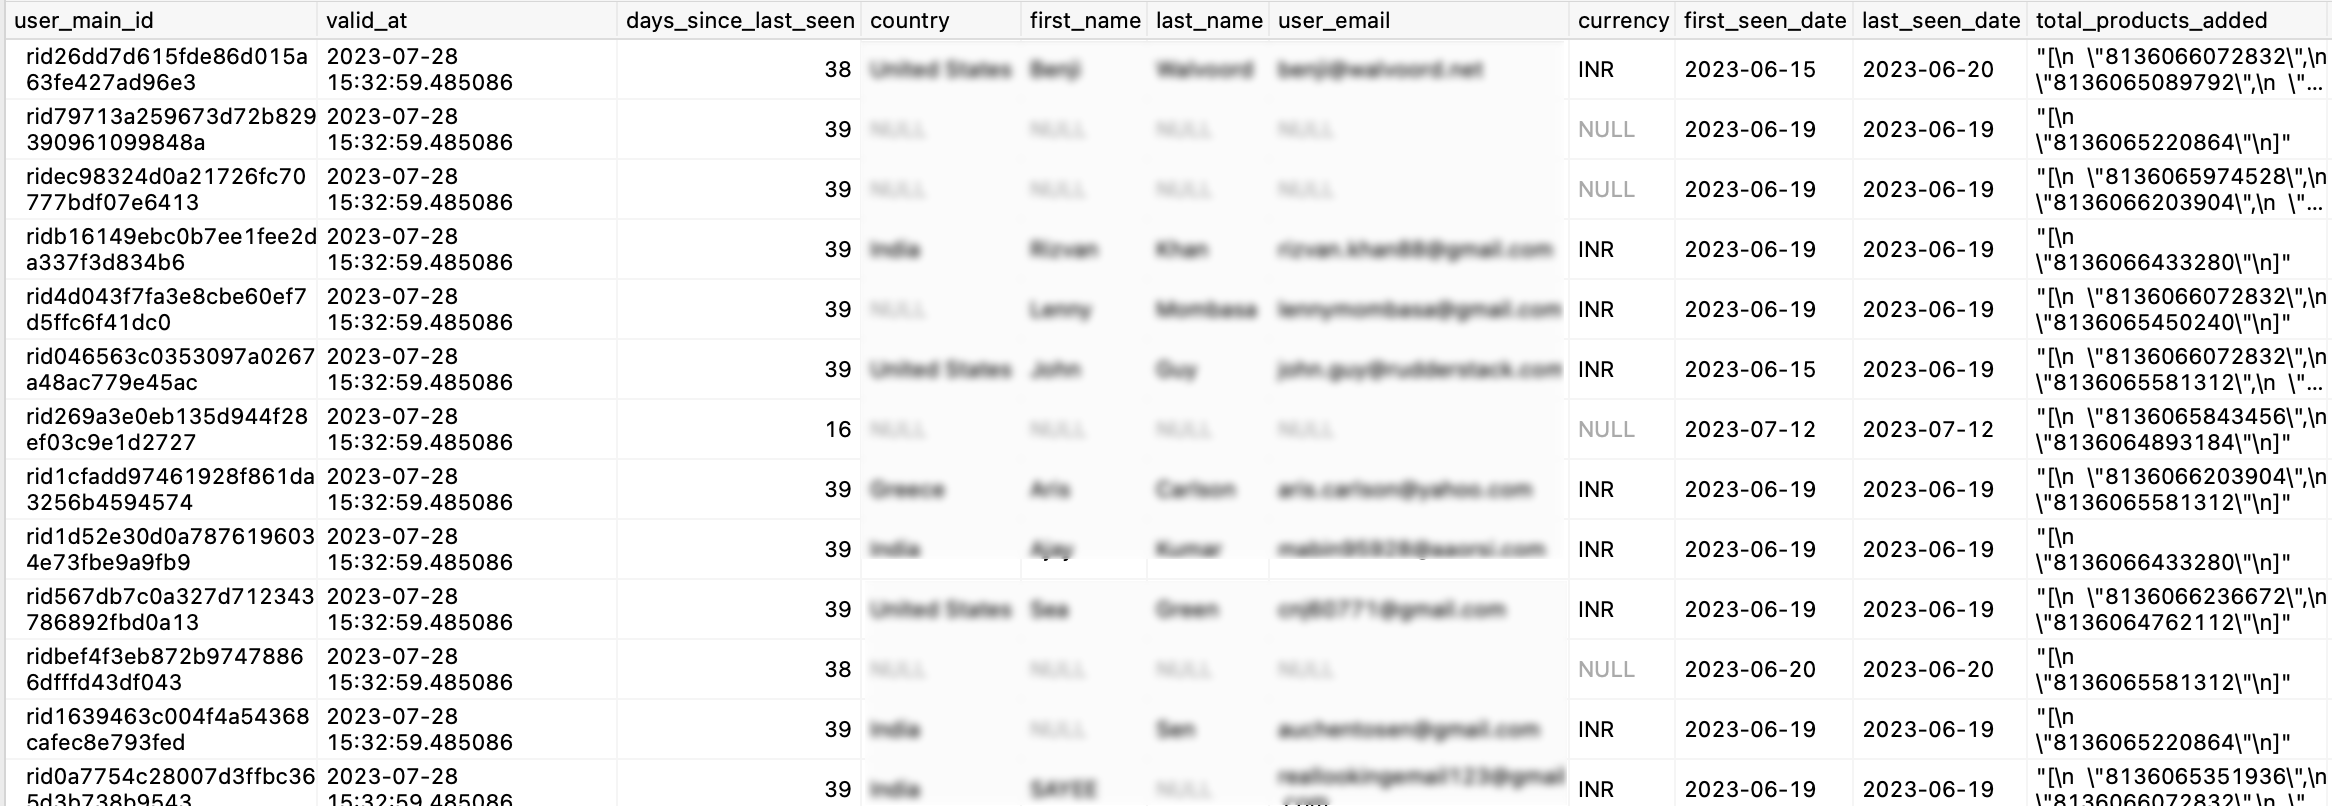
- user_main_id: Rudder ID generated by Profile Builder.
- valid_at: Date when the feature table entry was created for this record.
- first_seen, last_seen, country, first_name, etc. - All features for which values are computed.
See Also
- Basic Profiles project: Get started with RudderStack Profiles by creating a basic project including the identity stitcher and feature table models.
Migrate your existing project
To migrate an existing PB project to the schema version supported by your PB binary, navigate to your project’s folder. Then, run the following command to replace the contents of the existing folder with the new one:
pb migrate auto --inplaceA confirmation message appears on screen indicating that the migration is complete. A sample message for a user migrating their project from version 25 to 44:
2023-10-17T17:48:33.104+0530	INFO	migrate/migrate.go:161
Project migrated from version 25 to version 44